Transforming a rental kitchen doesn’t require a full renovation or risking your security deposit. Refrigerator and freezer accessories offer one of the highest-impact, lowest-commitment upgrades for rental properties—delivering immediate functionality gains while remaining completely removable when your lease ends. Whether you’re dealing with a dated appliance, inadequate storage, or simply want to personalize your space, quick-install solutions can revolutionize how you interact with your kitchen daily.
The key is selecting accessories designed specifically for temporary installation: magnetic mounts that require no hardware, adhesive systems that release cleanly, and clip-on components that leverage existing structures. These solutions protect the underlying appliance while giving you custom organization that rivals built-in systems. Let’s explore the essential categories every renter should consider when planning their refrigerator makeover.
Top 10 Refrigerator & Freezer Accessories for Rental Makeovers
Detailed Product Reviews
1. Chilly blue Mama Fridge Odor Absorber, Refrigerator Moisture Absorber & Freshener Holder,Add Baking Soda to Absorb Funky Odors in The Refrigerator(blue)
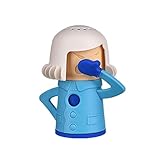
Overview: The Chilly Mama Fridge Odor Absorber brings personality to kitchen maintenance. This reusable container, shaped like a cheerful character, holds baking soda to eliminate refrigerator odors and moisture. Measuring 6"H x 4"W, it fits discreetly on any shelf while working more effectively than an open box. The design maximizes air exposure to the baking soda, ensuring consistent deodorizing action for approximately three months before needing a refill.
What Makes It Stand Out: Its whimsical design transforms a mundane chore into something enjoyable. Made from advanced, dishwasher-safe materials, this container is built for longevity and easy cleaning. Unlike disposable options, it generates minimal waste—just refill with fresh baking soda quarterly. The contained design prevents spills and messes while circulating air optimally. It also serves as a thoughtful, practical gift for new homeowners or neighbors, combining utility with charm in a way standard boxes cannot.
Value for Money: At $8.58, you’re investing in convenience and aesthetics rather than just deodorizing power. Plain baking soda costs pennies, but this reusable vessel eliminates mess, improves efficiency, and adds visual appeal. With indefinite reusability, the long-term cost drops dramatically after the initial purchase. For those who value kitchen organization and design, the premium is justified over disposable alternatives.
Strengths and Weaknesses: Strengths include its cute, gift-worthy design, dishwasher-safe reusability, contained mess-free operation, and effective moisture absorption. Weaknesses are the ongoing need to purchase baking soda refills, the three-month lifespan per fill (which varies by fridge size), and that you’re paying for a container rather than a proprietary deodorizing technology.
Bottom Line: This product suits anyone wanting an eco-friendly, reusable deodorizing solution with personality. It’s especially recommended for those who appreciate thoughtful kitchen design and need a housewarming gift. While simple in concept, it executes its purpose effectively at a fair price.
2. Ever Bamboo Fridge & Freezer Deodorizer w/Natural Bamboo Charcoal (2 Pack). Are your LEFTOVERS becoming LEFTODORS?

Overview: The Ever Bamboo Deodorizer set provides a natural, fragrance-free solution for refrigerator and freezer odors using activated bamboo charcoal. This two-pack absorbs moisture and eliminates smells rather than masking them. Each pouch’s porous structure traps odor particles continuously, and with proper maintenance, the set lasts up to one year. The unscented design makes it ideal for odor-sensitive households.
What Makes It Stand Out: Bamboo charcoal is a sustainable, renewable resource offering eco-friendly deodorizing without chemicals. The two-pack allows simultaneous fridge and freezer use, providing comprehensive coverage. Unlike disposable options, these are reusable—simply reactivate in sunlight 2-3 hours per side every 30-60 days. This eliminates waste and reduces long-term costs. The completely unscented operation is perfect for those allergic to synthetic fragrances.
Value for Money: At $14.99 for two ($7.50 each), the year-long lifespan delivers excellent value. Baking soda methods cost $8-12 annually with quarterly replacements. While the initial investment exceeds a simple baking soda box, the reusability and extended effectiveness justify the price. For eco-conscious buyers, the minimal environmental impact adds significant value beyond the monetary savings.
Strengths and Weaknesses: Strengths include natural composition, unscented performance, freezer compatibility, impressive longevity, and waste reduction. The reactivation process is simple and cost-free. Weaknesses are the mandatory sunlight exposure every 1-2 months, which requires consistency and good weather. Initial odor absorption may be slower than baking soda, and extreme smells might overwhelm the charcoal’s capacity.
Bottom Line: This set suits environmentally conscious consumers wanting a low-maintenance, year-long solution. It’s ideal for fragrance-sensitive individuals and those needing both fridge and freezer protection. The sunlight requirement is a minor inconvenience for sustainable, effective odor control.
3. Appliance Armor Heavy Duty Refrigerator Moving and Storage Cover Wrap. Fits and Protects Most Top-Mount Fridges, Upright Freezers, French Door, and Side-by-Side Refrigerators.
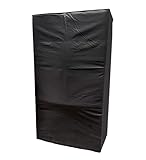
Overview: The Appliance Armor Cover delivers professional-grade protection for refrigerators during moving and storage. Engineered to fit most top-mount, French door, side-by-side, and upright freezer models, this heavy-duty black wrap defends against scratches, dents, and dust. Unlike generic blankets, it’s specifically designed for refrigerator vulnerabilities during transport, offering targeted defense for doors, corners, and surfaces.
What Makes It Stand Out: Universal compatibility across multiple refrigerator types provides exceptional versatility. The heavy-duty construction surpasses flimsy moving blankets in durability. As a purpose-built solution, it addresses specific transit risks like door damage and corner impacts. The black finish maintains a professional appearance while concealing transit dirt and scuffs, distinguishing it from makeshift protection methods.
Value for Money: At $199.95, the price reflects professional-grade quality. A single dent on a $1,500+ refrigerator can cost $200+ to repair, making this cover a prudent insurance policy. For DIY movers or long-term storage, the one-time investment prevents costly damage. While expensive for casual use, frequent movers or owners of premium appliances will find the cost justified compared to professional moving services or potential repairs.
Strengths and Weaknesses: Strengths include robust materials, broad model compatibility, specialized moving protection, and peace of mind during relocation. It prevents expensive damage effectively. Weaknesses involve the high price for budget-conscious users, potential imperfect fit on non-standard models, and single-purpose utility. For short local moves, cheaper alternatives may be sufficient.
Bottom Line: This cover is indispensable for long-distance moves, extended storage, or protecting high-value refrigerators. It suits professional movers and homeowners with premium appliances. While the cost is significant, it prevents far more expensive damage. For local moves of basic fridges, consider less expensive options.
Magnetic Organization Systems
Magnetic accessories represent the gold standard for rental-friendly refrigerator upgrades, utilizing the appliance’s metal exterior to create instant storage without a single screw or drill bit. These systems transform wasted vertical space into functional zones for spices, towels, and frequently-used tools.
Weight Capacity Considerations
Before loading up magnetic racks, understand that refrigerator metal panels vary dramatically in thickness and composition. Standard refrigerators typically support 5-15 pounds per square foot of magnetic contact, but this decreases significantly if the door contains insulation pockets or decorative panels. Test your surface with a simple refrigerator magnet first—if it slides easily, the hold will be weak. For heavier items like wine bottles or cast iron spice containers, distribute weight across multiple magnetic points rather than concentrating it on a single large rack.
Surface Compatibility Issues
Not all refrigerators are created equal when it comes to magnetic adhesion. Stainless steel models often use non-magnetic grades (particularly 304-grade), while many modern finishes are actually painted metal over a non-ferrous core. Conduct a simple test with any standard magnet. If it doesn’t stick firmly, magnetic accessories won’t work on that surface. For these situations, consider hybrid systems that combine magnetic strips with adhesive backing as a failsafe—giving you the organization benefits while working around material limitations.
Multi-Level Magnetic Configurations
Stack magnetic accessories strategically to create vertical storage towers. Place lighter, frequently-accessed items at eye level and heavier, occasional-use items lower. Most magnetic systems allow you to adjust height in seconds, making it easy to reconfigure as your needs change. For maximum stability, offset accessories so weight distributes across different door panels rather than aligning everything in a single column that could stress the door hinges over time.
Removable Shelf Liners & Mats
Shelf liners protect against spills, reduce cleaning time, and prevent that maddening “sticky bottle ring” phenomenon that plagues refrigerator surfaces. For rentals, these serve the dual purpose of preserving the original condition while adding a custom aesthetic touch.
Material Durability Factors
Look for BPA-free, food-grade EVA foam or premium silicone that withstands temperatures from -20°F to 120°F without cracking or off-gassing. Cheap vinyl options may contain plasticizers that leach at cold temperatures or leave adhesive residue when removed. The ideal thickness ranges from 0.8mm to 1.5mm—thick enough to provide cushioning and spill containment, but thin enough to allow proper air circulation around stored items. Textured surfaces should be fine enough to prevent trapping crumbs while still providing grip.
Customization & Sizing Techniques
Purchase rolls or sheets rather than pre-cut sizes to ensure a perfect fit for your rental’s unique dimensions. Use butcher paper to create templates of each shelf before cutting your liner material. Leave a 1/8-inch gap around edges to prevent bunching and allow for proper door closure. For wire racks common in freezer sections, select mesh-pattern liners or interlocking tiles that won’t sag between wires. Some advanced systems feature grid-marked backing for precise cutting without measuring tools.
Cleaning & Maintenance Protocols
Quality liners should be dishwasher-safe on the top rack or easily hand-washed with mild detergent. Avoid abrasive scrubbers that damage the protective surface. Establish a quarterly removal schedule to clean underneath and inspect for moisture accumulation—a common issue that can lead to mold in humid climates. The best rental-friendly options feature antimicrobial additives that inhibit bacterial growth between cleanings, extending the time between maintenance sessions.
Adhesive Storage Bins & Caddies
Adhesive-mounted interior accessories maximize vertical space inside the refrigerator itself, creating customized zones without modifying shelf positions. Modern adhesive technology has evolved far beyond damaging sticky pads.
Adhesive Strength & Removability Balance
Seek 3M Command-style adhesive systems rated for cold environments—standard adhesives become brittle and fail below 40°F. The sweet spot for rental applications is a system that supports 3-5 pounds while releasing with a clean pull tab. Test any adhesive in an inconspicuous area first, especially on textured plastic interiors common in budget rental units. Some manufacturers offer refrigerator-specific adhesives that maintain flexibility in cold while ensuring zero residue upon removal, even after years of installation.
Weight Distribution Principles
Never mount adhesive bins on the ceiling of refrigerator compartments—the constant vibration and temperature cycling create stress points that lead to premature failure. Instead, focus on side walls and door interiors where surfaces are more stable. Distribute weight evenly across the bin’s mounting surface rather than concentrating it at mounting points. For heavier items like condiment bottles, use multiple smaller bins rather than one large container to prevent catastrophic failures that could crack shelving.
Temperature Resistance Specifications
Interior refrigerator adhesives face constant condensation cycles that test their bonding chemistry. Look for products specifically rated for “high-moisture environments” with service temperature ranges from -10°F to 100°F. The adhesive should maintain at least 70% of its room-temperature bond strength at 35°F. Some premium options feature two-stage curing that initially sets at room temperature but fully cures in cold conditions, creating a stronger bond over time while remaining removable.
Clip-On Drawer Dividers
Clip-on dividers transform cavernous refrigerator drawers into organized compartments without any permanent modification. These systems leverage existing drawer structures to create customizable sections for produce, meats, and cheeses.
Adjustability Features
Prioritize dividers with sliding or ratcheting mechanisms that accommodate drawer width variations from 12 to 18 inches. The best systems offer both vertical and horizontal adjustment, allowing you to create L-shaped configurations that maximize corner space. Look for dividers that clip onto drawer walls at multiple height positions—this lets you create tiered storage for items of different sizes. Spring-loaded tension systems often outperform fixed clips because they adapt to drawer wall thickness variations common in rental appliances.
Material Options & Performance
Clear acrylic dividers offer visibility but can crack in extreme cold, especially if overloaded. Opt for BPA-free polypropylene or ABS plastic that maintains flexibility at refrigerator temperatures. These materials resist absorbing food odors and can withstand the impact of heavy vegetables. For freezer applications, choose dividers specifically marked as “freezer-safe”—standard refrigerator dividers may become brittle at 0°F and shatter if bumped. Some advanced models feature silicone-wrapped edges that grip drawer walls more securely while preventing scratches.
Installation Tolerance Ranges
Measure your drawer interior walls at multiple points—rental refrigerators often have slight warping from years of use. Quality clip-on systems accommodate up to 1/4-inch variance in wall thickness. Before purchasing, check that drawer walls are solid rather than perforated wire, as most clip systems require a continuous surface. For wire freezer baskets, look for specialized wrap-around clips that encircle the wire frame rather than attempting to clip onto individual wires.
Over-the-Door Storage Solutions
Over-the-door racks maximize the prime real estate of refrigerator doors without any installation hardware. These systems hang over the door top, using gravity and strategic padding to stay secure.
Fit & Clearance Requirements
Measure door thickness at the top edge—most over-door systems accommodate 1.5 to 2.5 inches, but European-style refrigerators may have thicker doors. Critical clearance exists between the door top and any overhead cabinets; you need at least 1 inch of clearance to install most racks. Check side clearance too—when the door opens 90 degrees, the rack shouldn’t contact adjacent walls or counters. The best rental solutions feature adjustable-height hanging brackets that compensate for door handle placement and overhead obstructions.
Adjustable Shelving Configurations
Look for systems with shelves that adjust in 1-inch increments and can be removed entirely for cleaning. Some premium models offer tilted shelves with retaining bars, perfect for preventing sauce bottles from tumbling out when the door opens. Consider your typical item heights—standard condiment bottles need 4-5 inches of clearance, while wine bottles require 12+ inches. Modular systems let you mix deep and shallow shelves within the same rack, adapting to your specific storage pattern rather than forcing a one-size-fits-all approach.
Door Seal Impact Prevention
The cardinal sin of over-door racks is compromising the refrigerator’s magnetic door seal, which leads to energy waste and food spoilage. Quality systems feature a thin mounting bracket (under 3mm) that slides between the door and frame without disrupting seal compression. Before installation, clean the door top thoroughly—grit trapped under the bracket can permanently dent seals. Check seal function by closing the door on a dollar bill; you should feel resistance when pulling it out at multiple points around the perimeter. If the rack interferes, add adhesive foam pads to the bracket to distribute pressure more evenly.
Temperature & Humidity Monitors
Standalone monitoring devices give you precise control over food storage conditions without wiring into the appliance—a critical advantage in rentals where you can’t modify electrical systems.
Wireless vs. Wired Sensor Options
Bluetooth sensors offer smartphone connectivity without requiring Wi-Fi passwords (important in rentals where you may not control the network). They typically provide 30-50 foot range, sufficient for most apartments. For freezer monitoring, verify the sensor’s battery operates at -10°F—many lithium batteries fail below 0°F. Wired sensors with external displays avoid battery issues but require careful cable routing to prevent door seal damage. The best rental compromise is a wireless sensor with a 6-month+ battery life and low-battery alerts, preventing mid-month failures that could spoil food.
Calibration & Accuracy Standards
Consumer-grade sensors typically advertise ±2°F accuracy, but this can drift over time. For rental applications, choose monitors with user-accessible calibration features—usually a simple ice-water bath test (32°F) or boiling water test (212°F at sea level). Look for devices that log temperature history, which helps identify refrigerator performance issues you should report to landlords before they become your problem. Some advanced models track door-open events, correlating temperature spikes with usage patterns to optimize your storage habits.
Placement Strategies for Reliable Readings
Never place sensors directly against walls or near the cooling vent—this creates false readings. Position them in the center of the compartment, suspended from a shelf if possible, to measure true ambient conditions. For multi-zone monitoring, place sensors at different heights since temperature stratification can create 5-10°F differences between top and bottom shelves. In freezer applications, avoid the door shelves for monitoring—they experience the most temperature fluctuation and won’t represent core storage conditions accurately.
Portable Ice Making Solutions
Many rental refrigerators lack ice makers, and you can’t plumb a water line. Portable ice solutions provide restaurant-quality ice without permanent installation.
Countertop vs. Freezer Tray Systems
Countertop ice makers produce ice in 6-10 minutes but require counter space and produce heat/noise. For rentals, measure your available counter space and check your lease for appliance wattage restrictions—some older buildings limit countertop appliances to 800 watts. Freezer tray systems are completely passive but require pre-planning; silicone molds with lids stack efficiently and prevent freezer burn. Hybrid solutions include manually-filled ice maker units that sit inside the freezer compartment, using the freezer’s cold but providing automated production—though these require sufficient clearance and can be noisy.
Capacity & Production Speed Trade-offs
A typical rental household needs 1-2 pounds of ice daily. Countertop units producing 26 pounds per day sound excessive but account for storage melt cycles. For freezer trays, calculate based on mold volume: standard 1-ounce cubes mean 16 cubes per pound. The best rental strategy combines a small countertop unit for immediate needs with freezer storage for bulk events, giving you flexibility without requiring a high-capacity, space-consuming machine.
Water Source & Drainage Requirements
Countertop units need a water reservoir fill—some connect to standard sink faucets with adapters, while others require manual filling. For rentals, manual fill systems avoid plumbing modifications but demand discipline. Check the unit’s water quality requirements—hard water common in rental buildings can scale internal mechanisms quickly. Look for models with self-cleaning cycles and removable drain plugs that don’t require permanent drainage connections. The water recycling feature, which melts unused ice back into the reservoir, reduces waste but can concentrate minerals over time, requiring periodic descaling.
Produce Preservation Systems
Specialized produce containers extend freshness dramatically, reducing waste in rental kitchens where you may shop less frequently due to storage limitations.
Ethylene Gas Control Mechanisms
Many fruits release ethylene gas that accelerates ripening of nearby vegetables. Quality produce bins feature replaceable carbon filters or venting systems that absorb or dissipate this gas. For rentals, avoid systems requiring proprietary filters—choose containers with standard activated charcoal packets available in bulk. Some advanced models use zeolite minerals that can be “recharged” in sunlight, eliminating ongoing filter costs. Check filter replacement indicators; in a rental scenario, you want visual cues rather than app-based notifications that require setup.
Ventilation Design for Humidity Management
Different produce requires different humidity: leafy greens need 90-95%, while onions need 65-70%. Look for containers with adjustable vent sliders that control airflow. The best systems include removable inserts that elevate produce above condensation, preventing soggy bottoms. For rental applications, choose stackable designs that maximize vertical drawer space—some systems interlock securely even when refrigerator drawers slide open and closed frequently.
Stackability & Space Efficiency
Measure your crisper drawer height and depth before purchasing multi-tier systems. Many rental refrigerators have shallow drawers that won’t accommodate tall containers. Look for nesting designs that collapse when empty, and side-clip systems that prevent tower tipping when accessing lower drawers. Some premium models feature pull-out trays within the main container, letting you access back items without unpacking everything—crucial for deep rental refrigerator drawers.
Freezer Organization Containers
Freezer organization challenges multiply in rentals where freezer space is often minimal and oddly configured. The right containers transform chaotic piles into accessible inventory.
Frost-Resistant Material Selection
Standard plastic becomes brittle and cracks in freezers below 10°F. Choose polypropylene (PP) marked with a “freezer safe” symbol, or opt for silicone containers that remain flexible. Avoid snap-lock lids with small tabs—they’re the first failure point in cold conditions. Instead, look for hinged lids or simple friction-fit designs. Clear containers should be actual transparent plastic, not just translucent, because frost buildup makes identification difficult enough without opaque materials complicating matters.
Stackable Design Principles
Effective freezer containers create stable vertical towers that maximize cubic footage. Look for containers with interlocking lids and bases—some feature slight recesses that nest securely. For rental chest freezers (common in garage setups), consider angled-front containers that let you see contents without unpacking. Width should match your freezer’s interior dimensions minus 1 inch for easy removal. Always verify containers fit through the door opening when full; some wide designs require emptying to extract, defeating the organization purpose.
Labeling Systems for Rental Turnover
Since you’ll eventually move, implement a labeling system that removes cleanly. Avoid permanent markers directly on containers—use freezer tape with water-based adhesives or static-cling labels that peel off without residue. Some renters prefer dry-erase markers on white plastic lids, though these can smudge. For maximum efficiency, label contents, date frozen, and estimated use-by date. Consider color-coding by food category (red for meat, green for vegetables) to enable visual inventory at a glance.
Odor & Moisture Control Solutions
Rental refrigerators often harbor odors from previous tenants. Effective control systems work passively without requiring electrical connections or permanent mounts.
Activated Charcoal vs. Baking Soda Technologies
Baking soda absorbs odors but requires monthly replacement and can spill easily. Activated charcoal systems last 3-6 months and often include indicator strips showing when they’re saturated. For rentals, choose charcoal packets in breathable fabric bags that can be tucked anywhere—avoid loose granules that could contaminate food if the bag ruptures. Some advanced systems use zeolite minerals that can be regenerated in sunlight, offering a one-time purchase solution ideal for multi-year leases.
Placement Strategies for Maximum Efficacy
Position odor absorbers in airflow paths, typically near the back wall where circulation fans direct air. Avoid door shelves where temperature fluctuations reduce effectiveness. For multi-compartment refrigerators, use separate units in fridge and freezer sections—freezer-specific formulations prevent the moisture saturation that ruins standard odor absorbers. In particularly problematic rentals, place a small absorber in each crisper drawer where ethylene gas and moisture concentrate.
Replacement Schedule Optimization
Set calendar reminders based on your lease cycle—replace odor absorbers every 3 months for typical use, or monthly if you store strong-smelling items like kimchi or blue cheese. Some premium systems feature color-changing indicators that progress from blue to pink as they saturate, eliminating guesswork. For budget-conscious renters, mark replacement dates directly on the absorber with a dry-erase marker, creating a visual tracking system that doesn’t require separate apps or notes.
Space-Saving Bottle & Can Storage
Bottles and cans create dead space between shelves. Specialized organizers reclaim this volume while preventing the domino-effect spills that plague rental refrigerators.
Vertical vs. Horizontal Storage Configurations
Vertical can dispensers (first-in-first-out) work brilliantly for standard 12-ounce cans but require 6+ inches of height clearance. Horizontal stackers maximize shelf space but need stable base surfaces. For rentals with adjustable shelves, measure the range of possible heights—some organizers expand vertically to accommodate different configurations. Consider your consumption patterns; vertical dispensers excel for bulk storage of single beverage types, while modular horizontal systems better accommodate variety.
Anti-Tip Mechanisms for Door Storage
Door shelves experience the most vibration and jarring when closing. Quality bottle holders feature spring-loaded retaining rings or silicone grip liners that prevent tipping. For wine bottles specifically, look for holders that cradle the neck rather than just the base—this two-point contact prevents rocking. Some advanced systems use magnets within the holder base that adhere to metal door liners, adding stability without permanent installation. Always test door closure with bottles installed; added weight can misalign door seals over time.
Adjustable Width & Depth Features
Rental refrigerator shelves vary from 14 to 24 inches deep. Choose expandable organizers with telescoping mechanisms that lock securely at your specific depth. For width, modular systems that connect via dovetail joints let you build custom configurations that adapt to shelf width changes when you move. Avoid organizers requiring shelf removal for installation—true quick-install designs slide in from the front and self-stabilize.
Egg & Dairy Management Systems
Egg and dairy storage represents a microcosm of rental refrigerator challenges: awkward spaces, specific temperature requirements, and frequent access. Dedicated organizers solve these issues elegantly.
Temperature Zone Optimization
Eggs store best at consistent 35-40°F, which typically means middle shelves rather than door compartments with their temperature fluctuations. Look for covered egg containers that protect from impact while allowing air circulation—solid plastic lids create condensation that promotes bacterial growth. For butter, choose covered dishes with built-in spreader rests that keep the compartment clean. Cheese storage requires breathable containers; avoid airtight seals that trap moisture and accelerate mold. Some premium systems include humidity-control vents specifically calibrated for dairy products.
Capacity Scaling for Rental Households
Standard egg holders accommodate 12-18 eggs, but singles or couples may prefer smaller 6-egg containers that fit narrow shelves. For dairy, consider modular butter dishes that stack with cheese containers, creating a dedicated dairy tower. In rentals with small refrigerators, prioritize vertical stacking over horizontal spread. Some systems feature removable dividers within the egg container, letting you store other small items like cream cheese packets when egg inventory is low.
Impact Protection & Stability
Eggs break when containers slide during door opening. Choose organizers with silicone feet or magnetic bases that grip shelf surfaces. For door-mounted egg storage (not recommended but sometimes necessary in tiny rentals), select containers with locking lids and internal dividers that isolate each egg. Butter dishes should have weighted bases or adhesive strips to prevent launching during aggressive door closures. Consider the domino effect: if this organizer tips, will it knock over adjacent items? Stable bases prevent cascade failures.
Condiment & Sauce Caddy Systems
Condiment bottles multiply uncontrollably in rentals, creating door shelf chaos. Dedicated caddies corral these items while making them portable for cleaning or table service.
Portable vs. Fixed Installation
Portable caddies with handles let you transfer condiments directly to the table, reducing trips and keeping bottles contained. For rental applications, this portability means easy removal when cleaning the refrigerator or moving out. Fixed systems use adhesive or magnets to secure to door interiors, preventing sliding but requiring more commitment. The ideal rental solution combines both: a caddy that adheres semi-permanently to the door but releases easily via a slide-lock mechanism, giving you stability with removability.
Bottle Size Accommodation
Condiment bottles range from 6-ounce hot sauce to 64-ounce ketchup jugs. Look for adjustable dividers or elastic retaining systems that grip various diameters. Some caddies feature removable center inserts that convert from many small slots to fewer large compartments. For rental scenarios where you may acquire unusual condiments, choose systems with at least one oversized compartment. Consider height too—tall bottles like Worcestershire sauce need 8+ inches of clearance, while flat sauce packets require shallow pockets.
Spill Containment & Cleanup
Condiments leak—it’s inevitable. Quality caddies feature integrated drip trays or waterproof bases that contain spills before they reach shelf surfaces. For rentals, this protection is crucial for deposit recovery. Choose caddies with smooth, non-porous interiors that wipe clean easily. Some include removable, dishwasher-safe liners that catch drips—replace these periodically to maintain hygiene. Avoid caddies with textured bottoms or decorative grooves where dried sauce can hide from quick cleaning attempts.
Maintenance & Cleaning Tool Integration
The final category isn’t about storage but about preserving your rental refrigerator’s condition throughout your tenancy. The right tools make end-of-lease cleaning dramatically easier.
Coil Brush Accessibility
Refrigerator coils accumulate dust, reducing efficiency and potentially causing breakdowns that landlords may blame on tenants. A coil brush with a 24-inch handle lets you clean underneath without moving the heavy appliance. For rentals, choose brushes with non-scratch bristles that won’t damage coil fins—damage that could be deducted from your deposit. Some brushes include a flexible design that bends to reach coils from the front or side, adapting to different refrigerator designs without requiring appliance movement.
Drip Pan Maintenance Tools
The drip pan under the refrigerator collects condensation and often harbors mold in rentals. A drip pan cleaning kit with a flexible wand and absorbent pads lets you service this area without pulling the fridge out. Look for kits with LED lights to illuminate the dark space and inspection mirrors to check for leaks. For rentals, document drip pan condition upon move-in with photos; cleaning it quarterly prevents disputes about pre-existing issues versus tenant-caused problems.
Seal Cleaning & Preservation
Door seals (gaskets) collect grime that prevents proper closure, leading to energy waste and food spoilage. Use a seal cleaning tool with a narrow brush and silicone lubricant applicator. Clean seals monthly with baking soda solution, then apply a thin layer of silicone lubricant to prevent cracking—this maintenance extends seal life and demonstrates responsible tenancy. Avoid petroleum-based products that degrade rubber. Some seal tools include a pull-test gauge that measures seal compression force, giving you objective data to share with landlords if cooling issues arise.
Frequently Asked Questions
How do I ensure magnetic accessories won’t damage my rental refrigerator’s finish?
Test magnets in an inconspicuous area first, like the side panel. Quality magnetic accessories have rubber-coated surfaces that prevent scratching. Avoid sliding magnets across the surface; lift straight off when repositioning. For delicate finishes, place a thin sheet of clear adhesive film on the refrigerator first, then attach magnets to the film—this creates a protective barrier while maintaining magnetic attraction.
What should I do if adhesive accessories leave residue when I move out?
Prevention is key: choose accessories marketed as “rental-friendly” with clean-release adhesives. If residue occurs, use a plastic scraper (never metal) and adhesive remover safe for appliance finishes—test in a hidden spot first. Many landlords accept minor residue if you document it with photos and attempt removal. For stubborn spots, heat the residue with a hair dryer (not a heat gun) to soften it before scraping.
Can I install over-the-door racks on any refrigerator?
No—measure door thickness, top clearance, and side clearance first. French door and side-by-side models often lack sufficient top clearance due to hinges. Check that the rack won’t interfere with door seals or prevent full closure. Some modern refrigerators have decorative top caps that prevent over-door installation entirely. When in doubt, choose interior door-mounted options instead.
How often should I replace refrigerator deodorizers in a rental?
Replace activated charcoal deodorizers every 3 months, or sooner if you notice odors returning. Baking soda requires monthly replacement. Mark replacement dates on your calendar aligned with rent due dates for easy remembering. If you’re moving out, replace deodorizers 2 weeks before your final walkthrough to ensure the refrigerator smells fresh for the landlord inspection.
Are shelf liners really necessary if I’m only renting for a year?
Yes—they protect against spills that could stain shelves and result in cleaning deductions from your deposit. Liners also reduce cleaning time significantly, which matters during move-out. Choose inexpensive, disposable liners for short-term rentals, or invest in quality reusable ones if you plan to use them in your next home. The protection they provide far outweighs their minimal cost.
What’s the best way to organize a freezer in a tiny rental apartment?
Use stackable, clear containers that maximize vertical space. Group items by category (meat, vegetables, prepared meals) and label everything with dates. Place frequently-used items in the door if available, or in a designated “front and center” container. For chest freezers, use vertical standing organizers that create layers you can lift out like drawers. Avoid over-packing, which restricts airflow and reduces efficiency.
How can I tell if my refrigerator door seal is damaged by accessories?
Close the door on a dollar bill at multiple points around the perimeter. If you can pull it out easily without resistance, the seal isn’t compressing properly. Look for condensation between seal folds or frost buildup in the freezer—these indicate air leaks. Remove accessories and test again; if the problem persists, document it with photos and notify your landlord immediately to avoid liability for pre-existing issues.
Is it worth buying expensive organizers for a rental refrigerator?
Consider cost-per-use and portability. High-quality organizers that you can take to your next home offer better long-term value than cheap options that break quickly. For short leases under 6 months, budget options suffice. For multi-year rentals, invest in durable systems that protect your food investment and reduce waste. Many premium organizers retain 50-70% of their value when resold, making them a low-risk investment.
Can I use command hooks inside my refrigerator?
Standard Command strips aren’t rated for cold, humid environments and will fail quickly. Use refrigerator-specific adhesive products designed for temperatures down to -20°F. Even then, limit weight to 1-2 pounds maximum. Position hooks on side walls rather than the ceiling, and avoid areas near the cooling vent where condensation is heaviest. Always use the manufacturer’s alcohol prep pad to clean surfaces before application.
What accessories should I prioritize if I have a very limited budget?
Start with shelf liners (protects deposit), a basic set of freezer containers (prevents food waste), and one magnetic rack for frequently-used items (immediate daily impact). These three items typically cost under $50 total but transform functionality. Add other categories as budget allows, focusing next on produce preservation (extends grocery life) and door organizers (maximizes wasted space). Delay specialized items like temperature monitors until you’ve covered the basics.