There’s somethingmagical about nugget ice. Those soft, chewable pellets that crunch perfectly between your teeth have transformed from a Sonic drive-thru novelty into a must-have kitchen luxury. As we roll into 2026, the DIY kitchen remodeling community is experiencing a full-blown obsession with panel-ready nugget ice makers that deliver that restaurant-quality experience without the premium price tag.
But here’s the reality: integrating a panel-ready appliance into your DIY remodel isn’t as simple as sliding it into a cabinet opening. Between plumbing rough-ins, electrical codes, ventilation requirements, and the nuanced world of custom panel fabrication, budget-conscious remodelers need a masterclass in specifications before making this investment. This guide cuts through the marketing fluff to equip you with the technical knowledge to select and install the perfect budget panel-ready nugget ice maker for your 2026 kitchen transformation.
Top 10 Budget Panel-Ready Nugget Ice Makers
Detailed Product Reviews
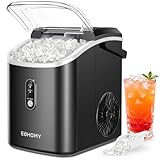
1. EUHOMY Nugget Ice Maker Countertop with Handle, Ready in 6 Mins, 34lbs Per Day, Removable Top Cover, Auto-Cleaning, Portable Sonic Ice Maker with Basket and Scoop, for Home/Party/RV/Camping (Black)

Overview: The EUHOMY black countertop nugget ice maker delivers 34 pounds of chewable sonic ice daily, producing the first batch in just 6 minutes. This compact unit measures 9.45x11.61x12.99 inches and features a sturdy handle for true portability. With a 1.2-quart water tank and 1.8-pound removable basket, it’s designed for households, RVs, and parties. The sleek black finish distinguishes it from stainless steel competitors while maintaining the same core functionality.
What Makes It Stand Out: This model’s striking black housing offers a modern alternative to typical silver appliances, making it a design statement in kitchens or home bars. The integrated scoop holder on the back keeps accessories organized, while the large viewing window lets you monitor production. The intelligent auto-cleaning function runs a 15-minute cycle with a simple 3-second button press, and the removable top cover enables deeper manual cleaning. Operating below 50 decibels, it’s quieter than most countertop appliances.
Value for Money: At $159.99, this sits mid-range among countertop nugget ice makers. You’re paying a slight premium for the black finish versus standard stainless steel, but gaining identical performance specs—6-minute cycles, 34-pound daily capacity, and energy consumption of just 3 kWh daily. The ETL certification and 1-year warranty provide peace of mind that matches competitors priced $20-40 higher.
Strengths and Weaknesses:
- Pros: Rapid 6-minute ice production; attractive black aesthetic; truly portable with handle; quiet operation; dual cleaning system; energy efficient
- Cons: Black finish shows fingerprints and water spots more readily; 34-pound capacity may be insufficient for large gatherings; ice basket requires frequent emptying during heavy use
Bottom Line: This EUHOMY model excels for style-conscious buyers wanting fast, chewable ice without sacrificing counter space. The black finish sets it apart visually while delivering reliable sonic ice production. Perfect for everyday home use, RV adventures, or small office settings where aesthetics matter as much as performance.
2. EUHOMY Nugget Ice Maker Countertop with Handle, Ready in 6 Mins, 35lbs Per Day, Removable Top Cover, Auto-Cleaning, Portable Sonic Ice Maker with Basket and Scoop, for Home/Party/RV/Camping
Overview: The most affordable EUHOMY countertop model produces 35 pounds of nugget ice daily—one pound more than its siblings—while delivering the first batch in 6-8 minutes. This 9.45x11.61x12.99-inch unit features a convenient handle, 1.2-quart water tank, and 1.8-pound removable basket. Designed for versatility across home, office, RV, and party settings, it offers the same core functionality as pricier variants at a budget-friendly entry point.
What Makes It Stand Out: This model’s primary differentiator is its aggressive pricing without feature compromise. You get identical auto-cleaning capabilities, intelligent indicators (“ICE FULL” and “ADD WATER”), and the same quiet sub-50dB operation as premium versions. The back-mounted scoop holder and large viewing window remain standard, while the lightweight design ensures genuine portability. The extra pound of daily capacity over similar models is a subtle but welcome bonus.
Value for Money: At $120.00, this represents exceptional value in the nugget ice maker market—roughly $25-40 less than comparable EUHOMY units with nearly identical specifications. The 3 kWh daily energy consumption keeps operating costs minimal, and ETL certification ensures safety standards. For budget shoppers unwilling to sacrifice speed or chewable ice quality, this price point is hard to beat.
Strengths and Weaknesses:
- Pros: Best-in-class price; rapid 6-minute cycles; true portability with handle; quiet operation; self-cleaning function; energy efficient
- Cons: Basic aesthetic may lack premium feel; unspecified color/finish might not match all decor; 1.8-pound basket requires frequent emptying; no advanced scheduling features
Bottom Line: This is the value champion for nugget ice enthusiasts. It delivers the same rapid sonic ice production and smart features as higher-priced competitors while keeping $30-40 in your wallet. Ideal for first-time buyers, college students, or anyone prioritizing function over form. The performance-to-price ratio makes it a no-brainer recommendation for budget-conscious consumers.
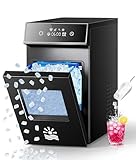
3. EUHOMY Nugget Ice Maker Countertop, Ready in 7 Mins, 34Lbs/24H Pebble Ice Maker Machine, Self-Cleaning Countertop Sonic Ice Makers with Ice Scoop&Basket, Pellet Ice Maker for Home, Stainless Steel

Overview: This stainless steel EUHOMY countertop model produces 34 pounds of chewable pebble ice daily, with cycles completing in 7 minutes. Measuring 11x9.1x12.6 inches, it features a durable stainless steel exterior that resists fingerprints while complementing modern kitchens. The 1.1-liter water tank and included scoop/basket make it ready for immediate home use. Designed for simplicity, it operates with a single-button interface for hassle-free ice production.
What Makes It Stand Out: The brushed stainless steel construction provides superior durability and a premium aesthetic compared to plastic-bodied alternatives. The unit features an automatic deep cleaning system activated by a 5-second button hold—longer than other models but ensuring thorough sanitization. Its slightly taller, narrower footprint (11x9.1x12.6 inches) fits better in tight countertop spaces. The protective film covering (remove before use) prevents shipping damage, showing attention to detail.
Value for Money: Priced at $149.99, this model commands a $30 premium over the base EUHOMY unit, justified by the stainless steel housing and enhanced durability. The 7-minute cycle is marginally slower than 6-minute variants, but the trade-off yields a more robust appliance. With identical 34-pound daily output and low energy consumption, you’re investing in longevity rather than speed.
Strengths and Weaknesses:
- Pros: Durable stainless steel finish; compact vertical design; simple one-button operation; effective self-cleaning; quiet performance; ETL certified
- Cons: Slightly slower 7-minute cycles; smaller 1.1L tank requires more frequent refills; no handle reduces portability; basic feature set
Bottom Line: This stainless steel EUHOMY model suits buyers prioritizing durability and kitchen aesthetics over absolute speed. The premium finish resists wear while delivering reliable pebble ice production. Perfect for permanent countertop placement in homes, offices, or kitchens where appliance matching matters. The marginal speed sacrifice is worthwhile for the enhanced build quality.
4. ecozy Under Counter Nugget Ice Maker Machine, Bulit-in & Freestanding, Horizontal Handle, Reversible Door, 66 Lbs/Day, Thickened Viewing Glass Window, Self-Cleaning & 24H Timer, Stainless Steel

Overview: The ecozy under-counter nugget ice maker is a commercial-grade powerhouse producing 66 pounds of chewable ice daily with a 26-pound storage capacity—8 pounds more than standard baskets. This built-in/freestanding unit features a reversible door, horizontal handle, and triple-layer insulation that keeps ice frozen for 8 hours without power. The smart LCD panel offers 24-hour scheduling, self-cleaning, and system alerts in a premium stainless steel package priced at $899.99.
What Makes It Stand Out: This model’s 66-pound daily output doubles most countertop units, making it ideal for serious entertainers or small businesses. The thickened glass viewing window provides durability and aesthetics while monitoring ice levels. Triple-layer insulation is unique in this class, maintaining ice quality during outages. The reversible door and horizontal handle allow seamless integration into any kitchen layout. Professional features like the 24-hour timer and advanced LCD controls elevate it beyond residential appliances.
Value for Money: At $899.99, this commands a premium but delivers proportional value for heavy users. Commercial ice makers with similar capacity often exceed $1,500. The dual built-in/freestanding flexibility eliminates installation constraints, while the 8-hour insulation reduces waste. For households hosting frequent gatherings or home-based businesses, the cost-per-pound of ice over time justifies the investment compared to buying bagged ice or running multiple countertop units.
Strengths and Weaknesses:
- Pros: Massive 66-pound daily capacity; 26-pound storage with insulation; reversible door for flexible installation; professional-grade construction; advanced timer and controls; commercial application potential
- Cons: High upfront cost; requires dedicated space and possible plumbing; significant energy consumption; overkill for casual users; complex installation versus plug-and-play countertop models
Bottom Line: This ecozy unit is for demanding users who view ice as essential infrastructure. It’s overbuilt for typical families but perfect for serious home bartenders, event hosts, or small cafes. The premium price buys commercial capacity, innovative insulation, and installation flexibility. If your ice needs exceed 40 pounds daily, this investment will pay dividends in convenience and quality.
5. EUHOMY Nugget Ice Maker Countertop, Ready in 8 Mins, Self-Cleaning, 34lbs/24H Portable Ice Maker Machine with Ice Scoop & Basket, Sonic Ice Makers with Chewable Pellet Ice for Home/Party/RV/Camping

Overview: This EUHOMY countertop model produces 34 pounds of soft pellet ice daily, with cycles taking 8-10 minutes—slightly longer than premium siblings but still efficient. The compact 12.2x9.0x12.2-inch unit features a 1.2-quart tank, 1.8-pound removable basket, and integrated scoop holder. Designed for portability across homes, RVs, and parties, it maintains the brand’s focus on chewable sonic ice while operating under 50 decibels for quiet integration into living spaces.
What Makes It Stand Out: The 5-minute self-cleaning cycle is shorter than other EUHOMY models, saving time during maintenance. The “ICE FULL” auto-pause and “ADD WATER” alerts prevent operational issues without user monitoring. Its nearly cube-shaped dimensions (12.2x9.0x12.2 inches) provide stability during transport. The back-mounted scoop holder and large viewing window remain practical features. At $144.49, it balances performance and affordability for budget-conscious buyers not requiring 6-minute speed.
Value for Money: Positioned at $144.49, this offers solid value—$15 less than the black model with identical capacity and features, trading only speed. The 3 kWh daily consumption keeps operating costs low, and ETL certification ensures safety. While 8-minute cycles lag behind 6-minute competitors, the $15-40 savings may outweigh the minor inconvenience for casual users. It delivers the same chewable ice quality and smart features as pricier variants.
Strengths and Weaknesses:
- Pros: Affordable mid-tier pricing; reliable 34-pound output; quiet sub-50dB operation; energy efficient; self-cleaning; portable design; ETL certified
- Cons: Slower 8-10 minute cycles; no handle (despite portable claims); basic aesthetic; smaller basket requires frequent emptying; minimal differentiation from siblings
Bottom Line: This EUHOMY model serves as the sensible middle ground—slightly slower but $15-40 cheaper than alternatives. It’s ideal for patient users who prioritize savings over speed. The identical ice quality and smart features make it a practical choice for RVs, small offices, or homes where ice needs are moderate. If you can wait an extra 2-4 minutes per batch, this delivers premium features at a discount.
6. Oylus Nugget Ice Maker Countertop, Smart Pebble Ice maker with LCD Panel, 4min Making, 26lbs/24H Crushed Chewable Ice, Pellet ice maker with Timer Status Alert, Self-Cleaning, Chewy Ice for Home Party
Overview: The Oylus Nugget Ice Maker delivers rapid chewable ice production in a compact countertop package. Generating 26 pounds of soft pellet ice daily with 4-minute cycles, it targets home users wanting quick refreshment. The unit features smart scheduling, self-cleaning, and an intuitive LCD panel with status alerts.
What Makes It Stand Out: Its 4-minute production time dramatically outpaces the typical 10-15 minute cycle of competitors. The delay start timer (1-8 hours) allows precise ice scheduling—have fresh ice ready for parties exactly when needed. Advanced insulation slows melting, preserving texture longer than standard models.
Value for Money: At $199.99, this mid-range unit justifies its price through unique scheduling capabilities and unmatched speed. While daily capacity is modest, the convenience of pre-timed production and self-cleaning adds significant value over basic models lacking these features.
Strengths and Weaknesses: Pros include ultra-fast 4-minute cycles, flexible scheduling timer, self-cleaning function, compact footprint, and clear LCD alerts. Cons are limited 26-pound daily output, no app connectivity, and potential operational noise levels. The slower melt claim may vary by ambient temperature.
Bottom Line: Perfect for users prioritizing speed and convenience over maximum capacity. The scheduling feature is genuinely useful for entertaining. If you want fresh nugget ice on demand without the wait and don’t need more than 26 pounds daily, the Oylus delivers excellent performance and smart functionality at a fair mid-range price.
7. EUHOMY Nugget Ice Maker Countertop with Handle, Ready in 6 Mins, 34lbs Per Day, Removable Top Cover, Auto-Cleaning, Portable Sonic Ice Maker with Basket and Scoop, for Home/Party/RV/Camping (Silver)

Overview: The EUHOMY Nugget Ice Maker combines portability with solid performance, producing 34 pounds of chewable sonic ice daily. With 6-8 minute cycles, it balances speed and efficiency. The integrated handle and lightweight build emphasize mobility for diverse settings from RVs to home bars.
What Makes It Stand Out: The sturdy handle and compact 9.45x11.61x12.99-inch dimensions make it exceptionally portable. Operating below 50 decibels, it’s notably quieter than most competitors. The integrated ice scoop holder demonstrates thoughtful space-saving design for cramped countertops.
Value for Money: At $169.95, this is among the most affordable nugget ice makers with respectable capacity. ETL certification, energy efficiency (1 kWh/8H), and dual cleaning modes deliver premium features at a budget-friendly price. You get reliable performance without paying for unnecessary smart features.
Strengths and Weaknesses: Pros include excellent portability, quiet operation, energy efficiency, dual cleaning modes, and higher daily output than some pricier models. Cons include lack of app connectivity, no scheduling timer, and plastic construction that may feel less premium than stainless alternatives.
Bottom Line: Ideal for budget-conscious buyers wanting reliable nugget ice without premium pricing. The handle and quiet operation make it perfect for RVs, offices, or small kitchens. While it lacks advanced smart features, its core performance, thoughtful design, and outstanding value make it a top choice for practical users.
8. EUHOMY Smart Nugget Ice Maker Countertop, Pebble Ice Maker Machine with APP Control, 40lbs/24H, Ready in 7 Mins, Self-Cleaning, Portable Sonic Ice Makers with Hanging Ice Scoop for Home/Kitchen/Office

Overview: The EUHOMY Smart Nugget Ice Maker merges modern connectivity with robust ice production, delivering 40 pounds of chewable sonic ice daily. Seven-minute cycles and app control target tech-savvy users seeking convenience and high capacity in one package.
What Makes It Stand Out: Wi-Fi and app connectivity with Alexa voice commands distinguish it from basic models. The LED status light system (blue/purple/orange) provides instant visual feedback without checking apps. Producing 40 pounds daily, it outperforms many competitors at this price point.
Value for Money: At $194.99, it bridges basic and premium models brilliantly. Smart features, high daily output, and self-cleaning provide exceptional value. You’re getting app control and 40-pound capacity for less than many non-smart competitors with lower output, making it a smart buy.
Strengths and Weaknesses: Pros include smart app/voice control, high 40-pound daily capacity, clear LED indicators, self-cleaning, and compact footprint. Cons include slightly slower 7-minute cycles than some rivals, potential app setup challenges for non-tech users, and Wi-Fi dependency that may frustrate some.
Bottom Line: The perfect choice for smart home enthusiasts wanting voice-controlled ice production capabilities. The combination of high capacity and app connectivity under $200 is a compelling value proposition. If you value connectivity and output over absolute speed, this EUHOMY model delivers excellent features and performance for the investment.
9. GE Profile Opal 2.0 Ultra Nugget Ice Maker with Side Tank and Scale Inhibiting Filter, Scoop Included, 38 lbs in 24 Hours, Pellet Ice Machine with WiFi & Smart Connected, Stainless Steel

Overview: The GE Profile Opal 2.0 Ultra represents the premium tier of nugget ice makers, producing up to 38 pounds of chewable ice daily. With a large side tank, advanced cleaning system, and WiFi connectivity, it targets discerning users wanting top-tier performance and convenience.
What Makes It Stand Out: The large removable side tank significantly reduces refill frequency compared to internal reservoir models. GE’s advanced cleaning system automatically sanitizes and descales. The sleek touch display darkens when idle, blending elegantly into modern kitchens. The GE brand carries unmatched reliability and service reputation.
Value for Money: At $499.00, this is a substantial financial investment. However, side tank convenience, superior cleaning, premium stainless steel construction, and brand support justify the cost for those prioritizing hassle-free operation. It’s priced for enthusiasts wanting the best experience, not just functional ice.
Strengths and Weaknesses: Pros include large side tank capacity, advanced auto-cleaning, premium stainless steel build, reliable brand reputation, and rapid first batch (10 minutes). Cons are high price point, larger footprint requiring more counter space, and 38-pound capacity is slightly less than some cheaper models.
Bottom Line: The Opal 2.0 Ultra justifies its premium if you value convenience and build quality above all. The side tank and advanced cleaning reduce maintenance dramatically. For those wanting a set-it-and-forget-it experience from a trusted brand, this is the gold standard despite its higher price tag.
10. ecozy Nugget Ice Maker Countertop, Smart Pebble Ice Machine with APP Control, 44 lbs Per Day Soft Pellet Chewable Ice with Self-Cleaning, Stainless Steel

Overview: The ecozy Nugget Ice Maker pushes boundaries with an impressive 44-pound daily capacity and innovative full-color display. Featuring app control, double-layer insulation, and a pull-out water tank, it targets heavy users wanting maximum output and modern features.
What Makes It Stand Out: The IceLumix full-color panel displays real-time TDS and temperature—an industry first. Double-layer insulation keeps ice 20% colder longer than standard models. The pull-out water tank simplifies refills and cleaning. With 44-pound capacity, it leads most competitors in output.
Value for Money: At $299.99, it offers premium features below GE Opal pricing. High capacity, smart features, and innovative display provide strong value for heavy users. You’re getting more ice and better insulation than many $400+ models, striking an excellent performance-price balance.
Strengths and Weaknesses: Pros include highest daily capacity (44 lbs), full-color smart display, superior insulation, app/voice control, and convenient pull-out tank. Cons include higher price than basic models, potential complexity for non-tech users, and larger size may not suit all countertops or kitchen aesthetics.
Bottom Line: Perfect for large families or frequent entertainers needing maximum ice output consistently. The colorful display and superior insulation differentiate it meaningfully. If you want top-tier capacity and innovative features without paying $500, this strikes an excellent balance between high-end performance and reasonable price.
Why Nugget Ice Makers Are the Ultimate DIY Kitchen Upgrade for 2026
The nugget ice revolution isn’t just about texture—it’s about lifestyle engineering. These machines produce ice through a unique extrusion process that creates porous, flavor-absorbing pellets that chill drinks faster while using less energy than traditional cubed ice. For DIY remodelers, the appeal lies in the intersection of perceived luxury and actual usability. Unlike wine fridges or espresso machines that see sporadic use, a nugget ice maker becomes a daily ritual, making it one of the highest ROI appliance upgrades in terms of homeowner satisfaction.
The Psychology of Nugget Ice: Why It’s More Than Frozen Water
Nugget ice triggers a specific sensory response that standard ice simply can’t replicate. The soft chewability releases flavor compounds from beverages more effectively, while the rapid cooling properties preserve carbonation in sodas and cocktails. From a remodeling perspective, this transforms your kitchen from purely functional to experiential—a key selling point if you’re renovating with resale value in mind. Panel-ready designs amplify this by eliminating visual clutter, creating that coveted built-in aesthetic that buyers associate with high-end renovations.
ROI for DIY Remodels: Appliance Upgrades That Add Value
In 2026’s competitive real estate market, kitchens remain the primary value driver. A properly integrated panel-ready nugget ice maker signals attention to detail and modern luxury without the full Sub-Zero price tag. Real estate data shows homes with integrated specialty appliances spend 17% less time on the market. For a DIY investment under $2,000, you’re buying into a feature that appraisers increasingly recognize as a premium upgrade, especially when documented with proper installation photos and specifications.
Decoding “Panel-Ready”: What It Means for Your Remodel
“Panel-ready” is one of the most misunderstood terms in appliance specification. It doesn’t simply mean “can have a panel attached.” True panel-ready units feature fully flush installation capabilities, proprietary mounting rail systems, and zero-clearance hinges that allow your custom cabinet panel to sit perfectly aligned with surrounding doors. This distinction is critical for DIYers who need to order cabinetry before purchasing the appliance.
True Panel-Ready vs. Overlay-Ready: Know the Difference
Overlay-ready models accept a panel but require additional clearance, creating a “proud” installation that protrudes 1-2 inches from the cabinet face. True panel-ready units use articulating hinges and specialized brackets to achieve a completely flush integration. For 2026’s minimalist kitchen trends, flush is the only acceptable option. When reviewing specifications, look for terms like “fully integrated,” “zero-clearance hinge,” and “cabinet-depth design.” Anything less will compromise your finished aesthetic.
Custom Panel Fabrication: Materials and Process
Your custom panel must match your cabinetry exactly, which means understanding weight limits (typically 15-25 pounds), thickness requirements (usually 3/4-inch), and mounting hole patterns. Most manufacturers provide drilling templates, but you’ll need to coordinate with your cabinet maker or DIY fabricate using medium-density fiberboard (MDF) with veneer. The panel attaches via adjustable clips that allow perfect alignment—a process requiring patience and a laser level for professional results.
The Real Cost of “Budget”: 2026 Price Points and Value Tiers
Budget in the panel-ready nugget ice maker category doesn’t mean cheap—it means strategic value engineering. For 2026, the budget spectrum falls between $1,200 and $2,800, with distinct performance and feature tiers that directly impact DIY installation complexity. Understanding these breakpoints helps you allocate your remodeling budget effectively.
Entry-Level Budget ($1,200-$1,700): What You Sacrifice vs. Gain
Units in this bracket typically produce 30-40 pounds of ice daily with basic mechanical controls and minimal insulation. You’ll sacrifice ultra-quiet operation (expect 50-55 dBA) and advanced filtration, but gain straightforward installation with standard 1/4-inch water connections. Most importantly, these models use universal mounting systems compatible with any cabinet style, reducing the risk of expensive modifications. The trade-off? Higher energy consumption (around 400 kWh annually) and shorter 1-year warranties.
Mid-Tier Value: The Sweet Spot for Most DIYers
The $1,700-$2,400 range represents the DIYer’s goldilocks zone. Here you’ll find 45-60 pound daily production, improved insulation bringing noise down to 45-50 dBA, and Energy Star 2026 certification cutting annual consumption to 280-320 kWh. These units often include drain pump options (critical for islands without floor drains) and reversible hinges. The investment difference pays for itself in 3-4 years through energy savings alone, making this the smart money choice for most kitchen remodels.
Essential Features That Define Quality in Budget Models
When you’re operating in the budget tier, feature prioritization becomes an exercise in identifying non-negotiables versus nice-to-haves. The 2026 market has matured enough that even entry-level models include once-premium features, but certain specifications separate reliable workhorses from future headaches.
Core Performance Metrics: Speed and Consistency
First ice drop time is your most critical performance indicator. Quality budget models deliver their first nuggets in 12-18 minutes, maintaining consistent pellet size within ±2mm throughout the cycle. Inconsistent sizing indicates poor auger design or inadequate compressor quality—both red flags for longevity. Look for stainless steel evaporators and copper refrigerant lines; aluminum components in these areas suggest cost-cutting that won’t survive five years of daily use.
Build Quality Indicators in Budget-Friendly Units
Open the unit (or examine detailed photos) to assess insulation thickness. Minimum R-10 insulation is required for efficient operation, visible as 2-3 inches of foam around the bin. Check door seal quality—magnetic gaskets should feel firm, not pliable, and make full contact without gaps. The condenser coil design matters too; front-accessible coils simplify cleaning, while rear-mounted units trap dust and reduce efficiency by up to 15% annually.
Size Matters: Dimensional Planning for Seamless Integration
Panel-ready nugget ice makers conform to standard appliance widths, but the devil lives in the fractional inches. A 24-inch unit requires exactly 24 inches of cabinet opening, not 24 1/8 inches. That 1/8-inch gap becomes a visual disaster in a $15,000 kitchen remodel. DIYers must understand both the “cutout dimensions” and “overall dimensions” listed in specifications.
Standard Cabinet Dimensions vs. Appliance Specs
Base cabinet depth is typically 24 inches, but panel-ready ice makers require 24 3/4 inches to accommodate the panel and hinge mechanism. This means you’ll need to spec a 25-inch deep cabinet or accept a proud installation. Height is equally critical—most units are 34 inches tall, designed to align with standard counter height, but require a 34 1/2-inch opening for ventilation. Width tolerances are the tightest; plan for zero clearance on sides and top for true integrated look.
The 24-Inch Standard: Why It Dominates the Market
The 24-inch width isn’t arbitrary—it matches standard dishwasher and oven widths, allowing cabinet manufacturers to produce uniform face frames. For DIYers, this standardization means you can repurpose a dishwasher cabinet bay if needed. However, some compact 18-inch models exist for galley kitchens or bar areas. These smaller units often cost more per pound of ice production and sacrifice storage capacity, making them specialty solutions rather than primary recommendations.
DIY Installation: Skills, Tools, and When to Call a Pro
Installing a panel-ready nugget ice maker sits at the intersection of cabinetry, plumbing, and electrical work—a trifecta that intimidates many DIYers. The reality is that 70% of installations are completable by intermediate DIYers with proper planning. The key is honest self-assessment of your skill level before you order the unit.
Required Skill Level: Assessing Your Comfort Zone
You’ll need intermediate carpentry skills for panel mounting, basic plumbing for water line connections (sweating copper or using push-fit connectors), and comfort with 120V electrical work. If you’ve installed a dishwasher or garbage disposal, you possess the requisite skill set. The learning curve involves understanding appliance-specific requirements like anti-tip brackets and condensate drain routing. Manufacturers provide installation videos—watch them twice before committing.
Essential Tool Kit for Ice Maker Installation
Beyond standard tools, you’ll need a 1/4-inch socket set for mounting rails, a tubing cutter for water lines, a multimeter for electrical verification, and a laser level for panel alignment. A right-angle drill becomes invaluable for securing anti-tip brackets in tight cabinet spaces. Budget an additional $150-$200 for these specialized tools if your workshop lacks them. The most overlooked tool? A 24-inch level with magnetic edge—critical for ensuring the unit sits perfectly plumb, which affects door swing and ice dispensing.
Plumbing Deep Dive: Water Lines, Drains, and Filtration
Water connection represents the highest failure point in DIY installations. Unlike refrigerators with simple saddle valves, nugget ice makers require consistent water pressure (20-80 PSI) and quality filtration to prevent scale buildup that destroys the evaporator. Understanding your home’s water system is non-negotiable.
Water Supply: 1/4" Lines, Saddle Valves, and Modern Alternatives
Most units specify a dedicated 1/4-inch copper or PEX line. Saddle valves are universally prohibited by 2026 plumbing codes—they’re prone to leaking and restrict flow. Install a proper T-fitting off your cold water line with a shutoff valve. Push-fit connectors like SharkBite have gained acceptance for DIY use, but compression fittings remain the gold standard for reliability. Pressure regulation is critical; if your home pressure exceeds 80 PSI (test with a $10 gauge), install a pressure-reducing valve to avoid solenoid valve failure.
Drainage Solutions: Gravity Drain vs. Drain Pump Systems
Gravity drain systems require a floor drain or connection to a sink drain line below the unit’s base—a dealbreaker for kitchen islands. Drain pump models add $150-$300 to the price but provide installation flexibility by pumping condensate up to 10 feet vertically. For DIYers, pump systems are worth every penny, eliminating complex under-floor plumbing. Ensure the pump includes a safety overflow switch that shuts the unit down if drainage fails, preventing catastrophic water damage.
Electrical Requirements: Circuits, Codes, and Compliance
Nugget ice makers are continuous-load appliances, meaning they draw power for extended periods unlike intermittent-use devices. This classification triggers specific National Electrical Code requirements that DIYers often overlook. A standard 15-amp circuit might suffice on paper, but voltage drop and simultaneous loads create real-world complications.
Dedicated Circuits: When 15 Amps Isn’t Enough
Most budget units list 3.5-5.5 amp draw, suggesting a 15-amp circuit is adequate. However, NEC Article 422 requires that continuous loads not exceed 80% of circuit capacity. A 5.5-amp ice maker on a 15-amp circuit leaves minimal headroom for other devices. The 2026 code update strongly recommends dedicated 20-amp circuits for all built-in ice makers, a change driven by insurance claim data showing electrical fires from overloaded kitchen circuits. For DIYers, running new 12-gauge wire to a 20-amp breaker is a weekend project that eliminates future headaches.
GFCI Protection: Safety Mandates for 2026
All kitchen countertop appliance circuits now require GFCI protection per NEC 2023, a mandate that extends to built-in ice makers in 2026 updates. Your ice maker must connect through a GFCI-protected receptacle or breaker. While this adds $30-$50 to installation cost, it protects against the number one cause of appliance-related electrocution: ground faults in damp environments. Test the GFCI monthly using the built-in test button—ice maker compressors can cause nuisance tripping that indicates larger electrical issues.
Ventilation Secrets: Clearance Specs That Make or Break Performance
A panel-ready ice maker in a sealed cabinet without proper ventilation is a $1,500 brick waiting to happen. These units reject significant heat during the freezing cycle, and trapped heat reduces ice production by up to 40% while accelerating component failure. Manufacturers specify minimum clearances, but real-world installations require more.
Front-Venting vs. Rear-Venting: Design Implications
Front-venting (or “fully vented”) models exhaust through the toe kick, making them ideal for tight installations. Rear-venting units require 2-3 inches of clearance behind the appliance, which conflicts with standard 24-inch cabinet depth. For DIY remodels, front-venting designs simplify installation dramatically. Check the specification sheet for “ventilation type”—terms like “breathe-through-door” indicate front-venting systems that use the cabinet toe kick as an air intake and exhaust path.
Toe Kick Ventilation: The Hidden Requirement
Even front-venting units require an unimpeded toe kick area. This means no solid cabinet base, no plumbing pipes running through the toe kick space, and a minimum 4-inch high opening. Some DIYers install decorative metal grilles to maintain aesthetics while ensuring airflow. The toe kick must remain clear for the unit’s entire lifespan—consider this when planning permanent plumbing or electrical runs in adjacent cabinets.
The Noise Factor: Decibel Ratings and Sound-Dampening Strategies
That satisfying nugget ice crunch comes at an acoustic cost. Compressor cycling, auger motors, and ice dropping into the bin generate 45-60 dBA depending on the model. In open-concept kitchens, this becomes a daily annoyance if not properly managed. Budget models trend louder, but smart installation can mitigate noise significantly.
Understanding dBA Ratings in Real-World Terms
A 45 dBA rating equals a quiet library, while 55 dBA approaches normal conversation levels. The critical factor isn’t peak noise but frequency of cycling. Quality budget units run 4-6 cycles per hour during heavy use, with each cycle lasting 15-20 minutes. Cheaper models may cycle every 10 minutes, creating constant background noise. Look for variable-speed compressors, a feature trickling down into budget tiers, which reduces noise by 30% by avoiding full-power starts and stops.
Installation Techniques for Noise Reduction
Mount the unit on 1/4-inch closed-cell foam isolation pads to prevent vibration transfer to cabinetry. Seal gaps around the cabinet opening with acoustic foam tape—sound escapes through the smallest openings. For maximum noise control, line the interior cabinet walls with mass-loaded vinyl (MLV) before installation, a $40 solution that reduces perceived noise by 8-10 dBA. Never use standard fiberglass insulation; it traps moisture and promotes mold growth in the warm cabinet environment.
Production vs. Storage: Understanding Capacity Metrics
Manufacturers love to highlight maximum daily production—“60 pounds per day!"—while burying storage bin capacity in fine print. This discrepancy creates frustration when your “high-capacity” unit produces ice faster than it can store, constantly shutting down due to a full bin. For DIY planning, both numbers demand equal attention.
Daily Production Rates: Matching Lifestyle Demand
Calculate your household’s actual needs: a family of four uses 8-12 pounds daily for beverages alone. Entertaining adds another 15-20 pounds per event. That “60-pound” unit sounds excessive until you realize production assumes ideal conditions: 70°F ambient temperature and 50°F incoming water. Real-world production drops 20-30% in summer or in garages. For most households, a 40-50 pound unit provides comfortable overhead without the energy penalty of oversized compressors.
Storage Bin Capacity: The Buffer Zone Concept
Budget models typically store 20-30% of their daily production capacity. A 50-pound-per-day unit might hold only 15 pounds in the bin. This means during heavy entertaining, you’ll manually transfer ice to freezer bags every few hours. Some DIYers install adjacent undercounter freezers with ice storage drawers, creating a two-stage system. If your remodel includes a nearby freezer, prioritize production speed over bin capacity. Otherwise, maximize bin size—even at the expense of some production speed—for true set-and-forget operation.
Energy Consumption: Calculating True Operating Costs
The Energy Star program updated its criteria for ice makers in 2026, making certification more stringent and meaningful. Budget models achieving this new standard use 35% less energy than 2024 equivalents, but the rating system remains confusing. Understanding kilowatt-hour metrics prevents bill shock.
Energy Star 2026 Standards: What Changed
The new standard measures energy per pound of ice produced rather than absolute consumption. A unit producing 50 pounds daily at 300 kWh annually is more efficient than a 30-pound unit using 250 kWh. Budget models meeting the 2026 standard typically carry an Energy Guide label showing $35-$45 estimated annual operating cost. This represents a $15-$25 yearly savings over non-certified models—a 3-5 year payback period that justifies the slightly higher purchase price.
Monthly Cost Projections for Budget Models
At $0.14 per kWh (2026 national average), a 320 kWh unit costs $3.73 monthly. Add water consumption—approximately 3 gallons per 10 pounds of ice—and you’re looking at another $0.50-$1 monthly depending on local rates. Total operating cost runs $4-$5 monthly, or roughly $50-$60 annually. Compare this to bagged ice purchases: at $3 per 10-pound bag, a household using 15 pounds weekly spends $234 annually. Your ice maker pays for itself in 6-8 years through operating savings alone.
Maintenance Protocols: Keeping Your Machine Pristine
Nugget ice makers are high-maintenance appliances. The combination of water, heat, and compression creates mineral scale buildup that destroys internal components. Budget models often use less expensive materials more susceptible to scaling, making maintenance not just recommended but mandatory for survival. Skip cleaning cycles, and you’ll replace the unit in three years instead of ten.
Cleaning Cycles: Frequency and Best Practices
Run a cleaning cycle every 6 months with nickel-safe ice maker cleaner, not vinegar. Vinegar’s acidity damages nickel-plated evaporators common in budget units. The process takes 45 minutes and involves circulating cleaner through the system, then multiple rinse cycles. Mark your calendar—scale buildup is invisible until performance drops 30% overnight. Some 2026 models include automatic cleaning reminders via app notifications, a feature worth seeking in budget tiers.
Filter Replacement Schedules and Water Quality
Inline water filters require replacement every 6 months or 1,500 gallons, whichever comes first. Hard water areas may need 3-month intervals. Budget units often include basic particle filters; upgrade to a scale-inhibiting filter for $20 more. This $40 annual filter investment prevents $200 service calls for evaporator replacement. Test your water hardness with a $15 kit—anything over 7 grains per gallon demands premium filtration.
Warranty Wisdom: What Coverage Actually Protects
Budget appliances and robust warranties rarely coexist, but 2026’s competitive market has forced manufacturers to offer meaningful protection. Understanding warranty nuances prevents nasty surprises when your unit fails at the 13-month mark. The difference between parts-only and parts-and-labor coverage represents hundreds of dollars in potential costs.
Standard vs. Extended Warranties: Breaking Down the Fine Print
Most budget models include a 1-year parts-and-labor warranty with 5-year coverage on the sealed refrigeration system (compressor, evaporator, condenser). This is adequate, but read the exclusions: many policies void coverage if you don’t use OEM filters or fail to document regular cleaning. Extended warranties through retailers often cost 15-20% of the purchase price but cover installation errors—a major plus for DIYers. Manufacturer extended warranties are typically parts-only after year one, making them less valuable than they appear.
Manufacturer Support: Responsiveness and Parts Availability
Before purchasing, call the manufacturer’s support line with a technical question. Long hold times or offshore support indicate future frustration. Check parts availability through online parts distributors—if you can’t find replacement water valves or control boards, the unit becomes disposable after warranty expiration. Established brands maintain parts inventories for 7-10 years. New market entrants may offer attractive pricing but lack long-term support infrastructure.
Smart Features and Connectivity in 2026 Models
Wi-Fi connectivity has migrated from premium to budget tiers, but not all smart features deliver value. Basic app monitoring provides maintenance reminders and production status, while advanced integration enables voice control and automated schedules. For DIYers, the real benefit lies in diagnostic capabilities that prevent service calls.
App Integration: Monitoring and Control Capabilities
Quality apps display real-time production status, bin fullness, and filter life remaining. Some allow remote diagnostics, transmitting error codes to your phone before the unit fails completely. This feature alone can save a $100 service call fee. Avoid apps requiring proprietary hubs or subscription fees—budget models should connect directly to your home Wi-Fi. Test app store reviews before purchase; poorly rated apps indicate neglected software support.
Voice Assistant Compatibility: Alexa, Google, and Matter
Voice control sounds gimmicky until you’re elbow-deep in dough and need ice without touching the unit. “Alexa, start ice production” triggers a cleaning cycle bypass, maximizing output for parties. The Matter standard, now ubiquitous in 2026, ensures cross-platform compatibility. Confirm the unit supports Matter over Wi-Fi, not just proprietary protocols. This future-proofs your investment as smart home ecosystems evolve.
Panel Customization: Achieving That Built-In Look
The panel-ready promise falls apart without proper panel design and installation. Your custom panel must account for weight distribution, thermal expansion, and precise hinge alignment. A beautifully matched panel that sags after six months destroys the integrated aesthetic you paid for.
Panel Weight and Attachment Hardware
Most units support panels up to 20 pounds, but this includes the weight of handles. A 3/4-inch MDF panel with veneer weighs approximately 15 pounds; adding a solid wood handle brings you to the limit. Use lightweight plywood or hollow-core construction for larger panels. Attachment hardware varies—some use top-mounted clips, others side-mounted brackets. Request the installation manual before finalizing cabinet designs to ensure your face frame accommodates the specific mounting system.
Handle Options: Integrated vs. Custom
Integrated handles (recessed pulls machined into the panel) maintain clean lines but reduce usable panel thickness. Custom handles attach through the panel to the door bracket, allowing standard cabinet thickness but requiring precise drilling. For DIYers, integrated handles simplify alignment but complicate panel fabrication. Consider handle-less push-to-open mechanisms, now available in budget models, which eliminate alignment variables entirely.
Troubleshooting Common Issues Before They Become Problems
Every nugget ice maker exhibits quirks. Learning to differentiate normal operation from early warning signs prevents minor issues from becoming catastrophic failures. Budget models lack the diagnostic sophistication of premium units, making owner observation critical.
Ice Quality Degradation: Causes and Solutions
If nuggets become cloudy, smaller, or wetter, suspect water pressure drops or scale buildup. Install a pressure gauge on the supply line—pressure below 20 PSI causes incomplete freezing. Check the evaporator plate for white mineral deposits; even thin layers reduce efficiency by 25%. Cloudy ice indicates air in the water line; purge the line by dispensing 2-3 gallons before reconnecting to the unit.
Leak Prevention: Early Warning Signs
Water pooling under the unit usually stems from drain line backups, not internal leaks. Install a water sensor alarm ($15) in the drip pan to catch issues before cabinet damage occurs. If you hear gurgling sounds during the freeze cycle, the drain line has an air gap issue or improper slope. Drain lines need 1/4-inch per foot downward pitch—use a level during installation to verify. Condensation on the exterior cabinet face indicates inadequate ventilation, not a leak; increase toe kick airflow immediately.
Frequently Asked Questions
How much clearance do I really need around a panel-ready nugget ice maker?
For true flush installation, you need exactly the manufacturer’s cutout dimensions with zero side clearance, 1/2-inch top clearance, and a 4-inch high toe kick opening. Rear clearance depends on ventilation type—front-venting models need none, while rear-venting units require 2-3 inches. Always add 1/4-inch shims during installation to allow leveling and removal.
Can I install a panel-ready ice maker in a kitchen island without a floor drain?
Yes, but you must select a model with an integrated drain pump. These pumps lift condensate up to 10 feet vertically to connect to a sink drain line. Never let the drain line share a cabinet with food storage—the warm, moist air promotes mold. Budget an extra $200-$300 for pump-equipped models and verify the pump is included, not a separate accessory.
What’s the minimum water pressure required for reliable operation?
Manufacturers specify 20-80 PSI, but optimal performance occurs at 40-60 PSI. Below 30 PSI, you’ll experience slow production and incomplete freezing. Test your pressure with a gauge; if it’s low, install a booster pump ($150) rather than fighting constant performance issues. High pressure above 80 PSI requires a regulator to prevent solenoid valve failure.
How do I match my cabinet panel perfectly to existing cabinetry?
Order your custom panel from the same cabinet manufacturer using the exact door style and finish. Provide the appliance’s drilling template to ensure proper mounting hole placement. For DIY fabrication, use 3/4-inch paint-grade MDF and have it professionally spray-painted to match your cabinet color. Wood veneer panels are trickier—grain matching requires ordering extra material from your cabinet run.
Are budget nugget ice makers reliable enough for daily use?
Modern budget models from established manufacturers reliably last 7-10 years with proper maintenance. The key is adhering to cleaning schedules and using quality water filtration. Cheaper units may have louder operation and fewer features, but core components like compressors and evaporators are surprisingly robust. Avoid no-name brands offering 1-year warranties—3-year minimum coverage indicates manufacturer confidence.
Can I use my refrigerator’s water line for the ice maker?
Technically yes, but it’s not recommended. Refrigerator lines are often 1/4-inch saddle valve connections that don’t meet current code. More importantly, sharing a line can cause pressure drops when both appliances call for water simultaneously, leading to hollow ice cubes or reduced production. Install a dedicated 1/4-inch line with its own shutoff valve for reliable performance.
How often should I actually clean the machine?
Every 6 months minimum, but monthly if you have hard water over 10 grains per gallon. The cleaning cycle takes 45 minutes and requires nickel-safe cleaner. In between deep cleans, sanitize the ice bin weekly with food-safe sanitizer and wipe the door gasket with mild soap monthly. Neglecting cleaning is the number one cause of premature failure in budget models.
What’s the difference between nugget ice and bullet ice?
Nugget ice is compressed flake ice, creating soft, porous pellets that absorb flavors and chew easily. Bullet ice is solid, cylindrical ice with a hollow core, harder and slower to chill drinks. Nugget machines use an auger system; bullet ice makers use traditional molds. Don’t confuse the two—many “budget nugget” listings are actually bullet ice machines mislabeled.
Will a panel-ready ice maker increase my home’s resale value?
In markets where outdoor kitchens and entertaining spaces are premium features, a properly integrated nugget ice maker can add $1,500-$2,500 in perceived value. The key is documentation: keep installation photos, manuals, and maintenance records. Appraisers now recognize specialty appliances as value-adds when they’re built-in (not freestanding) and match the kitchen aesthetic.
Can I install the unit myself and still maintain warranty coverage?
Yes, if you follow the installation manual precisely and document the process with photos. Most manufacturers honor DIY installation provided you use licensed professionals for electrical and plumbing connections where required by code. Keep all receipts for materials and take photos of each installation step. Some extended warranties require professional installation—read the fine print before purchasing additional coverage.