When space is at a premium and accessibility isn’t negotiable, ADA-height built-in refrigerators with front-venting technology emerge as the unsung heroes of modern kitchen design. These specialized appliances represent a sophisticated convergence of regulatory compliance, engineering innovation, and aesthetic refinement that solves multiple kitchen design challenges simultaneously. Whether you’re renovating a compact urban kitchen, designing a multi-generational home, or simply seeking that seamless, integrated look without sacrificing functionality, understanding these units is essential.
The marriage of ADA-height standards, built-in configuration, and front-venting technology creates a unique appliance category that defies traditional limitations. Unlike standard refrigerators that demand breathing room and dominate visual space, these models tuck neatly into cabinetry while remaining fully accessible to users of all abilities. Let’s explore what makes this combination revolutionary and how to navigate the complexities of selecting the perfect unit for your needs.
Top 10 ADA-Height Built-In Refrigerators for Zero-Clearance Installations
Detailed Product Reviews
1. Summit Appliance ACR45LSTO 20" Wide Built-In All-Refrigerator, ADA Compliant, 2.65 cu.ft Capacity, External Temperature Readout, Digital Thermostat, High/Low Temperature Alarm, No-Frost Operation
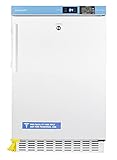
Overview: The Summit ACR45LSTO is a compact, ADA-compliant all-refrigerator designed for installation under lower counters. At 20 inches wide and under 32 inches high, it delivers 2.65 cubic feet of storage in a slim footprint, making it ideal for accessible kitchen designs, break rooms, or auxiliary cooling needs.
What Makes It Stand Out: The external temperature readout and digital thermostat set this unit apart from basic undercounter models. Users can monitor and adjust settings without opening the door, maintaining consistent temperatures and improving energy efficiency. The no-frost operation eliminates manual defrosting, a rare feature in this size class that significantly reduces maintenance.
Value for Money: At $1,250, this refrigerator sits in the mid-to-premium range for ADA-compliant units. While more expensive than basic models, the digital controls, alarm system, and no-frost technology justify the cost for those prioritizing convenience and accessibility. Comparable units with similar features often exceed $1,400.
Strengths and Weaknesses: Strengths include true ADA compliance, external temperature monitoring, maintenance-free no-frost operation, and space-efficient design. Weaknesses are the modest 2.65 cu.ft capacity limiting bulk storage, lack of a freezer compartment, and premium pricing that may deter budget-conscious buyers.
Bottom Line: The ACR45LSTO excels for accessible design projects requiring reliable, low-maintenance refrigeration. Its digital features and no-frost operation make it worth the investment for commercial or residential settings where convenience and compliance are priorities.
2. Summit Appliance ALFD24WBVPANTRY 24" Built-In Dual-Zone Refrigerator, ADA Compliant, Built-in Capable, Pantry Zone, Digital Thermostats, Factory Installed Locks, Adjustable Wire Baskets, LED Lighting

Overview: The Summit ALFD24WBVPANTRY is a sophisticated dual-zone refrigerator designed for ADA-compliant installations. At 24 inches wide and 32 inches high (adjustable to 33.5 inches), it offers versatile undercounter placement with a unique pantry zone for specialized storage.
What Makes It Stand Out: The dual-zone design with a dedicated Pantry Zone (41-68°F) is revolutionary for undercounter units. This warmer compartment perfectly preserves produce, bread, and items that suffer in standard refrigeration. Two removable wire baskets enable easy transport of contents, while factory-installed locks provide security for commercial or multi-user environments.
Value for Money: At $1,997.81, this is a premium investment. However, you’re essentially getting two specialized appliances in one ADA-compliant package. Separate units with similar capabilities would cost significantly more and consume additional space. For commercial kitchens or serious home cooks requiring precise temperature zones, the price is justified.
Strengths and Weaknesses: Strengths include innovative dual-zone flexibility, ADA compliance with adjustable height, secure locking mechanism, LED lighting, and professional-grade construction. Weaknesses include the high price point, larger 24-inch width requiring more cabinet space, and potential complexity for users needing only basic refrigeration.
Bottom Line: This unit is ideal for discerning users who need specialized storage beyond standard refrigeration. The dual-zone functionality and ADA compliance make it perfect for upscale residential kitchens, cafés, or commercial settings where produce quality is paramount.
3. Summit Appliance FF195ADA ADA Shallow Depth Built-In All-Refrigerator, ADA Compliant; 3.13 cu.ft.; Automatic Defrost; Ideal For Small-spaced Commercial and Residential Settings

Overview: The Summit FF195ADA combines commercial durability with ADA compliance in a shallow-depth design. At 32.5 inches high and only 17.25 inches deep, this 3.13 cubic foot refrigerator maximizes space in tight commercial and residential settings while meeting strict accessibility standards.
What Makes It Stand Out: Its commercial listing to NSF-7 and UL-471 standards distinguishes it from residential-only units, making it legal for food service operations. The shallow depth is a game-changer for narrow galley kitchens, food trucks, or compact break rooms where every inch matters. The seamless stainless steel door adds professional aesthetics and easy cleaning.
Value for Money: At $1,019.57, this offers exceptional value for a commercially-rated, ADA-compliant unit. Competitors with similar certifications typically start at $1,300+. For small businesses needing code-compliant refrigeration, this represents significant savings without sacrificing quality or accessibility.
Strengths and Weaknesses: Strengths include commercial certification, space-saving shallow depth, built-in lock, ADA compliance, and attractive stainless steel finish. Weaknesses include manual defrost (not no-frost), slightly taller height (32.5") that may not fit under all ADA counters, and basic controls without external readout.
Bottom Line: The FF195ADA is the go-to choice for small commercial operations requiring ADA compliance and code certification. Its shallow depth and competitive pricing make it equally attractive for space-conscious residential users who prioritize durability over advanced digital features.
Understanding ADA-Height Standards in Kitchen Appliances
What Makes a Refrigerator ADA-Height Compliant?
ADA-height compliance isn’t merely about being “shorter” than standard models. The Americans with Disabilities Act specifies that at least 50% of storage space must be accessible within a specific reach range. For refrigerators, this translates to units with a maximum height of 54 inches for side-by-side models, though most compliant built-in units cap at 32 inches for the main compartment to ensure the interior is fully accessible from a seated position.
The critical measurement isn’t the exterior height alone—it’s the relationship between the floor and the highest operable parts. Controls, dispensers, and at least one shelf must be reachable from 15 to 48 inches above the finished floor. This engineering constraint drives unique design solutions that actually enhance usability for everyone, not just those with mobility challenges.
The 32-Inch Rule and Why It Matters
The 32-inch height benchmark has become the gold standard for ADA-height built-in refrigerators because it represents the sweet spot where universal design meets practical capacity. At this height, the top shelf remains accessible to someone in a wheelchair while still providing substantial storage volume. Manufacturers achieve this through deeper rather than taller compartments, often extending depth to 24-27 inches to compensate for reduced height.
This dimensional constraint also influences compressor placement, insulation thickness, and door seal design—factors that directly impact energy efficiency and longevity. The engineering required to maintain performance in a compressed vertical space often results in more robust components and superior temperature stability compared to taller, standard-height units.
Decoding Built-In Refrigerator Design
The Difference Between Built-In and Freestanding Units
Built-in refrigerators differ fundamentally from their freestanding counterparts in both construction and installation methodology. These units utilize front-flush installation with cabinet-depth dimensions, creating a seamless integration that appears custom. The chassis is reinforced to support panel-ready applications where cabinet fronts attach directly to the door, requiring precise hinge engineering to handle the additional weight.
Unlike freestanding models that rely on rear or side ventilation, built-in units must dissipate heat within confined spaces. This necessitates active ventilation systems and compressors designed for continuous operation in enclosed environments. The result is a more substantial, often heavier appliance with superior insulation and more precise temperature control mechanisms.
Panel-Ready vs. Stainless Steel Finishes
Your finish choice dramatically impacts both aesthetics and installation complexity. Panel-ready models accept custom cabinetry panels, creating an invisible integration that makes the refrigerator disappear into the kitchen design. However, this requires precise panel weight calculations, specialized hinge systems, and exact alignment with adjacent cabinets.
Stainless steel built-in units offer professional aesthetics with simpler installation but still maintain the zero-clearance capabilities. These models feature protruding door handles and may extend slightly beyond cabinet depth, though premium units achieve true flush installation. The choice between finishes affects not only visual appeal but also maintenance requirements, with panel-ready units hiding fingerprints but requiring careful alignment checks over time.
The Science of Front-Venting Technology
How Front-Venting Enables Zero-Clearance Installations
Front-venting technology represents a paradigm shift in refrigeration engineering. Traditional refrigerators expel heat from rear-mounted condensers, requiring 2-3 inches of clearance for adequate airflow. Front-venting units relocate the condenser to the bottom or top of the unit and employ forced-air systems that direct exhaust forward through discreet grilles.
This design utilizes centrifugal fans that create positive pressure, forcing hot air out even when the toe-kick area appears obstructed. The system operates on a principle similar to computer server cooling, with thermal sensors monitoring cabinet temperature and adjusting fan speed dynamically. This prevents heat buildup that would otherwise degrade compressor efficiency and shorten appliance lifespan.
The Mechanics of Forced-Air Cooling Systems
The forced-air system in front-venting refrigerators typically consists of multiple components working in concert: a condenser fan, evaporator fan, and strategically placed air channels. The condenser fan draws cool air from the toe-kick area, passes it over hot condenser coils, and expels it through front-mounted vents. This creates a continuous air exchange that maintains optimal operating temperatures.
Advanced models incorporate variable-speed ECM (electronically commutated motor) fans that adjust based on thermal load, reducing noise and energy consumption during low-demand periods. Some premium units even feature dual-condenser systems that isolate freezer and refrigerator compartments, preventing flavor transfer and maintaining more precise humidity levels.
Zero-Clearance Installation Explained
What Zero-Clearance Really Means for Your Kitchen
Zero-clearance installation is often misunderstood as requiring literally zero space around the unit. In reality, it refers to the ability to install the refrigerator flush with cabinetry on sides and top without traditional ventilation gaps. Most units still require a minimal 1/8-inch gap for thermal expansion and installation tolerance, but this is negligible compared to the 2-3 inches needed for standard built-ins.
This specification transforms kitchen design possibilities, particularly in galley kitchens or compact urban spaces where every inch matters. It allows designers to treat the refrigerator as a true built-in appliance rather than a separate entity, enabling continuous countertops and uninterrupted sight lines that make small spaces feel larger.
Required Clearances: Fact vs. Fiction
While marketing materials boast “zero-clearance,” technical specifications reveal nuanced requirements. The critical clearance is at the toe-kick—typically 2-4 inches of unobstructed space beneath the unit for air intake. Side clearances of 1/8-inch are standard, but some manufacturers specify zero side clearance only when using their proprietary installation kits.
The rear clearance often surprises installers: most units require 1/4 to 1/2 inch for electrical and water line connections, though this doesn’t impact the flush front appearance. Always consult the installation manual for “cutout dimensions” rather than “unit dimensions” to avoid costly cabinet modifications. The key is understanding that zero-clearance refers to ventilation, not absolute physical contact with surrounding structures.
The Perfect Storm: Why These Three Features Create Kitchen Magic
Accessibility Meets Design Flexibility
The convergence of ADA-height, built-in configuration, and front-venting technology solves a design paradox: how to create an accessible appliance that doesn’t look institutional or compromise premium aesthetics. Standard ADA appliances often sacrifice style for function, appearing as afterthoughts rather than integral design elements.
These specialized units flip that script by offering the same sophisticated panel-ready options and professional features as their full-height counterparts. The result is an appliance that serves users with mobility challenges while elevating the entire kitchen’s design language. This universal design approach future-proofs homes for aging-in-place scenarios without announcing “accessible design” to visitors.
The Spatial Efficiency Equation
In kitchens under 150 square feet, these refrigerators can reclaim up to 6 square feet of floor space compared to traditional installations with required clearances. This reclaimed space can accommodate additional cabinetry, a slim pantry pull-out, or simply improve traffic flow. The front-venting design eliminates the need for ventilation chases within walls, simplifying framing and reducing construction costs.
The math becomes compelling: a 32-inch high unit might sacrifice 8-12 inches of vertical storage compared to an 84-inch built-in, but gains 24 inches of width in a compact kitchen while eliminating clearance gaps. For many households, the trade-off yields net-positive storage when combined with thoughtful interior organization systems.
Key Benefits of ADA-Height Front-Venting Built-In Refrigerators
Universal Design for Multi-Generational Homes
Multi-generational households face unique challenges in creating spaces that work for toddlers, working adults, and elderly parents simultaneously. ADA-height refrigerators place frequently accessed items—fresh produce, beverages, daily essentials—within everyone’s reach while still providing full-capacity freezer storage below or beside the main compartment.
This design reduces strain for all users, minimizing bending for children and reaching for seniors. The lower height also improves visibility, reducing forgotten leftovers and food waste. When combined with soft-close drawers and easy-grip handles, these units create a kitchen that genuinely works for every family member regardless of age or ability.
Maximizing Small Kitchen Footprints
Urban dwellers and owners of historic homes understand that kitchen square footage is precious. These refrigerators enable design strategies impossible with standard units: installation under windows, integration into kitchen islands, or placement in former pantry closets. The front-venting feature means you can build them into alcoves that would suffocate conventional models.
Designers often specify these units for studio apartments where the kitchen flows into living space, as the lower profile creates less visual bulk. The ability to panel-match means the refrigerator can camouflage as cabinetry, making the entire space feel more like a furnished room and less like a utilitarian kitchen.
Seamless Integration Without Sacrificing Performance
Early accessible appliances compromised on features—fewer temperature zones, manual defrost, basic interiors. Modern ADA-height built-in refrigerators offer the same advanced features as premium full-height units: dual evaporators, precise humidity control, rapid chill functions, and smart connectivity. The engineering required for front-venting often results in more robust cooling systems that maintain tighter temperature tolerances.
The built-in configuration ensures professional-grade insulation and door seals, contributing to energy efficiency that exceeds many freestanding models. This performance parity means you’re not choosing between accessibility and quality—you’re simply selecting a different form factor that happens to excel in both areas.
Critical Features to Evaluate Before Buying
Interior Configuration and Storage Flexibility
The reduced height demands smarter interior design. Look for units with convertible compartments that can switch between refrigerator and freezer modes, providing flexibility as your needs change. Adjustable split shelves allow accommodation of tall items without wasting vertical space, while full-extension drawer glides ensure you can access items at the very back without strain.
Pay attention to door bin design—some manufacturers compensate for reduced height by deepening door storage, which can interfere with interior shelves when the door closes. The best designs feature adjustable bins with clear height markers and weight limits. For freezer compartments, consider whether you prefer drawer-style access or traditional swing doors, as each impacts how you organize and retrieve frozen goods.
Temperature Management Zones
Premium units offer multiple cooling zones beyond the standard refrigerator/freezer split. Look for dedicated produce drawers with independent humidity controls, deli compartments with adjustable temperatures (28-32°F for meat storage), and rapid-chill zones that quickly cool beverages or party platters. The compressor’s location—bottom-mounted is standard for ADA-height units—actually improves efficiency by keeping the coldest air low and reducing the need for defrost cycles.
Advanced models feature separate evaporators for each compartment, preventing odor transfer and allowing precise humidity control. This technology, once exclusive to full-height luxury models, is now available in ADA-height configurations, representing a significant leap in performance parity.
Noise Level Considerations
Front-venting systems inherently generate more audible noise than passive rear-venting designs, as they rely on active fans. However, manufacturers have made significant strides in sound dampening. Look for specifications below 40 decibels—roughly the sound of a quiet library—for the main compressor, and variable-speed fans that operate at lower RPMs during normal conditions.
The installation itself impacts noise transmission. Units installed on solid platforms with acoustic isolation pads transmit less vibration to surrounding cabinetry. Some premium models feature compressor mounts that float on rubber isolators, dramatically reducing operational noise. Always ask for operational demos in showroom settings, and request installation references to gauge real-world noise levels.
Door Swing and Handle Options
ADA compliance extends to door operation forces—handles must be operable with one hand without tight grasping, pinching, or twisting of the wrist. Look for paddle-style handles or integrated pulls that meet these requirements while maintaining aesthetic appeal. The door swing radius is critical in tight kitchens; some units offer 90-degree stop hinges that prevent doors from hitting adjacent cabinets.
Consider whether you need reversible hinges, as ADA-height units often have asymmetrical interiors that make door reversal more complex than standard models. Some manufacturers offer dual-hinge designs that simplify field reversal, while others require factory-ordered configurations. The best designs allow hinge reversal without affecting the door seal integrity or panel alignment.
Installation Requirements and Best Practices
Pre-Installation Measurements That Matter
Precision is non-negotiable with built-in installations. Measure the cutout width at three points—top, middle, and bottom—as floors and walls are rarely perfectly plumb. The cutout height must account for the unit’s adjustable feet, which typically provide 1-2 inches of height variation for leveling. Don’t forget to measure doorway widths and hallways leading to the kitchen; these units often ship fully assembled and cannot be disassembled to fit through tight spaces.
The flooring material impacts installation depth. If you’re installing over tile, account for grout lines and thickness variations. For floating floors, ensure the refrigerator’s weight won’t impede floor expansion. Create a detailed cutout drawing showing electrical outlet placement, water line access, and any structural obstacles before the unit arrives.
Electrical and Plumbing Considerations
Most ADA-height built-in refrigerators require dedicated 115V/20-amp circuits, though some compact models operate on 15-amp circuits. The electrical outlet must be recessed into the wall or positioned so the plug doesn’t interfere with flush installation. Never install the outlet directly behind the unit—place it in an adjacent cabinet or within the cutout’s top recess area.
Water line installation demands extra attention. Use braided stainless steel supply lines rather than copper, as they’re more flexible and less prone to kinking during installation. The water shut-off valve should be accessible from the front, typically installed in the toe-kick area or adjacent cabinet. Ensure the line includes a pressure regulator set to the manufacturer’s specifications, as excessive water pressure can damage internal solenoid valves.
Professional vs. DIY Installation
While experienced DIYers can handle freestanding refrigerator installation, built-in units with zero-clearance requirements demand professional expertise. Certified installers understand the nuances of panel alignment, ventilation verification, and warranty compliance. Many manufacturers require professional installation to validate warranties, and improper installation can void coverage.
Professional installation typically includes thermal imaging to verify adequate ventilation post-installation, load testing of electrical circuits, and pressure testing of water lines. The cost—usually $300-600—represents insurance against costly mistakes. If you choose DIY, meticulously follow the installation manual and document each step with photos for warranty purposes.
Design Integration Strategies
Creating a Cohesive Look with Cabinetry
Successful panel-ready integration requires cabinetmaker coordination. The refrigerator panels must match adjacent cabinet doors in thickness, edge profile, and finish. Most units accommodate 3/4-inch panels, but some European models require metric thicknesses. The panel weight cannot exceed the hinge specifications—typically 15-20 pounds per door.
Specify full-overlay cabinet design to ensure the refrigerator panels align perfectly with surrounding doors. The toe-kick height must match throughout the kitchen run, which may require custom refrigerator bases. Some designers specify a 1/16-inch reveal around the refrigerator panels to prevent binding, while true flush designs demand perfect alignment and soft-close mechanisms to prevent door slamming.
Lighting and Sight Lines
The lower height of ADA units changes kitchen lighting dynamics. Under-cabinet lighting becomes more critical, as the refrigerator doesn’t extend high enough to reflect ceiling light. Consider installing LED strip lighting above the refrigerator to eliminate shadows and create visual continuity. The refrigerator’s location impacts task lighting zones—positioning it at the end of a cabinet run often works better than center placement.
Sight lines from adjacent rooms matter in open-concept designs. A 32-inch-high unit sitting below a 36-inch-high countertop creates a stepped profile that can be visually jarring. Some designers specify a 34-inch custom countertop height to align with the refrigerator top, creating a unified horizon line. Others use the height difference to create a defined kitchen zone, treating the lower refrigerator as a visual anchor.
Protrusion Depth and the Flush Fit
True built-in design demands precise depth coordination. Standard base cabinets are 24 inches deep, while most ADA-height built-ins are 23 7/8 inches deep—designed to sit flush with cabinet faces. However, door handles, panels, and hinge mechanisms add 1-2 inches of protrusion.
For absolute flush installation, specify push-to-open mechanisms or integrated handle pulls that sit within the door plane. Some premium models offer “zero-protrusion” hinge designs that allow doors to swing open without extending beyond the cabinet face, crucial for kitchens with islands or tight clearances. Always verify the “installed depth with panels” specification, not just the unit depth.
Performance Metrics That Matter
Compressor Types and Longevity
Most ADA-height built-ins utilize either traditional reciprocating compressors or modern linear/inverter compressors. Linear compressors, pioneered by premium manufacturers, operate with fewer moving parts, reducing mechanical noise and vibration. They modulate speed based on cooling demand rather than cycling on/off, maintaining more consistent temperatures and extending lifespan to 15-20 years.
Reciprocating compressors remain common in mid-tier models and offer proven reliability, though they typically last 10-15 years. The key differentiator is the compressor’s location—bottom-mounted units place the compressor in the warmest part of the kitchen, actually improving efficiency as compressors perform better in warmer environments.
Defrost Cycles and Humidity Control
Front-venting designs influence defrost cycle frequency and efficiency. Because heat dissipates more effectively, these units often require fewer defrost cycles, reducing temperature fluctuations and energy consumption. Look for adaptive defrost systems that monitor frost buildup rather than operating on fixed timers.
Humidity control separates premium from basic models. Dual evaporator systems maintain separate humidity levels—higher for fresh produce (70-80%), lower for freezer compartments (<50%). Some units feature humidity sensors that adjust venting automatically, while others require manual adjustment. The best designs include sealed crispers with independent humidity controls that actually maintain set levels, not just approximate them.
Energy Star Ratings and Real-World Consumption
ADA-height units often achieve superior Energy Star ratings because their compact size reduces the volume requiring cooling. However, the front-venting fan adds continuous power draw—typically 3-5 watts—that isn’t present in passive-venting models. Calculate total cost of ownership using the yellow Energy Guide label’s annual consumption figure, but add 10-15% for real-world usage patterns.
Models with inverter compressors show the greatest efficiency gains, using up to 30% less energy than conventional compressors in variable-load conditions. The Energy Star “Most Efficient” designation identifies top performers, but verify that the rating applies to the specific configuration you’re purchasing—panel-ready models sometimes differ slightly from stainless steel versions in insulation values.
Maintenance and Longevity
Cleaning Condenser Coils in Front-Venting Units
Front-venting condensers accumulate dust and pet hair more rapidly than rear-mounted units because they draw air from the floor level. Monthly vacuuming of the toe-kick intake grille prevents airflow restriction that forces the compressor to work harder. Most designs allow grille removal without tools, exposing the condenser coil for cleaning with a soft brush attachment.
Some premium models feature self-cleaning condenser designs that use rotating brushes or reverse airflow cycles. While convenient, these systems still require periodic manual cleaning. Neglected condensers can increase energy consumption by 15-25% and shorten compressor lifespan dramatically. Set calendar reminders for monthly grille cleaning and quarterly deep coil cleaning.
Filter Replacement Schedules
Water filters require replacement every 6-12 months depending on usage and water quality. Front-venting units often position filters behind the toe-kick grille or inside the fresh food compartment. While toe-kick placement saves interior space, it makes replacement more physically demanding—consider this if mobility is a primary concern.
Air filters, increasingly common in premium models, need replacement every 6 months to maintain odor control and proper airflow. These carbon-based filters prevent cross-contamination between compartments and should never be washed and reused. Many units feature filter status indicators, but these are often time-based rather than performance-based—replace filters on schedule regardless of indicator status.
Preventive Maintenance for Extended Lifespan
Schedule professional maintenance every 2-3 years to check refrigerant levels, test door seal integrity, and calibrate temperature sensors. The front-venting fan system requires bearing lubrication and balance checks that most homeowners cannot perform. Technicians can also update firmware on smart models, improving performance and efficiency through software optimizations.
Door seal maintenance is critical in zero-clearance installations. The tight fit can compress seals unevenly, creating small gaps that compromise efficiency. Clean seals monthly with mild soap solution and inspect for cracks or deformation annually. Replace seals at the first sign of wear—waiting until failure risks compressor damage from overwork.
Budgeting and Cost Analysis
Understanding the Price Premium
ADA-height front-venting built-in refrigerators command significant price premiums over standard units—typically 40-80% more than comparable freestanding models. This reflects specialized engineering, lower production volumes, and premium component requirements. Expect to invest $3,500-8,000 for quality units, with luxury models exceeding $10,000.
The premium isn’t arbitrary. The reinforced chassis, advanced ventilation systems, and precision hinges cost more to manufacture. Additionally, the compact size doesn’t proportionally reduce material costs—many components remain the same as full-height units, spread across a smaller production volume. Consider this premium an investment in both accessibility and design flexibility that standard models cannot provide.
Total Cost of Ownership
Calculate total cost over a 15-year lifespan, including purchase price, installation ($300-600), energy consumption ($50-80 annually), maintenance ($200 every 3 years), and filter replacements ($50-100 annually). A $5,000 unit might cost $7,500 over its lifetime, while a cheaper $3,500 model with lower efficiency could exceed $8,000 in total ownership costs.
Factor in potential home value increases. Universal design features can increase resale value by 2-5% in markets with aging populations or accessibility-conscious buyers. The seamless integration also appeals to design-focused purchasers, potentially justifying the initial investment through faster home sales and higher offers.
When It Makes Financial Sense
These refrigerators make financial sense in three scenarios: when renovating for aging-in-place (avoiding future costly retrofits), when space constraints make standard units impossible (preventing major structural changes), or when designing high-end kitchens where seamless aesthetics command premium pricing. In each case, the alternative costs more than the refrigerator premium.
For new construction, specifying these units during the design phase costs minimally more than standard built-ins, as framing and utility rough-in remain identical. The financial penalty comes from retrofitting existing kitchens, where cabinet modifications and electrical relocation can add $1,000-2,000 to the project.
Common Pitfalls and How to Avoid Them
The Cabinet Depth Miscalculation
The most frequent installation error involves cabinet depth miscalculation. Designers specify 24-inch deep cabinets but forget that drywall, tile backsplashes, and cabinet face frames add 3/4 to 1 inch of depth. This pushes the refrigerator forward, breaking the flush aesthetic and potentially interfering with door swing.
Avoid this by measuring from the finished wall surface to the front of cabinet faces, then subtracting the refrigerator’s “installed depth with panels.” Always include backsplash thickness in calculations. Some installers recommend building a 1/4-inch recess into the wall behind the refrigerator to guarantee flush fit regardless of finish materials.
Ventilation Obstruction Mistakes
Zero-clearance doesn’t mean zero-maintenance access. Building solid toe-kicks that cannot be removed blocks the primary air intake, causing compressor failure within months. Similarly, installing decorative grilles with insufficient open area (less than 80% free air space) restricts airflow proportionally.
Specify removable toe-kick panels with magnetic catches or quarter-turn fasteners. Verify that any decorative grille meets the manufacturer’s free area requirements—many beautiful metal grilles have only 50% open area, effectively choking the ventilation system. Use thermal imaging post-installation to confirm adequate airflow before finalizing cabinetry.
Accessibility Oversights
Focusing solely on height while ignoring other ADA requirements creates partially accessible installations. Controls mounted on the door exterior must also meet reach range requirements—some units place ice maker controls at the top of the door, violating ADA guidelines even though the interior is compliant.
Verify that all operable parts, including water filters, ice bins, and control panels, fall within the 15-48 inch reach range. Test door opening force—ADA specifies maximum 5 pounds of force for interior doors, and while refrigerators have no specific standard, excessive door seal strength can make units inaccessible. Some models offer adjustable door tension to balance seal integrity with accessibility.
Beyond Height: Comprehensive ADA Compliance
Reach Range Requirements
ADA compliance extends beyond the refrigerator itself to its relationship with surrounding counters. The unit cannot be the only accessible appliance in a run of cabinetry—at least 50% of all appliances must be accessible. This means if you specify an ADA-height refrigerator, you should also consider accessible-height ovens, dishwashers, and microwaves.
The clear floor space in front of the refrigerator must be 30x48 inches minimum, with no obstructions from adjacent cabinets or islands. This impacts kitchen layout significantly, often requiring 4-6 inches more aisle width than standard designs. The approach to the refrigerator must be level, with maximum 1:48 slope—verify floor levelness during rough framing.
Operable Parts and Controls
Control design must accommodate users with limited dexterity. Touch controls should require minimal pressure and provide audible or visual feedback. Physical knobs must be operable without tight grasping—D-shaped or lever handles work better than round knobs. Controls should be distinguishable by touch alone, with raised icons or Braille labels for visually impaired users.
Ice and water dispensers present particular challenges. Paddle-style activators are more accessible than button-activated systems. The dispenser height must accommodate cup placement from a seated position, and the drip tray should be removable for cleaning without tools. Some models offer voice-activated dispensing, though this technology remains in early stages.
Visual and Tactile Indicators
Interior lighting must provide uniform illumination without glare—LED strips along the sides are preferable to top-mounted bulbs that create shadows. Shelf edges should be contrast-colored or illuminated to improve depth perception for users with visual impairments. Drawers should include tactile indicators for temperature settings, allowing adjustment without visual confirmation.
Door position indicators, either audible alarms or smartphone notifications, alert users with cognitive impairments if doors are left ajar. Some advanced models feature automatic door closing mechanisms that engage after 60 seconds, preventing food spoilage and energy waste while providing peace of mind for caregivers.
Future-Proofing Your Investment
Smart Technology Integration
Modern ADA-height built-ins increasingly feature Wi-Fi connectivity and smart home integration. These capabilities offer particular benefits for accessibility—remote temperature monitoring, door status alerts, and filter replacement notifications sent to caregivers’ phones. Voice control through Alexa or Google Home enables hands-free operation for users with limited mobility.
However, smart features introduce potential obsolescence. Look for units with over-the-air firmware updates and manufacturers with strong software support histories. Some premium brands guarantee app support for 10 years, while budget models may abandon apps after 2-3 years. Consider whether smart features enhance accessibility or merely add complexity for your specific situation.
Modular Component Design
Repairability significantly impacts long-term value. Units with modular compressors, control boards, and fan assemblies allow targeted repairs rather than complete replacement. Some manufacturers design components to be field-replaceable in under 30 minutes, reducing service costs and extending usable lifespan.
Ask about parts availability—premium brands guarantee parts for 10-15 years post-production, while some manufacturers discontinue support after 5 years. The ability to replace a failed compressor for $800 after 12 years is far more economical than replacing a $5,000 unit. Look for service manuals available online, indicating manufacturer support for third-party repairs.
Resale Value Considerations
Universal design features increasingly appear on homebuyer wishlists, particularly in markets with aging demographics. A kitchen with accessible appliances can sell 15-30% faster than comparable homes with standard designs, according to real estate studies. The seamless integration of built-in units appeals to design-conscious buyers regardless of accessibility needs.
Document your appliance specifications and installation details for future owners. Create a binder with manuals, cutout dimensions, panel specifications, and maintenance records. This demonstrates thoughtful design and simplifies future renovations, potentially justifying a higher asking price. The investment in accessibility becomes a market differentiator rather than a specialized feature.
Frequently Asked Questions
Can I install an ADA-height refrigerator in a standard kitchen design, or will it look out of place?
ADA-height refrigerators integrate seamlessly into standard kitchens when properly designed. Many homeowners intentionally choose them for island installations or under-window placement where full-height units wouldn’t fit. The key is treating it as a design choice rather than a compromise—coordinate panels and countertops to create intentional sight lines. In fact, the lower height can make kitchens feel more spacious and less dominated by appliances.
Do front-venting refrigerators require more maintenance than standard models?
They require different maintenance rather than more. The toe-kick intake grille needs monthly vacuuming compared to annual coil cleaning for rear-venting units. However, front-venting designs often have more accessible components, making professional maintenance quicker and less expensive. The trade-off is convenience—it’s easier to remember maintenance when the grille is visible daily versus coils hidden behind the unit.
How do I verify a refrigerator is truly zero-clearance before purchasing?
Request the installation manual and examine the “cutout dimensions” page. True zero-clearance models specify 1/8-inch or less side clearance and include detailed ventilation requirements. Look for UL or CSA certifications specifically testing enclosed installation performance. Reputable manufacturers provide thermal imaging examples showing safe operating temperatures in zero-clearance configurations. Avoid units that simply claim “zero-clearance capable” without technical documentation.
Will an ADA-height refrigerator reduce my food storage capacity significantly?
Capacity reduction is typically 15-25% compared to full-height built-ins of the same width, but clever interior design minimizes the impact. The deeper compartments and improved organization systems often make the space more usable than the raw cubic footage suggests. Most families report no practical difference in storage, though bulk shoppers may need supplemental freezer space. Consider your actual usage patterns—many full-height refrigerators are poorly organized, with inaccessible back areas that waste space.
Can I convert a standard built-in refrigerator to front-venting by modifying the cabinetry?
No—this is dangerous and will void warranties while potentially creating fire hazards. Front-venting requires specific condenser placement, fan systems, and thermal sensors integrated at the factory. Attempting to enclose a standard built-in restricts airflow, causing compressor overheating and potential refrigerant leaks. The engineering differences are fundamental, not cosmetic. Always purchase a unit specifically designed for your installation type.
Are there ADA-height options for different refrigerator styles (French door, side-by-side, etc.)?
Side-by-side configurations are most common in ADA-height designs because they provide full-height freezer access within reach range. French door models exist but are rare—the width requirements often exceed accessibility standards. Bottom-freezer drawers are popular, placing the most-accessed fresh food at ideal height. True column refrigerators (separate fridge and freezer units) offer maximum flexibility, allowing you to place freezer units in separate locations.
How does installation cost compare between ADA-height built-ins and standard built-in refrigerators?
Installation costs are comparable, typically $300-600 for professional installation. ADA-height units sometimes cost slightly less to install because their lighter weight (due to reduced height) makes maneuvering easier. However, panel-ready installations require more precise alignment, potentially increasing labor time. The real cost difference comes from potential cabinet modifications—ADA-height units often require custom base platforms to align with standard 36-inch countertop heights.
What happens if the front-venting fan fails? Can the refrigerator still operate?
Most units will continue operating but enter a protective mode with reduced efficiency. Thermal sensors detect inadequate heat dissipation and trigger more frequent but shorter compressor cycles to prevent overheating. This maintains safe food temperatures but increases energy consumption by 30-50% and accelerates compressor wear. Fan failure typically triggers an audible alarm or smartphone alert in smart models. Replace failed fans immediately—continued operation without proper ventilation will lead to compressor failure within weeks.
Do ADA-height refrigerators qualify for tax credits or accessibility rebates?
Federal tax credits for accessible home modifications expired in 2017 and have not been renewed as of 2024. However, some states offer accessibility improvement incentives—check your state’s disability services department. Veterans may qualify for VA grants covering accessibility renovations. The refrigerator itself rarely qualifies independently, but as part of a comprehensive accessibility remodel, costs may be partially deductible as medical expenses if itemized and exceeding 7.5% of adjusted gross income. Consult a tax professional for your specific situation.
How long should I expect an ADA-height front-venting built-in refrigerator to last?
With proper maintenance, expect 12-18 years of reliable service. The front-venting system adds mechanical complexity but reduces thermal stress on the compressor, often extending lifespan compared to enclosed standard built-ins. Units with linear compressors typically outlast reciprocating models by 3-5 years. The key factor is maintenance adherence—regular filter changes and coil cleaning have more impact on longevity than the specific technology. Premium brands with robust service networks often last longer due to parts availability and repairability.