Let’s be honest—how many times have you stared at your refrigerator’s ice maker, willing it to produce just one more cube for that perfectly chilled drink, only to be met with silence or a sad trickle of lukewarm water? If you’re a DIY enthusiast who thrives on fixing what’s broken rather than replacing it, you’ve likely felt that mix of frustration and determination. Modern refrigerators often come with ice makers that underdeliver, clog easily, or simply can’t keep up with your household’s demands. But what if you could transform that underperforming component into a reliable, high-output system without swapping out the entire appliance? That’s where ice maker conversion kits enter the scene, offering a smart, cost-effective upgrade path that puts you in control of your kitchen’s coolest utility.
The beauty of these kits lies in their promise: breathe new life into your existing setup with minimal hassle and maximum payoff. No need to drain your wallet on a brand-new fridge or settle for lackluster performance that turns summer entertaining into a logistical nightmare. For the hands-on homeowner, conversion kits represent more than just a fix—they’re a chance to customize your ice production to match your lifestyle, whether you’re hosting backyard barbecues or just craving a frosty glass of water after a long day. In this guide, we’ll cut through the noise and focus on what truly matters when choosing and installing a conversion kit, so you can make an informed decision that delivers crisp, clear ice for years to come—without the guesswork or regret.
Top 10 Ice Maker Conversion Kits
Detailed Product Reviews
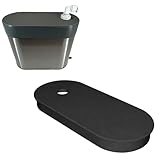
1. GE Opal Nugget Ice Maker Conversion Kit for Opal 2.0 - Permanent Water Line, Measure Tank Size First, Size Chart in Images

Overview: This kit enables a permanent water line connection for GE Opal 2.0 nugget ice makers, eliminating the need for manual tank refills. It’s a fully assembled solution requiring users to verify tank dimensions against provided size charts before purchase, as the water tank itself is not included. A Velcro strap secures the lid post-installation. What Makes It Stand Out: Official GE branding inspires confidence in compatibility and quality control, a rarity among conversion kits. The inclusion of a detailed size chart in images reduces measurement errors, while the pre-assembled design minimizes installation complexity compared to DIY setups. Value for Money: Priced moderately higher than generic alternatives, it justifies cost through assured Opal 2.0 compatibility and reduced risk of leaks or malfunctions. For users prioritizing reliability over minimal savings, this kit offers peace of mind that cheaper options may lack. Strengths and Weaknesses: Strengths: Genuine GE part ensures seamless integration; clear sizing guidance prevents mismatches; Velcro strap enhances safety. Weaknesses: Tank not included (additional cost); mandatory pre-purchase measurement adds step; limited to Opal 2.0 models. Bottom Line: Highly recommended for Opal 2.0 owners seeking a trustworthy, hassle-free permanent connection, provided tank size is confirmed first.
2. Generic Permanent Water Line Conversion Kit Fully Assembled for GE Opal 2.0 XL 1 Gallon Side Water Tank

Overview: A budget-friendly, fully assembled conversion kit designed specifically for GE Opal 2.0 XL models with the 1-gallon side water tank. It facilitates direct plumbing but excludes the water tank, requiring precise measurement against seller-provided size charts to ensure fit. What Makes It Stand Out: Targets the less common Opal 2.0 XL variant with its larger tank, addressing a niche compatibility gap. The pre-assembled nature and included Velcro strap simplify installation, while generic pricing makes permanent plumbing more accessible. Value for Money: Offers significant savings over official GE kits while fulfilling the core function. Ideal for cost-conscious users with Opal 2.0 XL units, though potential fit uncertainties with third-party parts slightly offset the value. Strengths and Weaknesses: Strengths: Affordable entry to permanent plumbing; tailored for Opal 2.0 XL tank; no assembly needed. Weaknesses: Generic branding risks fit/quality inconsistencies; tank sold separately; sizing errors could lead to returns. Bottom Line: A solid economical choice for Opal 2.0 XL owners willing to meticulously verify tank dimensions, but prioritize GE-branded kits for guaranteed reliability.
3. Generic Permanent Water Line Conversion Kit Fully Assembled for GE Opal 1.0 XL 1 Gallon Side Water Tank

Overview: This generic kit converts GE Opal 1.0 XL nugget ice makers to a permanent water line, compatible only with the 1-gallon side tank model. It arrives fully assembled but requires users to measure their tank against size charts; the water tank is not included. What Makes It Stand Out: Caters exclusively to the older Opal 1.0 XL configuration, which is often overlooked by newer kits. The plug-and-play assembly and included Velcro strap provide convenience, filling a specific compatibility void for legacy model owners. Value for Money: Delivers essential functionality at a low price point, making it a practical upgrade for aging Opal 1.0 XL units. However, the absence of brand assurance may concern users wary of potential leaks or short lifespans. Strengths and Weaknesses: Strengths: Affordable solution for obsolete Opal 1.0 XL; easy installation; fits a hard-to-serve model. Weaknesses: Generic quality control risks; mandatory measurement step; no tank included; limited long-term support. Bottom Line: Recommended for budget-focused Opal 1.0 XL users needing permanent plumbing, but verify measurements rigorously and expect less durability than premium kits.
4. GE Opal Nugget Ice Maker Conversion Kit for Opal 2.0 - Permanent Water Line, Measure Tank Size First, Size Chart in Images, it is 3" Wide with Round Ends, White Color

Overview: A GE-branded conversion kit for Opal 2.0 units, featuring a distinct 3-inch wide tube with round ends and white coloring. It enables permanent plumbing but requires tank size verification using included charts; the water tank is sold separately. What Makes It Stand Out: The specific white, 3" round-ended tubing differentiates it from standard kits, potentially improving aesthetics or space efficiency in tight setups. Official GE compatibility and pre-assembly maintain reliability, while visual specs aid accurate sizing. Value for Money: Commands a slight premium over basic kits due to the tailored tubing design and GE backing. Worth the cost for users prioritizing clean integration or needing the unique dimensions, though functionally similar to Kit #1 for most. Strengths and Weaknesses: Strengths: GE authenticity ensures compatibility; unique tubing suits specific installations; clear sizing visuals. Weaknesses: Niche design may not benefit all users; tank sold separately; measurement prerequisite remains. Bottom Line: Choose this if the white 3" round-end tubing meets your spatial or aesthetic needs for an Opal 2.0; otherwise, Kit #1 offers identical core functionality at likely lower cost.
5. GE Opal 1.0 Nugget Ice Maker Permanent Water Line Conversion Kit for (only Opal 1.0) Water Tank NOT Included. Only fits 1.0 Angled Water Tank. See Second Photo for Compatible Tank.

Overview: This kit is strictly designed for GE Opal 1.0 models with the original angled 3/4-gallon water tank. It provides a permanent water line connection but excludes the tank, with explicit warnings via photos that it only fits the angled variant—not later straight tanks. What Makes It Stand Out: Uniquely targets the angled tank of early Opal 1.0 units, a critical distinction many generic kits overlook. The heavy emphasis on photo-based compatibility (including a “only fits angled tanks” disclaimer) prevents costly mismatches for this legacy model. Value for Money: Reasonable for the highly specific use case it serves. While generic kits are cheaper, this offers certainty for Opal 1.0 angled tank owners, avoiding wasted money on incompatible parts—a key value for a discontinued configuration. Strengths and Weaknesses: Strengths: Guaranteed fit for angled Opal 1.0 tanks; clear visual compatibility guides; prevents installation errors. Weaknesses: Extremely narrow compatibility; tank not included; irrelevant for Opal 2.0 or straight-tank 1.0 models. Bottom Line: Essential and recommended only for Opal 1.0 owners with the angled water tank; confirm compatibility via photos before purchasing—useless for all other setups.
6. Permanent Water Line Conversion Kit for Nugget Ice Maker | Compatible with GE Opal 2.0 Model
Overview: This kit converts the GE Opal 2.0 Nugget Ice Maker from manual water filling to a permanent, direct plumbing connection. It eliminates the need to refill the internal water tank, enabling uninterrupted ice production for households or light commercial use where constant ice supply is essential. What Makes It Stand Out: Its fully assembled, plug-and-play design significantly simplifies installation compared to piecemeal solutions. Precise sizing (requiring user verification) ensures a secure fit, while dedicated mounting hardware guarantees stability and leak prevention during continuous operation, preserving the unit’s original functionality and aesthetics. Value for Money: Priced competitively against generic kits, its model-specific engineering justifies the cost. Avoiding potential leaks from ill-fitting parts and the convenience of endless ice production offers strong long-term value over repeatedly buying replacement tanks or enduring manual refills. Strengths and Weaknesses: Strengths: Hassle-free setup, reliable continuous operation, maintains unit integrity. Weaknesses: Critical need to measure tank dimensions first (risk of incompatibility if skipped), exclusive focus on Opal 2.0 limits broader applicability. No filter included. Bottom Line: An excellent, must-have upgrade for GE Opal 2.0 owners tired of tank refills. Ensure precise tank measurement before purchase; if compatible, it delivers exceptional convenience and reliability, making it a worthwhile investment for seamless ice production.
7. The Pod Company Conversion Kit for the Standard Ice Pod – Enables Compatibility with Standard & Pro Water Chillers – Complete Hose & Valve Adapter System for 41°F or 39°F Cooling
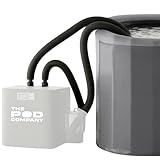
Overview: This specialized kit connects The Ice Pod Pro or Long Pod cold plunge tubs to compatible Standard or Pro Water Chillers, enabling consistent, ice-free water cooling down to 41°F (or 39°F). It replaces the need for daily ice refills with automated, filtered temperature control. What Makes It Stand Out: It delivers true “set-and-forget” cold therapy with integrated 20-micron filtration for crystal-clear water and energy-efficient operation (280W). The plug-and-play hose/valve system ensures quick, no-plumbing setup, while quiet operation makes it suitable for indoor use. Value for Money: Justifies its price through eliminating ongoing ice costs and labor. The filtration extends water cleanliness, reducing maintenance. While niche, it’s the only solution for seamless chiller integration with these specific Pods, offering premium convenience worth the cost for dedicated users. Strengths and Weaknesses: Strengths: Effortless temperature control, continuous filtration, quiet/energy-efficient, fast setup. Weaknesses: Only works with The Pod Company’s specific Pods and chillers (no universal compatibility), initial water chill time can vary with ambient conditions. Bottom Line: Highly recommended for Ice Pod Pro/Long Pod owners seeking reliable, ice-free cold therapy. If you own the compatible ecosystem, this kit transforms your experience with minimal effort, providing significant long-term value through convenience and water quality.
8. GE Profile Opal Ice Despenser Permanent Water Line Conversion kit. Doesn’t fit ice Makers with ice Bins. This is for The Opal ICE DESPENSER ONLY. See Photos

Overview: This kit provides a permanent water line connection specifically for the standalone GE Profile Opal Ice Dispenser unit (distinct from the ice maker). It bypasses manual water tank refills, enabling continuous ice dispensing – but only for dispenser models, not integrated ice makers with bins. What Makes It Stand Out: Its critical differentiator is precise compatibility with the Opal Ice Dispenser chassis. The fully assembled black kit (matching the dispenser), including a Velcro strap for secure lid attachment, ensures a clean, integrated look without requiring modifications or risking damage to the wrong unit type. Value for Money: While narrowly focused, it solves a specific pain point for dispenser owners at a reasonable cost. Generic kits risk leaks or incompatibility; this model-specific solution prevents costly mistakes, offering good value for its intended, limited audience. Strengths and Weaknesses: Strengths: Guaranteed fit for dispenser models, simple installation, maintains aesthetics. Weaknesses: Utterly useless for standard Opal ice makers (only dispensers), no tank included, very limited market applicability. Bottom Line: A niche but essential solution only for owners of the GE Profile Opal Ice Dispenser (not ice makers). Verify your unit type meticulously using the provided photos; if compatible, it’s a worthwhile upgrade for endless dispensing convenience.
9. Ice Maker Fridge Quick Installation Kit with 25’ Feet Tubing for Drinking Water Appliance Water Line, Solid Brass Stop Tee and Valve, 1/4" Fittings

Overview: This professional-grade kit provides everything needed to connect a refrigerator ice maker or water dispenser to a household water supply. It features 25’ of NSF-certified LLDPE tubing, a solid brass Stop Tee with shut-off valve, and quick-connect fittings for straightforward, reliable installation. What Makes It Stand Out: The LLDPE tubing offers superior flexibility and crack resistance over rigid PEX, crucial for tight fridge installations. Its NSF/ANSI certification guarantees safety for drinking water (no taste/odor), while the lead-free brass valve and universal fittings ensure broad compatibility and tool-free connections. Value for Money: Excellent value as a complete, plumber-sourced solution. The durable LLDPE and brass components promise longevity, avoiding cheap plastic failures. Inclusion of a dedicated shut-off valve simplifies future maintenance, making it cost-effective versus buying parts separately. Strengths and Weaknesses: Strengths: Premium flexible & safe tubing, durable brass valve, easy universal/quick-connect fittings, versatile for multiple appliances. Weaknesses: White tubing may yellow over time, lacks specialized tools for saddle valve installation (relies on existing supply line). Bottom Line: A top-tier, versatile choice for DIYers and pros needing a reliable, safe water line. Its superior materials and thoughtful design justify the price, making it the recommended kit for hassle-free, long-lasting fridge or ice maker connections.
10. Ice Maker Water Line Kit - Food Grade Refrigerator/Fridge Water Line Kit,25FT 1/4In O.D.Water Line with Self Piercing Valve and Quick Fittings, for Adding a branch waterway to Refrigerator/Ice Maker

Overview: This comprehensive kit enables adding a water line branch to an existing pipe for refrigerators, ice makers, or dispensers. It includes 25’ of food-grade tubing, a self-piercing saddle valve, shut-off valve, and all necessary push-to-connect fittings for quick, tool-free installation. What Makes It Stand Out: The self-piercing saddle valve is the key feature, allowing connection to a main copper or plastic supply line without shutting off the household water or cutting the pipe. All components are NSF-certified, lead-free, and BPA-free, ensuring safe drinking water delivery. Value for Money: Highly cost-effective for basic installations. The saddle valve eliminates plumbing complexity, making it ideal for renters or quick DIY fixes. While less durable long-term than brass tee solutions (Product 9), it’s a budget-friendly option for standard home use. Strengths and Weaknesses: Strengths: Extremely easy saddle valve installation, complete NSF-safe components, affordable, includes all essentials. Weaknesses: Saddle valves can leak over time or struggle with hard water, plastic fittings less robust than brass, tubing less flexible than LLDPE. Bottom Line: A solid, budget-conscious choice for straightforward installations where ease and speed are priorities. Ideal for DIYers needing a quick, safe connection; opt for a brass tee kit (like Product 9) if longevity and maximum reliability are critical.
Understanding Ice Maker Conversion Kits
What Exactly Is a Conversion Kit?
A conversion kit is a specialized set of components designed to retrofit your refrigerator’s existing ice maker system, replacing outdated or inefficient parts with modern, high-performance alternatives. Unlike full appliance replacements, these kits target the core mechanisms responsible for ice production—think motors, molds, sensors, and tubing—allowing you to upgrade functionality while preserving your fridge’s structure and aesthetics. They’re engineered to integrate seamlessly with specific refrigerator models or universal configurations, turning a finicky ice source into a dependable one.
Why Convert Instead of Replacing Your Entire Unit?
Swapping out an entire refrigerator for ice-related issues is often overkill—both financially and environmentally. Conversion kits cost a fraction of a new appliance, reduce electronic waste, and let you retain features you already love in your current fridge. They’re ideal for extending the lifespan of reliable refrigerators whose ice makers have simply aged poorly, making them a pragmatic choice for eco-conscious DIYers who value resourcefulness over disposability.
Key Features to Evaluate Before Purchasing
Compatibility Checkpoints You Can’t Skip
Not all kits work with every refrigerator model, so verifying compatibility is non-negotiable. Start by identifying your fridge’s make, model, and ice maker type (e.g., modular, in-door, or bottom-mounted). Cross-reference this with the kit’s specifications, paying close attention to mounting styles, electrical connectors, and water inlet dimensions. Many manufacturers provide online compatibility tools—use them. Skipping this step risks installation headaches or voided warranties.
Ice Production Rate: Setting Realistic Expectations
Ice output varies wildly between kits, measured in pounds per day. While high-output models (10+ lbs/day) suit large households or frequent entertainers, they may strain older water lines or compressors. Assess your typical usage: a family of four might need 6–8 lbs/day, while a solo dweller could manage with 3–4 lbs. Prioritize kits that align with your fridge’s cooling capacity to avoid overworking the system.
Water Filtration Integration
Clean water equals clean ice—period. Some kits include built-in filtration or adapters for third-party filters, reducing mineral buildup and odors. If your home has hard water, prioritize kits with advanced filtration compatibility to prevent scaling, which can clog nozzles and shorten the ice maker’s life. Check whether the kit requires separate filter purchases and ongoing replacement schedules.
Noise Level Considerations
A noisy ice maker can disrupt quiet kitchens or open-concept living spaces. Modern kits often feature insulated molds or vibration-dampening components to minimize operational sounds. Look for decibel ratings in product specs; anything below 40 dB is considered whisper-quiet. If noise is a priority, seek kits explicitly marketed for “quiet operation” and read user feedback on sound performance.
Energy Efficiency Metrics
Upgrading shouldn’t mean spiking your electricity bill. Efficient kits optimize motor design and defrost cycles to reduce power consumption. While most conversions won’t drastically alter overall fridge energy use, prioritize ENERGY STAR-adjacent features like smart sensors that halt production during idle periods. This subtle efficiency can add up in savings over time.
Installation Considerations for DIY Success
Assessing Installation Complexity
Not all kits are created equal when it comes to DIY-friendliness. Some require only basic screwdriver work and tubing swaps, while others involve electrical rewiring or refrigerant handling (which should be left to professionals). Gauge complexity by reviewing installation manuals upfront—look for clear diagrams, minimal disassembly steps, and whether specialized tools are needed. If terms like “evaporator coil” or “thermistor calibration” appear, consider professional help.
Essential Tools and Workspace Prep
Gather these before starting: adjustable wrenches, screwdrivers, tubing cutters, a towel bucket for water drainage, and safety goggles. Clear the area around your fridge, unplug it, and shut off the water supply. Pro tip: lay down a tarp to catch condensation or stray ice. Having the right setup prevents rushed mistakes and protects your kitchen floors.
Step-by-Step Process Overview
Most conversions follow a logical sequence: disconnect power/water, remove the old unit, mount the new components, reconnect tubing and wiring, then test for leaks and functionality. Allow 2–4 hours for the job, depending on experience. Never skip the leak test—run water through the system for 10 minutes before powering on to avoid water damage. Patience here saves costly repairs later.
Maintenance and Longevity Tips
Routine Cleaning Protocols
Even the best kit fails without upkeep. Clean the ice mold and water reservoir monthly using vinegar or manufacturer-approved solutions to prevent mold and mineral deposits. Wipe sensors gently—they’re critical for detecting ice levels and can malfunction if coated in grime. Neglecting this leads to inconsistent production or shutdowns.
Troubleshooting Common Post-Installation Issues
If ice production slows after installation, check for kinked water lines or clogged filters first—these are the usual culprits. Frost buildup often indicates a door seal leak or incorrect thermostat settings. For electrical glitches (e.g., the unit won’t start), verify all connectors are secure and the fridge’s circuit breaker hasn’t tripped. Most issues stem from simple oversights, not kit defects.
When to Seek Professional Support
DIY has limits. Call a technician if you encounter refrigerant leaks (hissing sounds or oily residue), persistent electrical faults, or if the compressor behaves erratically after installation. These signal deeper system issues that could compromise safety or void warranties. Knowing when to step back protects your investment and home.
Safety and Certification Essentials
Non-Negotiable Safety Certifications
Always verify kits carry certifications from recognized bodies like UL, ETL, or NSF International. These ensure components meet rigorous electrical, mechanical, and food-safety standards—critical for anything handling water and power near your food. Un certified kits risk fire hazards, contamination, or insurance complications if damage occurs.
Water Line Integrity and Leak Prevention
Your home’s water supply line must withstand constant pressure without bursting. Opt for kits that include braided stainless steel tubing over plastic, as it resists kinks and corrosion. Install a shut-off valve within reach for emergencies, and test connections twice before finalizing assembly. A single leak can cause thousands in water damage.
Cost Analysis and Value Assessment
Budgeting Beyond the Initial Purchase
The kit price is just the start. Factor in potential extras like replacement filters, specialized tools, or minor plumbing parts. For example, upgrading your home’s water filter system might be necessary for optimal performance. Budget 15–20% above the kit cost for these contingencies to avoid mid-project surprises.
Long-Term Value vs. Short-Term Savings
A $50 kit might seem appealing, but if it lacks durability or compatibility features, you’ll replace it within a year—costing more long-term. Invest in mid-range options with robust warranties (1–2 years minimum) that cover both parts and labor. This upfront premium pays off through reliability and reduced frustration.
Future-Proofing Your Investment
Scalability for Household Changes
Life evolves—so might your ice needs. Choose kits with modular designs that allow future upgrades, like adding a secondary storage bin or integrating with smart-home systems for remote monitoring. This flexibility ensures your investment adapts whether you’re downsizing or expanding your family.
Environmental Impact of Your Choice
Sustainable DIY isn’t just about saving money; it’s about reducing waste. Opt for kits made with recyclable materials and energy-efficient components. Some manufacturers even offer take-back programs for old parts. Small choices here contribute to a larger eco-friendly mindset in home maintenance.
Warranty and Support Matters
Deciphering Warranty Coverage Fine Print
Warranties can vary from “parts only” to comprehensive coverage. Prioritize kits where the warranty explicitly includes labor for defects and doesn’t void your fridge’s original warranty. Watch for exclusions like “damage from hard water”—if your area has mineral-heavy water, this could be a dealbreaker.
Frequently Asked Questions
Q: Can I install a conversion kit myself if I have no plumbing experience?
A: Many kits are designed for beginners with clear instructions, but if you’re uncomfortable cutting water lines or diagnosing leaks, consult a plumber for that single step—it’s worth the small fee for peace of mind.
Q: How long does a typical installation take for a first-timer?
A: Allow 3–4 hours to account for learning curves. Experienced DIYers might finish in 1.5–2 hours, but rushing increases error risks.
Q: Will a conversion kit work with any refrigerator brand?
A: No—compatibility is model-specific. Always confirm your fridge’s make/model matches the kit’s requirements before purchasing.
Q: Do these kits affect my refrigerator’s existing warranty?
A: Potentially. Some manufacturers void warranties if third-party parts are installed, so check your fridge’s terms or consult the maker first.
Q: How often should I replace filters in the converted system?
A: Standard filters need changing every 6 months, but hard water may require quarterly replacements. Monitor ice clarity as a visual cue.
Q: Can a conversion kit fix an ice maker that’s completely dead?
A: It depends on the root cause. If the issue is the ice maker module itself, a kit can resolve it—but if the fridge’s main control board is faulty, the kit won’t help.
Q: Are there safety risks I should know about?
A: Yes, primarily electrical shorts or water leaks. Always disconnect power and water before starting, and never bypass safety certifications to save time.
Q: Will ice production be noticeably faster after conversion?
A: Output improves if the old unit was outdated, but dramatic speed increases are rare. Focus on consistency and reliability as the main upgrades.
Q: Can I use the same kit if I move to a new house?
A: Only if your new refrigerator matches the kit’s compatibility specs. Most kits aren’t transferable between different fridge models.
Q: What’s the average lifespan of a converted ice maker system?
A: With proper maintenance, expect 5–7 years—similar to a new fridge’s ice maker—before efficiency declines significantly.