Ever opened your refrigerator only to feel that subtle disappointment when your gaze lands on the gasket? That humble rubber seal, crucial for keeping your food fresh, often clashes with meticulously planned kitchen aesthetics. In today’s design-conscious homes, where every detail matters—from cabinet hardware to appliance finishes—the refrigerator gasket has悄然 stepped into the spotlight. No longer just a functional necessity, it’s now a potential design element, an opportunity to elevate the entire look of your kitchen rather than a detail to overlook. The quest for a seamless, polished appearance means even the smallest components deserve attention, and the gasket trim is no exception.
Gone are the days when a plain black gasket was the only option, silently accepting its utilitarian role. Homeowners and designers increasingly recognize that cohesion matters. A refrigerator is a major visual element, and its perimeter seal can either harmonize beautifully with your cabinetry, countertops, or backsplash, or create a jarring visual break. Choosing the right gasket trim isn’t just about matching a color; it’s about understanding materials, installation nuances, longevity, and how this small component contributes to the overall feeling of quality and intentionality in your space. Getting it right transforms the fridge from an appliance into an integrated part of your kitchen’s story.
Top 10 Refrigerator Gasket Trim
Detailed Product Reviews
1. TRIM-LOK Old Refrigerator D Door Replacement Self Adhesive HT Seal Price Per Foot (14 Feet)
Overview:
This TRIM-LOK kit provides a 14-foot self-adhesive seal gasket designed specifically for restoring vintage refrigerator doors. It replaces Frost King RG17 models and targets older units where original seals often crack or lose elasticity, compromising cooling efficiency and increasing energy costs.
What Makes It Stand Out:
The integrated self-adhesive backing is its key differentiator, eliminating messy glue applications and simplifying DIY installation. Its high-temperature (HT) rubber formulation ensures durability against frequent door use and temperature fluctuations, while included Cheyenne-brand instructions cater precisely to vintage appliance enthusiasts.
Value for Money:
Priced per foot, the 14-foot length offers excellent coverage for most standard vintage fridge doors at a fraction of professional repair costs. While slightly pricier than generic rolls, the adhesive convenience and vintage-specific fit justify the cost compared to non-specialized alternatives requiring extra sealant.
Strengths and Weaknesses:
Strengths: Hassle-free adhesive installation; precise vintage compatibility; robust HT rubber resists wear; comprehensive instructions. Weaknesses: Adhesive may fail on heavily degraded surfaces without thorough prep; limited to 14ft (shorter fridges may have excess); not ideal for modern units with different groove profiles.
Bottom Line:
A top choice for vintage fridge owners seeking a reliable, user-friendly seal replacement. Its adhesive design and tailored fit make it a worthwhile investment for restoring older appliances efficiently.
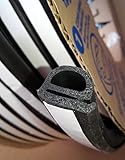
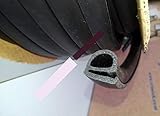
2. E Shape Foam Rubber Seal Strip, EPDM Rubber Weather Stripping Gasket for Auto, Boat, Garage Door/Window, Refrigerator Door Replacement Gasket, Machinery, Home Application and More, Black(13Feet)

Overview:
This versatile 13-foot EPDM rubber strip features an E-shaped profile for multi-surface sealing. Engineered for durability, it targets gaps in refrigerators, vehicles, boats, and home fixtures, addressing common issues like noise, drafts, and dust infiltration.
What Makes It Stand Out:
The E-shape design uniquely seals both edges and gaps simultaneously, while EPDM material delivers exceptional resistance to tears, UV, and extreme temperatures (-40°F to 248°F). Its noise-reduction capability and universal 13-foot length set it apart from flat-profile alternatives.
Value for Money:
At a mid-range price, it offers superior longevity over cheaper PVC foams. Though lacking adhesive, the material’s flexibility and cut-to-size ease provide broad utility across projects, making it cost-effective versus buying specialized single-use seals.
Strengths and Weaknesses:
Strengths: Exceptional all-weather durability; effective sound dampening; adaptable E-profile; easy to customize length. Weaknesses: Requires separate adhesive/screws for secure fridge installation; initial stiffness may need warming for tight bends; not pre-cut for specific appliances.
Bottom Line:
Highly recommended for users needing a rugged, multipurpose seal. Its versatility and resilience justify the minor installation effort, especially for non-fridge applications or experienced DIYers.
3. TRIM-LOK Universal Vintage Refrigerator Door Replacement Seal Price Per Foot e (14 Feet)
Overview:
This 14-foot TRIM-LOK gasket serves as a universal replacement for vintage refrigerator door seals, directly substituting Frost King RG17 models. It focuses on reviving older units where worn seals cause frost buildup and energy waste.
What Makes It Stand Out:
Unlike adhesive-dependent kits, this relies on a precise universal fit into existing door grooves, avoiding glue complications. The high-quality rubber maintains flexibility in cold temps, and UniversalⓇ-branded instructions simplify installation for novice restorers.
Value for Money:
Competitively priced per foot, it matches similar TRIM-LOK kits but targets broader vintage compatibility. Savings come from no adhesive costs, though meticulous groove cleaning is essential. Cheaper generic rolls risk poor fit, making this a smarter long-term buy.
Strengths and Weaknesses:
Strengths: No adhesive needed (snaps into grooves); excellent cold-flexibility; clear UniversalⓇ instructions; ideal vintage sizing. Weaknesses: Requires immaculate groove prep; may not suit non-standard doors; slight learning curve for first-time installers.
Bottom Line:
The best option for vintage fridge repairs if your model matches RG17 dimensions. Skip the adhesive hassle and opt for this reliable, groove-fit solution.
4. Passeal - True 810803 Compatible Door Gasket for GDM-49/T-49

Overview:
Crafted specifically for True Commercial GDM-49/T-49 units, this Passeal gasket is a direct OEM-compatible replacement. Made in the USA, it addresses seal failure in commercial refrigeration where precision and durability are critical.
What Makes It Stand Out:
Tailored engineering ensures perfect fitment for True models, while “toolless” installation saves significant labor time. Custom perforations for hinges/handles and odor-free, long-lasting rubber distinguish it from generic commercial seals.
Value for Money:
Though premium-priced, it eliminates costly technician fees and downtime for businesses. Pre-punched holes and USA-made quality reduce installation errors versus DIY-modified alternatives, offering strong ROI for commercial users.
Strengths and Weaknesses:
Strengths: Perfect True model compatibility; effortless tool-free setup; pre-perforated for accuracy; odorless, durable rubber. Weaknesses: Only fits specific True units (not versatile); higher cost than universal kits; limited availability for non-commercial buyers.
Bottom Line:
Essential for True GDM-49/T-49 owners. The precision fit and DIY-friendly design make it indispensable for maintaining commercial refrigeration performance.
5. TRIM-LOK Old Refrigerator D Door Replacement Self Adhesive HT Seal Price Per Foot (17 Feet)

Overview:
This extended 17-foot TRIM-LOK seal features self-adhesive HT rubber for vintage refrigerator door restoration. It replaces Frost King RG17 gaskets, targeting larger or double-door vintage units needing extra coverage.
What Makes It Stand Out:
The 17-foot length accommodates wider or double-door models where standard 14-foot kits fall short. Combined with peel-and-stick installation and Cheyenne-specific guidance, it streamlines repairs for less common vintage configurations.
Value for Money:
Slightly higher per-foot cost is offset by eliminating waste for larger doors. Comparing to buying two 14-foot kits, this single roll saves money and ensures seamless continuity—crucial for preventing cold leaks in oversized appliances.
Strengths and Weaknesses:
Strengths: Ample length for double/oversized doors; clean adhesive application; robust HT material; vintage-focused instructions. Weaknesses: Excess material for single doors; adhesive requires spotless surface; not suitable for modern fridge grooves.
Bottom Line:
The go-to solution for larger vintage refrigerators. If your unit needs over 14 feet of seal, this kit delivers unmatched convenience and coverage.
6. TRIM-LOK Universal Refrigerator D Door Replacement 3M Self Adhesive Seal 25 Feet

Overview: This 25-foot universal gasket kit targets vintage refrigerator owners needing to replace worn door seals. It specifically replaces Frost King RG17 models and includes brand-specific installation instructions, catering to older units where original parts are obsolete.
What Makes It Stand Out: The integrated 3M self-adhesive backing is its key differentiator, eliminating messy glue applications and simplifying DIY installation significantly. Its universal design accommodates various vintage models, while the high-quality weather stripping material ensures durability against frequent door use and temperature fluctuations.
Value for Money: Priced competitively for a 25-foot roll, it offers substantial savings over sourcing rare OEM parts. Though slightly pricier than basic non-adhesive seals, the included adhesive justifies the cost by reducing installation time and potential errors, making it cost-effective for preserving antique appliances.
Strengths and Weaknesses: Strengths: Easy peel-and-stick application; versatile compatibility; robust weather stripping. Weaknesses: Adhesive may weaken over extreme time/temperature cycles; precise trimming required for perfect fit; not suitable for modern fridge models.
Bottom Line: An excellent, user-friendly solution for restoring vintage refrigerators, the adhesive feature makes it a top choice for DIYers seeking reliable, affordable restoration without professional help.
7. TRIM-LOK Universal Vintage Refrigerator Door Replacement Seal Price Per Foot e (25 Feet)

Overview: This 25-foot universal gasket kit serves as a direct replacement for vintage refrigerator door seals, notably Frost King RG17 models. It provides a comprehensive solution for aging units, complete with brand-specific fitting instructions to navigate obsolete designs.
What Makes It Stand Out: Marketed clearly “Price Per Foot,” it transparently positions itself as a bulk-material option ideal for extensive repairs or multiple projects. The high-quality weather stripping material ensures flexibility and resilience, critical for maintaining cold retention in older, less efficient units.
Value for Money: Offering material by the foot encourages economical purchasing for large jobs, though the total 25ft cost aligns with competitors. It delivers fair value for vintage restorers, but buyers must verify exact length needs—unused material may go to waste, slightly diminishing cost efficiency for single-door fixes.
Strengths and Weaknesses: Strengths: Cost-effective for large-scale repairs; universal vintage compatibility; durable construction. Weaknesses: No adhesive (requires separate sealant); precise measurement crucial to avoid waste; instructions may not cover ultra-rare models.
Bottom Line: A practical, economical choice for workshops or multi-unit restorations, but DIYers needing a single seal should confirm length requirements to avoid overbuying.
8. Vintage Refrigerator Door Replacement Seal e Shaped Door Seal gaskets for refrigerators(15feet)

Overview: This 15-foot silicone gasket kit addresses vintage refrigerator seal replacement, emphasizing material resilience. Designed for older units, it focuses on extreme cold tolerance, targeting users prioritizing longevity in demanding freezer environments.
What Makes It Stand Out: The high-quality silicone construction stands out, boasting exceptional low-temperature resistance down to -122°F—far exceeding standard rubber. This “e-shaped” profile ensures optimal compression sealing, while the flexible material maintains integrity through repeated door openings without cracking.
Value for Money: While silicone generally costs more than rubber, the extreme cold resilience justifies the premium for freezer-specific applications. The 15-foot length suits most single-door vintage units, but buyers must meticulously measure first, as oversizing isn’t feasible.
Strengths and Weaknesses: Strengths: Unmatched cold flexibility; durable silicone resists degradation; effective e-profile seal. Weaknesses: Shorter 15ft length may not fit all models; no adhesive included; “optimistic size” warning necessitates careful pre-purchase measurement.
Bottom Line: Ideal for freezer doors or harsh climates due to its silicone’s cold tolerance, but strict size verification is essential before purchase to ensure compatibility.
9. Dupont Rubber Saver Gasket Seal Trim Conditioner, 25ml

Overview: This 25ml applicator tube conditions and protects existing rubber seals on refrigerators, freezers, and automotive windows. It’s a maintenance product, not a replacement gasket, designed to extend the life of worn but functional seals.
What Makes It Stand Out: Dupont’s formula uniquely combines conditioning with anti-freeze properties, helping seals remain flexible in sub-zero temps to prevent sticking. The reusable rub-on applicator ensures precise, mess-free application on intricate gasket profiles, distinguishing it from spray alternatives.
Value for Money: Extremely cost-effective for preventative care—a single tube treats multiple appliances over time. It’s far cheaper than gasket replacement, though it won’t fix severely cracked or torn seals, positioning it as a smart supplement to physical repairs.
Strengths and Weaknesses: Strengths: Prevents seal freezing/sticking; easy targeted application; multi-use on trim/windows; affordable longevity boost. Weaknesses: Temporary solution only; ineffective on broken seals; not a substitute for physical replacement.
Bottom Line: A highly recommended maintenance essential for preserving existing seals and preventing winter-related issues, but not a fix for already-failed gaskets.
10. Joyfolk Refrigerator Freezer Door Gasket Seal Replacement, 21.06" x 34.25", Enhanced Magnetic Strip and High-Temp Welding, Compatible with W10164045, W10191103, W10443322, Wpw10714545

Overview: This precision-fit freezer gasket (21.06" x 34.25") replaces specific modern Whirlpool-compatible models (e.g., W10164045). Engineered with an enhanced magnetic strip and high-temp welding, it targets common issues like frost buildup and cold air leakage.
What Makes It Stand Out: The 815 GS magnetic strip delivers superior door adhesion versus standard gaskets, while the 1600°F high-temp welded seams ensure leak-proof durability. The formulated rubber maintains pliability in freezing temps, enabling quick resealing after door closure—critical for energy efficiency.
Value for Money: Competitively priced for a direct OEM alternative, its magnetic strength and welded construction justify the cost by potentially reducing long-term energy bills and eliminating frequent replacements common with weaker seals.
Strengths and Weaknesses: Strengths: Strong magnetic seal minimizes frost; welded seams prevent splits; cold-flexible rubber; exact OEM dimensions. Weaknesses: Limited to specific models; installation requires careful alignment; magnetic strength may degrade slowly over years.
Bottom Line: A top-tier replacement for compatible models, offering significant performance upgrades over basic gaskets—highly recommended for resolving temperature inconsistency and frost issues.
Understanding Refrigerator Gasket Trim: Beyond Basic Function
What Exactly is Gasket Trim?
Gasket trim refers to the visible outer edge or decorative covering applied to the standard refrigerator door seal (the gasket itself). While the primary gasket is the flexible rubber or silicone component creating the airtight seal against the cabinet frame, the trim is an aesthetic overlay. It’s designed to mask the functional gasket, offering a cleaner line and a finished look that aligns with your kitchen’s design scheme, whether that’s blending in or making a subtle statement.
Why Aesthetics Matter for This Small Component
The refrigerator is often the largest single appliance in the kitchen, commanding significant visual real estate. A mismatched or worn gasket draws the eye negatively, creating a sense of incompleteness or neglect. A well-chosen trim elevates the entire unit, making it appear more integrated, higher quality, and thoughtfully designed. It addresses the common issue where the stark black of a standard gasket clashes with lighter cabinetry, stainless steel appliances, or colorful kitchen themes, disrupting the visual flow you’ve worked so hard to achieve.
The Functional Foundation: Seal Integrity is Paramount
Before aesthetics, remember the core purpose: maintaining a perfect seal. Any trim solution must work with, not against, the gasket’s primary job of preventing cold air leakage and moisture ingress. Poorly designed or incorrectly installed trim can compromise the seal, leading to increased energy consumption, frost buildup, and spoiled food. Aesthetic appeal should never come at the expense of reliable functionality; the ideal trim enhances appearance while supporting the seal’s integrity.
Key Features to Evaluate When Choosing Trim
Material Composition and Durability
The material dictates longevity, ease of cleaning, and visual appeal. Common options include specialized flexible polymers, thermoplastic elastomers (TPE), and high-grade silicone composites. Look for materials resistant to UV fading (if near a window), extreme temperature fluctuations, and common kitchen cleaners. Durability against cracking, warping, or becoming brittle over time is non-negotiable for a component exposed to constant door movement and environmental shifts.
Color Matching and Finish Options
Achieving a true color match is critical. Options range from precise manufacturer-matched hues for specific appliance finishes (stainless, black stainless, white, custom colors) to neutral tones designed to blend with common cabinetry. Consider the finish: matte, satin, or gloss? A matte finish often hides minor imperfections better and blends more subtly, while gloss can add a touch of highlight. Swatch samples are essential, as screen colors can be misleading; view them in your actual kitchen lighting.
Flexibility and Conformity to Contours
Refrigerator doors aren’t perfectly flat; they have subtle curves and contours, especially around the corners. The trim material must possess excellent flexibility to bend smoothly around 90-degree corners without kinking, creasing, or pulling away from the gasket. Poor conformity creates gaps that look unprofessional and can trap dirt or even interfere with the seal. Test the flexibility of samples – it should feel supple but resilient, snapping back without permanent deformation.
Adhesion Method and Reliability
How the trim attaches is crucial for both installation and longevity. Options include pressure-sensitive adhesives (PSA), mechanical clips, or integrated channels that snap over the existing gasket profile. PSA must be extremely strong, resistant to cold, moisture, and plasticizer migration from the gasket itself, which can cause adhesives to fail over time. Clip systems offer mechanical security but require precise fitting. Evaluate the adhesive strength claims and look for solutions designed specifically for the challenging refrigerator environment.
Ease of Installation and DIY Friendliness
Installing trim requires patience and precision. Consider the learning curve. Some systems involve meticulous cleaning, priming, slow application to avoid bubbles, and careful corner mitering. Others might use pre-cut sections or simpler clip mechanisms. Assess your comfort level with detailed handwork. Good instructions, alignment tools (like applicator cards), and forgiving adhesives significantly impact success. Factor in the time commitment – rushing leads to poor results.
Material Deep Dive: Pros and Cons
Polymer-Based Trim Solutions
These are often cost-effective and come in a wide color range. High-quality polymers offer decent durability and flexibility. However, lower-grade versions can become brittle in cold temperatures or fade significantly over time, especially lighter colors. They may also be more susceptible to staining from oils or cleaners. Ensure any polymer trim specifies refrigerator-grade cold flexibility and UV resistance if applicable.
Thermoplastic Elastomer (TPE) Options
TPE blends rubber-like properties with plastic processability. It generally offers superior flexibility across a wide temperature range compared to basic polymers, excellent resistance to cracking, and good adhesion characteristics. TPE trims often feel more substantial and durable. They tend to have better long-term color retention and are usually easier to clean. This is often considered a premium material choice for balance of performance and aesthetics.
Silicone Composite Trims
Silicone is renowned for extreme temperature resistance, flexibility, and longevity. Silicone-based trims are highly resistant to UV fading, won’t become brittle in the cold, and are generally very easy to clean. They often have a slightly softer, more luxurious feel. However, they can sometimes be more expensive, and achieving a perfectly rigid “crisp” edge might be slightly harder than with stiffer polymers. Adhesion can also be trickier with pure silicone, so composites are common.
Avoiding Substandard Materials
Be wary of extremely cheap trims, especially thin vinyl or basic rubber. These often lack the necessary cold flexibility, leading to cracking within months. They frequently have poor color matching, fade quickly, and their adhesives fail prematurely due to the cold and moisture. Investing in a reputable, appliance-specific trim material pays off significantly in longevity and maintaining your kitchen’s polished look.
Installation Considerations for a Flawless Result
Critical Surface Preparation Steps
Success hinges on preparation. The existing gasket surface must be impeccably clean, dry, and free of any grease, wax, or old adhesive residue. Use isopropyl alcohol (70%+) and lint-free cloths; avoid household cleaners that leave oily films. Any contamination will cause adhesive failure. Allow ample drying time after cleaning before applying the trim. Skipping or rushing this step is the most common cause of peeling edges.
Mastering Corner Techniques
Corners are the Achilles’ heel of trim installation. Simply bending the material often causes unsightly gaps or puckering. The best approach usually involves precise miter cuts (typically 45-degree angles) at each corner, creating a tight, seamless joint. This requires sharp tools and steady hands. Some trim systems include corner pieces or specific folding techniques. Practice cuts on scrap material first; perfect corners make the biggest visual difference in the final professional appearance.
Managing Tension and Avoiding Bubbles
Applying consistent, moderate tension as you install the trim is vital. Too loose, and it sags or wrinkles; too tight, and it stretches, loses adhesion, or distorts the underlying gasket seal. Work slowly from the center of each side outward towards the corners. Use a plastic applicator tool (often included) to firmly press the trim onto the gasket, starting from the center and smoothing outwards to eliminate air bubbles trapped under the adhesive. Patience here prevents visible flaws.
Post-Installation Care and Setting Time
Don’t rush to use the fridge normally. Most adhesives require a significant curing time (often 24-72 hours) at room temperature to reach full bond strength before the door is opened and closed repeatedly. Avoid stressing the newly applied trim during this period. Gently clean any smudges immediately with alcohol on a cloth, but avoid harsh scrubbing. Understanding and respecting the adhesive’s cure cycle is essential for long-term adhesion.
Long-Term Performance and Maintenance
Expected Lifespan Under Normal Conditions
High-quality trim, correctly installed on a well-maintained gasket, should last 5-10 years or more. Factors impacting lifespan include the material quality, UV exposure (if near a window), frequency of door use, exposure to harsh cleaners, and the initial installation precision. Premium TPE or silicone composites generally outlast basic polymers. Watch for early signs of failure like edge lifting, discoloration, or cracking, especially in corners.
Cleaning Without Compromising the Finish
Maintain the trim’s appearance with gentle care. Use a soft cloth dampened with mild soapy water or diluted isopropyl alcohol. Avoid abrasive cleaners, scouring pads, bleach-based solutions, or harsh degreasers, as these can scratch the surface, degrade the material, or strip color. Wipe dry immediately. Regular gentle cleaning prevents grime buildup that can be harder to remove later and potentially stain the trim.
Identifying and Addressing Potential Seal Issues
The trim should not mask underlying gasket problems. Regularly inspect the entire seal, including under the trim edges where possible, for cracks, tears, or loss of flexibility in the primary gasket. If you notice increased frost, condensation inside the fridge, or the door doesn’t seal tightly (test with a dollar bill), the primary gasket may be failing, regardless of the trim’s appearance. Address primary seal issues promptly; trim won’t fix a broken gasket.
Integrating Trim into Your Overall Kitchen Design
Harmonizing with Appliance Finishes
The trim should complement, not compete with, your refrigerator’s main finish. For stainless steel, consider subtle brushed metallic trims or precise color matches to the frame. For panel-ready fridges, the trim should match or complement the cabinet panel material. White or black appliances often benefit from trims that match the exact shade of the cabinet or a slightly contrasting neutral for definition. Avoid trims that are noticeably lighter or darker than adjacent surfaces.
Creating Cohesion with Countertops and Cabinetry
Look beyond the fridge itself. Does the trim color echo your countertop edge, cabinet hardware, or backsplash tile? A trim that subtly picks up a secondary color in your space creates sophisticated cohesion. For example, a warm gray trim might tie into concrete countertops, or a cool taupe might complement oak cabinets. This level of detail is what transforms a kitchen from merely functional to thoughtfully designed.
When to Blend and When to Accent
Decide on the desired effect: seamless integration or a deliberate accent. Blending (e.g., matching cabinetry color) creates a minimalist, built-in look, making the refrigerator recede visually. A strategic accent (e.g., a thin brass-finish trim on a white fridge) can add a touch of luxury or highlight the appliance as a design feature. Consider your overall kitchen style – modern often favors blending, while traditional or eclectic might embrace subtle accents. Less is usually more with accents.
Cost vs. Value Analysis
Understanding the Price Spectrum
Prices vary significantly based on material (silicone composites > TPE > basic polymers), brand reputation, and complexity (pre-cut vs. roll). Don’t equate low price with value; cheap trim failing in a year costs more than quality trim lasting a decade. Factor in potential replacement costs and the labor of reinstallation. View it as a long-term investment in your kitchen’s appearance and perceived quality.
Evaluating True Long-Term Value
Calculate value beyond the sticker price. Consider: lifespan, ease of installation (saving potential professional fees), durability against fading/cracking, and the intangible value of a consistently polished kitchen appearance. High-quality trim that lasts 8+ years and maintains its look provides excellent value. Factor in the cost of potential energy waste if poor trim installation somehow compromised the seal (though rare with proper products).
Frequently Asked Questions
Frequently Asked Questions
Is refrigerator gasket trim purely cosmetic, or does it affect performance?
While primarily aesthetic, the right trim enhances appearance without harming the seal. Crucially, poor-quality or incorrectly installed trim can potentially cause gaps or stress the primary gasket, leading to air leaks. Always prioritize solutions designed not to interfere with the seal’s function.
Can I install trim over an old, worn-out gasket?
It’s strongly discouraged. Trim requires a clean, smooth, and intact gasket surface for proper adhesion and to maintain the seal. Installing over a cracked, brittle, or misshapen gasket will likely lead to poor adhesion, an uneven appearance, and won’t fix underlying seal problems. Replace the primary gasket first if it’s damaged.
How difficult is DIY installation for someone without experience?
It requires patience, attention to detail, and steady hands, but is achievable for careful DIYers. Corner work and surface prep are the biggest challenges. Thoroughly read instructions, watch installation videos, practice corner cuts, and clean meticulously. Rushing guarantees poor results. Allow ample time.
Will the trim yellow or fade over time, especially in sunlight?
High-quality trims specifically formulated for refrigerators include UV inhibitors to resist fading and yellowing. Cheaper materials, especially white or light colors, are prone to this. Look for explicit UV resistance claims. Avoid placing trim in direct, intense sunlight if possible, even with good UV protection.
Can I paint my existing black gasket instead of using trim?
Painting the gasket itself is generally not recommended. Standard paints won’t adhere well to the flexible rubber, will crack and peel quickly with door movement and temperature changes, and could potentially off-gas odors into the fridge. Purpose-made trim is the reliable solution for color change.
How do I know if a trim product is compatible with my specific refrigerator model?
Check the manufacturer’s compatibility list. Trim must match the profile (shape and size) of your fridge’s existing gasket. Measure your gasket’s visible width and profile if possible. Reputable sellers provide detailed sizing guides and model-specific fit information – don’t guess.
Does colored trim make it harder to notice mold or mildew?
Not necessarily. Lighter colors might show dirt more readily, but any discoloration (often gray/black) is usually visible against most trim colors. The key is regular cleaning and ensuring the primary seal is intact to prevent moisture intrusion where mold grows. Good trim materials are also non-porous and easy to clean.
Will adding trim make the refrigerator door harder to close?
Properly designed and installed trim adds negligible thickness and shouldn’t impact the door closing effort. If the trim is too thick, poorly applied causing bunching, or installed over a damaged gasket, it could create resistance. Quality trim is very thin and flexible to avoid this issue.
Can I remove the trim later without damaging the original gasket?
Removal can be tricky. High-bond adhesives are designed to last. Use dental floss or thin fishing line to gently saw through the adhesive layer. Apply heat (low setting hairdryer) to soften the adhesive. Go slowly to avoid tearing the underlying gasket. Some residual adhesive might remain, requiring careful removal with adhesive remover and alcohol.
Is professional installation worth the cost?
If you lack patience for detail work, have complex corners, or value absolute perfection, professional installation (often offered by appliance specialists or high-end kitchen designers) can be worthwhile. For standard installations, a careful DIYer can achieve excellent results, saving significant cost. Factor in the value of your time and frustration tolerance.