Ever opened your refrigerator to find wilted greens and a suspiciously warm beverage, only to realize the door isn’t sealing properly? That frustrating moment isn’t just inconvenient—it’s a silent energy thief and a potential food safety hazard. A compromised door seal allows cold air to escape, forcing your compressor to work overtime, spiking your electricity bill and shortening the lifespan of your appliance. The good news? Fixing this common issue is often simpler and far more affordable than calling a technician, putting effective DIY repair firmly within reach for most homeowners. Recognizing the subtle signs of seal failure is the crucial first step toward restoring your fridge’s efficiency and peace of mind.
Refrigerator door gaskets, those flexible rubber strips lining the door perimeter, are unsung heroes of kitchen efficiency. They create the airtight barrier essential for maintaining consistent internal temperatures and humidity levels. Over time, exposure to heat, cold, food residues, and simple wear and tear can cause these seals to crack, warp, lose their magnetic grip, or become detached from the door frame. Ignoring these issues leads to more than just spoiled milk; it creates an environment ripe for mold growth inside the seal channels and significantly increases your household’s carbon footprint through wasted energy. Understanding how to assess, choose, and install the right replacement seal kit empowers you to tackle this repair confidently, saving money and ensuring your appliance operates at its peak potential for years to come.
Top 10 Refrigerator Seal Kits
Detailed Product Reviews
1. Supco SU2004 Refrigerator Door Gasket Kit, Includes Magnetic Insert Strip - Designed To Fit Most Brands - 36 x 84 Inches

Overview: The Supco SU2004 is a universal refrigerator door gasket kit designed for DIYers and technicians needing a reliable seal replacement. Crafted from refrigeration-grade virgin vinyl, it targets leaks caused by worn or damaged gaskets across numerous refrigerator brands.
What Makes It Stand Out: Its standout feature is the factory-welded corners on four L-shaped sections, ensuring structural integrity without weak seams. The included magnetic insert strip enhances sealing performance, while the cut-to-fit design (max 36"x84") accommodates various door sizes within standard clearance ranges (5/8"-3/4").
Value for Money: Priced competitively, it offers significant savings over OEM parts while matching durability. The universal fit eliminates the need for model-specific ordering, making it cost-effective for multi-brand repairs or emergency fixes.
Strengths and Weaknesses: Strengths: Premium virgin vinyl resists cracking; easy customization; trusted by professionals. Weaknesses: Requires precise cutting for optimal fit; universal sizing may not match all profiles perfectly without adjustment.
Bottom Line: An excellent, versatile solution for common gasket failures. Ideal for budget-conscious users seeking professional-grade results, though meticulous sizing is essential for seamless installation.
2. 2 Pack-W10830162 Refrigerator Door Gasket Replacement for Whirlpool, Kenmore, Kitchen-Aid Refrigerator Door Seal, 39.7"x16.9" Fridge Door Gasket Seal fit Model WRF535SMBM00, KBFS20EVMS13, IX6HHEXDSM00

Overview: This 2-pack W10830162 gasket replaces specific Whirlpool, Kenmore, and KitchenAid models (e.g., WRF535SMBM00), targeting leaks, frost buildup, and poor seals. Made from upgraded EPDM rubber, it promises OEM-equivalent performance with enhanced features.
What Makes It Stand Out: The thickened 815GS magnetic strip delivers superior suction and sealing versus OEM parts. Precision welding at 1,600°F ensures cold resistance and elasticity, while the 2-pack offers value for double-door units. Compatibility checks (size/model verification) prevent common ordering errors.
Value for Money: The dual-pack price undercuts buying two OEM gaskets separately. Its durability upgrades justify the cost by extending refrigerator efficiency and reducing long-term energy waste from poor seals.
Strengths and Weaknesses: Strengths: Exceptional magnetic seal; solves condensation/ice issues; easy warm-water installation. Weaknesses: Critical reliance on exact model/size match; left/right door variations require separate part checks.
Bottom Line: Highly recommended for compatible models—delivers robust sealing and freshness retention. Prioritize precise size verification to avoid fitment issues, but expect reliable, long-lasting performance once installed.
3. motoparty RV Accessories for Inside RM2652 DM2652 RM2663 Refrigerator Gasket Kits 3108704.374

Overview: This gasket kit (part #3108704.374) restores seal integrity for Dometic RM2652, DM2652, and DM2663 RV refrigerators. It addresses critical issues like energy loss and food spoilage in mobile units, where compromised seals directly impact efficiency and safety.
What Makes It Stand Out: Tailored specifically for listed models, it eliminates guesswork. The kit includes both main and freezer door gaskets for double-door setups, plus instructions—a rarity in RV parts. Focus on energy conservation aligns perfectly with off-grid RV needs.
Value for Money: A cost-effective alternative to OEM, especially given RV refrigerators’ sensitivity to seal failures. Preventing compressor strain extends appliance life, saving potential repair costs far exceeding the kit’s price.
Strengths and Weaknesses: Strengths: Model-specific accuracy; comprehensive double-door coverage; promotes food safety/energy savings. Weaknesses: Zero flexibility for other models; no material durability details provided.
Bottom Line: Essential maintenance for RV owners with compatible units. Its precision fit ensures reliable performance, making it a worthwhile investment to maintain cooling efficiency and prevent costly RV refrigeration failures.
4. Topteng RV Refrigerator Door Gasket Kit 3108704382 for Dometic RM2852, RM3862, RM2862, RM4872 – Replacement Gaskets for Improved Seal and Efficiency

Overview: Targeting Dometic RM2852/RM3862 series, this Topteng kit replaces worn RV refrigerator gaskets to restore cold retention. Engineered for exact model compatibility, it addresses efficiency loss common in aging RV cooling systems.
What Makes It Stand Out: Built to original factory specs using high-quality materials, it claims to exceed OE standards in durability. The emphasis on seamless integration (“form, fit, function”) ensures no retrofitting, while the focus on energy efficiency resonates with power-conscious travelers.
Value for Money: Positioned as premium aftermarket, it balances cost against OEM pricing. The longevity promise—reducing frequent replacements—justifies a moderate premium for RV owners prioritizing reliability during trips.
Strengths and Weaknesses: Strengths: Guaranteed model fit; robust construction; improves cooling consistency. Weaknesses: Requires exact model/year confirmation; lacks specifics on magnetic strength or rubber grade.
Bottom Line: A dependable, hassle-free upgrade for specified Dometic models. Choose this for assured compatibility and efficient sealing—critical for maintaining safe food temperatures during extended RV use.
5. LXun Upgraded 41.6"x28.5" 242193206 Refrigerator Door Gasket Replacement for Kenmore Crosley Frigidaire Refrigerator Door Seal Replacement Fridge Door Gasket FFTR1828SP3A FFTR1828SE0 CRT185SS1 black

Overview: The LXun 242193206 gasket (41.6"x28.5") replaces freezer door seals on Kenmore, Frigidaire, and Crosley models (e.g., FFTR1828SP3A). Its black finish and upgraded materials target leaks, frost buildup, and energy inefficiency in top-mount refrigerators.
What Makes It Stand Out: An 815GS thickened magnetic strip ensures aggressive door adhesion, while premium EPDM rubber resists wear and temperature extremes. Broad compatibility covers multiple brands/part numbers, and the included step-by-step heating instructions simplify installation.
Value for Money: Competitive pricing for a 24/7 support-backed product. The magnetic upgrade directly tackles common seal failures, potentially lowering energy bills faster than cheaper alternatives.
Strengths and Weaknesses: Strengths: Strong magnetic hold; color-matched aesthetics; detailed install guidance. Weaknesses: Requires careful sizing/model checks; heating steps add complexity for beginners.
Bottom Line: A top-tier choice for compatible units, combining durability with effective sealing. Prioritize size verification, but expect excellent cold retention and longevity that justifies its value-focused price.
6. Frezon RV Refrigerator Gasket Kits 3108704382 Fit for Dometic RM2852 RM3862 RM3863 DM2862 RM4872 RM4873 RM2862 DM2852
Overview: This Frezon kit replaces worn door gaskets on Dometic RV refrigerators (models RM2852, RM3862, etc.), addressing cold air leaks and internal icing. Made from durable rubber, it targets common issues like food spoilage and water leakage in compact RV cooling units.
What Makes It Stand Out: Precise OEM-equivalent sizing (56.5cm x 41.5cm/99.5cm) ensures a seamless fit for specific Dometic models. The inclusion of detailed installation steps—using a hair dryer to smooth creases and tape for overnight setting—simplifies DIY repairs uncommon in generic kits.
Value for Money: Priced competitively against OEM parts, it offers significant savings while preventing costly technician visits. The durable rubber construction justifies the cost by extending appliance life, though RV-specific compatibility limits broader use.
Strengths and Weaknesses: Strengths: Exact model fit; clear installation guidance; effective at eliminating leaks/frost. Weaknesses: Requires manual skill (hair dryer/tape steps); only suits listed Dometic units; no magnetic strip for enhanced sealing.
Bottom Line: An essential, affordable fix for Dometic RV fridge owners battling inefficiency. Its targeted design and practical instructions make it a worthwhile investment for maintaining cooling performance on the road.
7. Upgraded 5304507200 Refrigerator Door Gasket Compatible with Frigidaire Ken-more Freezer Door Gasket Seal, 30.7" X 60.2" Elec-trolux Freezer Gasket Seal Replacement 216522309, 216522310, 5304507214

Overview: This upgraded EPDM rubber gasket replaces worn freezer seals for Frigidaire, Kenmore, and Electrolux models (part numbers 5304507200, 216522309, etc.), solving leaks, frost buildup, and temperature fluctuations in home freezers.
What Makes It Stand Out: Features thick magnetic strips for superior suction and high-elasticity EPDM rubber (welded at 1,600°F), outperforming OEM seals in durability and cold resistance. It actively prevents food oxidation and condensation by maintaining a consistent low-temperature environment.
Value for Money: Slightly pricier than basic gaskets but delivers long-term savings through energy efficiency and reduced compressor strain. Its broad compatibility (10+ part numbers) and effectiveness against common failure points justify the cost versus cheaper, short-lived alternatives.
Strengths and Weaknesses: Strengths: Exceptional sealing via magnetic strips; handles extreme cold without cracking; solves mold/leak issues. Weaknesses: Installation requires precise alignment; magnetic feature may complicate retrofitting on older units; no included tools.
Bottom Line: A top-tier upgrade for Frigidaire/Kenmore freezer owners seeking reliable, energy-efficient performance. The premium materials and sealing prowess make it a smart buy for extending appliance lifespan.
8. R134A Refrigerator Freon Recharge Hose Kit, R134A AC Refrigerant Charging Hose Gauge, Bullet Piercing Valve Hose Refrigerant Can Tap, R134a Self-Sealing Adapter for Home AC Refrigerant System
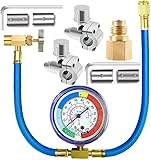
Overview: This kit enables homeowners to recharge R134A/R12/R22 refrigerant in home AC units using a piercing valve, gauge, and self-sealing adapter. It targets minor refrigerant top-ups for window/portable units without professional tools.
What Makes It Stand Out: Dual compatibility with piercing cans and self-sealing cans via the included R134a adapter offers unmatched versatility. The corrosion-resistant metal construction and anti-leak design prioritize safety, while the Fahrenheit gauge provides clear pressure readings for common home systems.
Value for Money: Affordable for DIY enthusiasts tackling small leaks, but caution is advised—improper use risks compressor damage. Better suited as a temporary fix than a professional solution, yet it’s cost-effective for occasional home use versus service calls.
Strengths and Weaknesses: Strengths: Adapts to multiple can types; robust build quality; straightforward for simple recharges. Weaknesses: Risk of overcharging/freezing coils; not for complex repairs; gauge lacks metric units.
Bottom Line: A functional, budget-friendly option for minor home AC top-ups, but inexperienced users should proceed cautiously. Ideal for emergencies, not as a long-term repair tool.
9. Lichamp A/C R134A Refrigerator Freon Recharge Kit with Bullet Piercing Valve, Piercing and Self-Sealing Can Tap 134A

Overview: Designed for automotive A/C systems, this comprehensive kit recharges R134A/R12/R22 refrigerant using dual can taps (piercing and self-sealing), a high-pressure gauge, and adaptable hose connections for car AC maintenance.
What Makes It Stand Out: Includes two specialized can taps—ensuring universal compatibility with all automotive can valves—and a 5ft hose with 3,000 psi burst resistance. The large Celsius gauge (250 psi blue scale) enhances readability, while L-key bullet valves simplify pipe connections across 1/4", 5/16", and 3/8" diameters.
Value for Money: Priced higher than basic kits but justified by its automotive-grade durability and complete toolset. Eliminates the need for multiple purchases, offering professional results for DIY mechanics at a fraction of shop costs.
Strengths and Weaknesses: Strengths: Dual can taps prevent leaks; handles high pressure safely; versatile for most vehicles. Weaknesses: Overkill for home AC; complex for beginners; hose length may limit tight-engine access.
Bottom Line: The premier choice for automotive DIYers needing reliable, precise refrigerant top-ups. Its robust design and comprehensive features deliver exceptional value for car-specific applications.
10. Vintage Refrigerator Door Replacement Seal Price Per Foot (12 Foot) Black
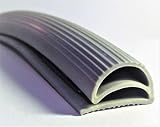
Overview: This 12-foot black weather-stripping gasket replaces worn seals on vintage refrigerators, specifically engineered as a substitute for Frost King RG17 models. Sold by the foot, it targets restoration of older, discontinued units.
What Makes It Stand Out: Rare focus on vintage appliances—unlike modern kits—ensures compatibility with obsolete designs. High-quality rubber resists cracking while the per-foot pricing allows custom sizing for unique door dimensions, a necessity for pre-1980s fridges.
Value for Money: Cost-effective for niche restorations (versus hunting OEM parts), but requires precise measurement to avoid waste. At ~$1/foot, it’s economical for one-off repairs, though shipping may offset savings for small quantities.
Strengths and Weaknesses: Strengths: Fills a critical vintage-parts gap; durable material; adaptable length. Weaknesses: No pre-cut sizing; installation demands precision; limited to specific retro models.
Bottom Line: An indispensable resource for vintage appliance restorers. Purchase only after confirming dimensions, as its specialized nature makes it ideal for preserving classic refrigerators.
Understanding Refrigerator Door Seals and Their Critical Role
The Science Behind an Effective Seal
A refrigerator door seal isn’t just a piece of rubber; it’s a precisely engineered component working in tandem with the door’s magnetic strip (if present) and the cabinet frame. Its primary function is to create a continuous, airtight barrier when the door closes. This barrier prevents warm, moist kitchen air from infiltrating the cold interior. When warm air meets the cold evaporator coils, it condenses, leading to excessive frost buildup in the freezer and humidity fluctuations in the fridge compartment. An effective seal minimizes this exchange, ensuring the compressor cycles efficiently and maintains optimal food preservation conditions.
Common Signs of Seal Failure You Can’t Ignore
Recognizing a failing seal early prevents bigger problems. Key indicators include visible cracks, tears, or brittleness in the rubber, especially at the corners. If the seal feels hard and doesn’t flex easily, it’s likely lost its pliability. A simple “dollar bill test” is highly effective: close the door on a crisp bill at various points around the seal. If you can pull the bill out with minimal resistance, that section isn’t sealing properly. Other telltale signs are condensation forming inside the fridge cabinet near the door, excessive frost in the freezer compartment despite regular defrosting, noticeably higher energy bills, or the door failing to stay closed on its own on a level floor.
Why DIY Repair Makes Sense Economically and Practically
Replacing a worn-out door gasket is one of the most cost-effective and impactful DIY appliance repairs you can undertake. Professional service calls often start at rates that can exceed the cost of a quality seal kit, especially when labor charges apply. Given that a single faulty seal can increase energy consumption by 5-15%, the savings from a successful DIY fix compound quickly on your monthly utility bill. Furthermore, the process, while requiring patience and attention to detail, is generally straightforward with the right tools and knowledge, avoiding the scheduling hassles and potential wait times associated with technician visits.
Key Features to Evaluate in a Quality Seal Kit
Material Composition and Durability Factors
The rubber compound used in the seal is paramount. Look for kits specifying high-quality, flexible EPDM (Ethylene Propylene Diene Monomer) rubber. EPDM is renowned for its exceptional resistance to extreme temperatures (both hot and cold), ozone degradation, and UV exposure—critical for longevity in a demanding environment. Inferior materials like basic PVC can harden, crack, and lose elasticity much faster, leading to premature failure. A good seal should feel supple yet resilient to the touch, not stiff or overly soft and tacky.
Magnetic Strip Integration and Strength
Most modern refrigerator doors rely on a magnetic strip embedded within the seal to create the final, tight closure against the metal cabinet frame. When evaluating kits, ensure the magnetic strip is robust and properly integrated along the entire length of the gasket. Weak or inconsistent magnetism results in poor sealing, particularly in the middle sections of the door. Check product descriptions for mentions of “strong magnetic closure” or similar phrasing, as this is non-negotiable for an effective repair on magnetic-seal models.
Adhesive Quality and Attachment Method
How the new seal attaches to your door is crucial for a lasting fix. Quality kits use a high-strength, temperature-resistant adhesive applied along the seal’s mounting flange. This adhesive must bond securely to the often slightly oily or dusty surface of the original door channel. Some kits might include a primer to enhance adhesion. Avoid kits that rely solely on friction or weak tape; proper adhesion prevents the common issue of the seal peeling away from the door over time, especially near the hinges where stress is highest.
The Crucial Importance of Precise Sizing and Fit
Measuring Your Existing Seal Accurately
Guessing the size is a recipe for failure. Before purchasing any kit, meticulously measure your current seal. Focus on the part that inserts into the door channel—the “mounting flange” width and depth. Measure the overall length of the seal by carefully removing a small section (if possible without damage) and measuring it stretched gently, or measure the perimeter of the door opening where the seal sits. Note the exact location of any seams (usually at the top center or bottom center). Manufacturer model numbers are vital, but direct physical measurements are the ultimate verification due to variations even within model lines.
Decoding Model Numbers and Compatibility Charts
Your refrigerator’s specific model number (typically found on a sticker inside the fridge compartment, on the ceiling, or along the door frame) is the key to finding the correct seal. Reputable kit manufacturers provide detailed compatibility charts on their websites or packaging. Cross-reference your model number exactly—including any suffixes like “A,” “B,” or “XX.” Don’t assume seals are interchangeable between similar-looking models or even different production years of the same model. When in doubt, contact the kit supplier’s customer support with your model number before purchasing.
Understanding Universal Kits vs. Model-Specific Designs
While “universal” seal kits exist, they often require significant trimming and adjustment, increasing the risk of a poor fit and frustrating installation. Model-specific kits, designed precisely for your refrigerator’s door contour, hinge placement, and channel dimensions, offer a vastly superior experience and result. They minimize guesswork, reduce cutting, and ensure the magnetic strip aligns perfectly with the cabinet frame. Investing in a model-specific kit, even if slightly more expensive, saves considerable time and effort and significantly increases the likelihood of a perfect, long-lasting seal.
Mastering the Installation Process for Long-Lasting Results
Essential Tools and Prep Work Before You Begin
Gather everything beforehand: your new seal kit, a hairdryer or heat gun (low setting), plastic putty knives or flat-head screwdrivers (wrap tips in tape to avoid scratching), rubbing alcohol and lint-free cloths, paper towels, and optionally, a small amount of appliance-safe silicone lubricant. Unplug the refrigerator for safety. Thoroughly clean the old seal channel on the door with rubbing alcohol to remove all dirt, grease, and old adhesive residue—this step is critical for the new seal’s adhesive to bond properly. Remove the old seal completely, noting how it was routed, especially around corners and hinges.
Step-by-Step Removal of the Old Gasket
Start at the top center seam if accessible. Gently pry the mounting flange out of the channel using the plastic tool, working slowly around the door. Be extra careful near the hinges and handles, where seals often have special clips or thicker sections. If the old seal is brittle, it may break into pieces; carefully remove all remnants from the channel. Never use metal tools directly on the channel, as scratches can prevent a good seal. Document the removal process with photos if helpful for reinstallation.
Techniques for Smooth Insertion and Securing the New Seal
Begin installing the new seal at the top center or the point indicated in the instructions. Warm the seal slightly with the hairdryer (about 1-2 feet away) to make the rubber more pliable—this is essential for navigating tight corners without kinking. Press the mounting flange firmly into the clean channel, starting at one point and working equidistantly towards both ends. Pay meticulous attention to corners; warm the seal well here and use the plastic tool to tuck it neatly without folding or creasing. Ensure the magnetic strip faces the cabinet frame. Work slowly and deliberately; rushing leads to misalignment. Allow the adhesive to cure fully (usually 24 hours) before closing the door tightly or plugging the fridge back in.
Maximizing Seal Longevity Through Proper Care
Routine Cleaning Practices to Prevent Premature Wear
Dirt, grease, and food splatter accelerate seal degradation. Wipe down the entire seal surface, including the inner channel where it meets the door, weekly with a solution of mild dish soap and warm water on a soft cloth. Rinse thoroughly with a damp cloth and dry completely. Avoid harsh chemicals, abrasive cleaners, or degreasers, as these strip the rubber’s natural oils and cause cracking. Pay special attention to the corners where grime accumulates.
Avoiding Common Mistakes That Damage Seals
Several everyday habits unknowingly harm seals. Never force the door closed if items are blocking it, as this puts immense stress on the seal corners. Avoid slamming the door. Don’t store open containers of oily or greasy foods directly against the seal. When cleaning the interior, be mindful not to snag the seal with sharp utensils or packaging. Most importantly, never apply oils, petroleum jelly, or commercial “seal conditioners” to the rubber; these often contain solvents that break down the material faster than natural aging.
When Minor Adjustments Can Save a Seal
Sometimes a slightly warped seal isn’t due to material failure but misalignment. If a section isn’t sealing but the rubber looks good, try gently warming it with a hairdryer and then carefully reshaping it while warm, holding it in place against the cabinet frame until cool. Ensure the refrigerator is perfectly level (use a bubble level on the top shelf); an unlevel fridge puts uneven pressure on the door, causing one side to seal poorly. Adjusting the leveling legs can sometimes miraculously fix a “leaky” door without needing a new seal.
Troubleshooting Post-Installation Issues
Diagnosing Persistent Air Leaks After Replacement
If cold air still escapes after a new seal install, don’t panic. First, double-check the refrigerator is level both front-to-back and side-to-side. Ensure the door closes squarely. Re-run the dollar bill test meticulously around the entire perimeter. Common culprits include an incompletely cleaned channel (preventing full adhesion), a section of seal not fully seated in the channel (especially corners), or the magnetic strip not aligning with the cabinet steel due to a slight twist in the door. Gently warm and re-seat problem areas.
Addressing Warping or Twisting in the New Seal
New seals can sometimes have a slight “memory” from packaging. If a section appears twisted or kinked after installation, use the hairdryer on a low setting to warm that specific area. While warm, carefully manipulate the seal into the correct position, ensuring the outer edge lies flat against the cabinet frame. Hold it in place for a minute or two as it cools. Avoid excessive heat, which can melt or distort the rubber permanently. Patience is key; this might require a couple of gentle attempts.
Ensuring Proper Door Closure and Alignment
The door itself must be aligned correctly for the seal to function. Check that the hinges are tight and not stripped. If the door sags (common on older units), tightening hinge screws or replacing worn hinge pins might be necessary. The door should close smoothly and meet the cabinet squarely without rubbing. If the door is out of alignment, even a perfect new seal won’t create a consistent seal. Consult your fridge’s manual for hinge adjustment procedures if needed.
Investing in Energy Efficiency and Food Safety
How a Perfect Seal Lowers Your Utility Bills
A refrigerator with a compromised seal can consume significantly more electricity as the compressor runs constantly trying to maintain temperature. Restoring an airtight seal directly reduces this energy drain. Studies show that fixing a major seal leak can lower a fridge’s energy consumption by double-digit percentages. Over the course of a year, this translates to tangible savings on your electricity bill, making the relatively low cost of a seal kit a highly efficient investment with a quick payback period.
Preventing Food Waste Through Consistent Temperatures
Fluctuating temperatures caused by air leaks are a primary cause of premature food spoilage. Perishables like dairy, meats, and leafy greens deteriorate much faster when exposed to warmer, more humid air infiltrating through a bad seal. A properly functioning gasket maintains the stable, cold environment necessary for food safety and longevity, reducing the frequency of tossing spoiled groceries and saving you money at the store. Consistent temperatures also prevent freezer burn in the freezer compartment.
Reducing Environmental Impact of Your Appliance
Every kilowatt-hour of electricity saved by ensuring your refrigerator operates efficiently reduces the demand on power plants, lowering associated greenhouse gas emissions. Given that refrigerators are typically the second-largest energy consumers in a home (after heating/cooling systems), optimizing their performance through simple maintenance like seal replacement is a direct and impactful way for homeowners to reduce their household carbon footprint. A well-sealed fridge runs less often and for shorter durations, contributing positively to environmental sustainability.
Frequently Asked Questions
How much does a typical refrigerator seal kit cost?
Quality model-specific seal kits generally range from $30 to $80, depending on the refrigerator size and brand. While universal kits might seem cheaper initially, the potential for poor fit and rework often makes model-specific kits the more economical choice long-term.
Is replacing a refrigerator seal difficult for a beginner?
It’s a moderate DIY project requiring patience and attention to detail, but not advanced skills. The most challenging parts are often removing stubborn old adhesive and neatly installing the new seal around tight corners. Following instructions carefully and using a hairdryer to warm the seal significantly eases the process. Most homeowners can complete it in 1-2 hours.
How long should a properly installed refrigerator seal last?
A high-quality EPDM rubber seal, correctly installed on a clean channel and maintained with regular cleaning, typically lasts 8-12 years. Factors like exposure to harsh cleaners, excessive heat near the appliance, or physical damage can shorten this lifespan.
Can I use a universal seal kit instead of a model-specific one?
While possible, universal kits require extensive trimming, bending, and guessing, increasing the risk of poor sealing, gaps, or an unattractive finish. Model-specific kits, designed for your exact door contour and channel, provide a vastly superior fit, easier installation, and better long-term results, making them the recommended choice.
Why does my new seal feel stiff when I install it?
New rubber seals, especially in cooler environments, are naturally stiff straight out of the package. Gently warming the entire seal with a hairdryer (on low, held 12-18 inches away) for a few minutes before and during installation makes the rubber pliable and much easier to work with, allowing it to conform smoothly to the door channel.
What’s the best way to clean refrigerator door seals?
Use a soft cloth dampened with a solution of mild dish soap and warm water. Wipe the seal thoroughly, including the inner channel groove. Rinse with a clean damp cloth and dry completely. Avoid bleach, ammonia, abrasive cleaners, or excessive water that could seep into the channel and degrade adhesive.
My door still doesn’t seal perfectly after replacement. What should I check first?
Start by ensuring your refrigerator is perfectly level using a bubble level on the top shelf (front-to-back and side-to-side). An unlevel fridge is a common cause of poor sealing. Next, meticulously clean the cabinet frame surface where the seal makes contact. Finally, re-check that the new seal is fully and evenly seated in the door channel, especially at corners.
Can a bad seal cause my refrigerator to frost over excessively?
Absolutely. A compromised door seal allows warm, moist kitchen air to enter the cold interior. This moisture condenses and freezes on the evaporator coils, leading to rapid frost buildup in the freezer and potentially in the fresh food compartment, forcing the defrost system to work harder and less effectively.
Is it safe to use my refrigerator while the seal is being replaced?
No. The refrigerator must be unplugged during the entire seal replacement process for safety. Furthermore, you need to leave the door open while the new seal’s adhesive cures (usually 24 hours) before closing it tightly and plugging the unit back in to allow proper setting.
How can I tell if I need a new seal or just an adjustment?
If the rubber is cracked, torn, brittle, or shows significant gaps even when the door is closed firmly, replacement is necessary. If the seal looks intact but has a small section not sealing, try warming and reshaping that spot first. If the door is level and the seal is clean but still leaks consistently around its entire perimeter, replacement is likely needed.