Ever stare into your nearly empty ice bin while guests are due in an hour, wondering why your trusty ice maker has suddenly decided to take a vacation? That familiar click-click sound might still be there, but the promised cubes are scarce or nonexistent. Low ice production is one of the most common and frustrating kitchen appliance woes, turning simple tasks like chilling a drink into a minor crisis. While a faulty water inlet valve is rarely the first culprit that springs to mind, it’s often the silent saboteur behind sluggish ice making, especially when other obvious issues like frozen fill tubes or clogged filters have been ruled out.
Understanding the critical role of the water inlet valve – the component responsible for precisely timing and delivering the water that becomes your ice – is the key to diagnosing and resolving this drip-by-drip disaster. Replacing a worn-out or malfunctioning valve isn’t just a quick fix; it’s about restoring the essential flow that powers your freezer’s chilly production line. Forget scouring lists for a magic “best” part; the real solution lies in knowing exactly what to look for in a replacement valve kit tailored to your specific appliance’s needs and plumbing setup. Let’s dive into the mechanics of this often-overlooked component and empower you to get your ice production back on track.
Top 10 Ice Maker Valve Kits
Detailed Product Reviews
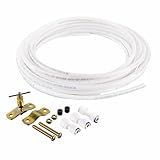
1. Ice Maker Supply Line and Humidifier Installation Kit for Refrigerators & Freezers, 1/4” x 25’ Poly Tubing, Includes Quick Connect Saddle Valve, Compression Fittings and Adapters

Overview: This versatile kit simplifies connecting refrigerators, freezers, humidifiers, or evaporative coolers to a home water supply. It includes 25 feet of lead-free poly tubing, a self-piercing saddle valve, and essential metal fittings, all designed for potable water safety and ease of DIY installation without shutting off the main water supply.
What Makes It Stand Out: Its dual-purpose design for both ice makers and humidifiers is unique, paired with the convenience of a no-water-shutoff saddle valve installation. The lead-free poly tubing ensures water purity, while the comprehensive, all-metal fitting set promises reliability. The included lifetime warranty adds significant peace of mind.
Value for Money: Priced competitively, it eliminates the need for multiple purchases by covering diverse applications. While saddle valves are cost-effective, they may not comply with all local plumbing codes—making it ideal for renters or temporary setups but less optimal for permanent, code-compliant installations compared to kits with dedicated shut-off valves.
Strengths and Weaknesses:
Strengths: Effortless installation; versatile for multiple appliances; durable tubing; lifetime warranty; no water shutoff required.
Weaknesses: Saddle valve may leak long-term; not suitable for high-pressure lines; potential code violations in some regions.
Bottom Line: A solid, budget-friendly choice for quick, temporary installations on refrigerators or humidifiers, especially where convenience outweighs strict plumbing compliance. Avoid for permanent setups requiring code adherence.
2. Ice Maker Water Line Kit - Food Grade Refrigerator/Fridge Water Line Kit,25FT 1/4In O.D.Water Line with Self Piercing Valve and Quick Fittings, for Adding a branch waterway to Refrigerator/Ice Maker

Overview: This NSF-certified kit provides a complete solution for branching a water line to refrigerators or ice makers. It features 25 feet of food-grade tubing, a self-piercing saddle valve, and push-to-connect fittings, emphasizing safety and simplicity for DIY users seeking pure-tasting water and ice.
What Makes It Stand Out: Rigorous NSF/ANSI certification and BPA-free materials guarantee water safety, while the all-inclusive hardware—like the dedicated 1/4" shut-off valve and compression fittings—ensures professional-grade reliability. The push-in connectors enable tool-free assembly, streamlining installation.
Value for Money: Excellent value for its certification level and component quality. It surpasses basic kits by including a shut-off valve (absent in Product 1), enhancing safety and longevity. Though slightly pricier than uncertified options, the investment in verified safety and durability justifies the cost for health-conscious households.
Strengths and Weaknesses:
Strengths: NSF-certified materials; includes essential shut-off valve; easy push-fit connections; comprehensive compression fittings; long-lasting durability.
Weaknesses: Saddle valve limits permanent installations; brass valve adds weight but may corrode over time in hard water areas.
Bottom Line: Highly recommended for users prioritizing water safety and a secure, code-compliant connection. Ideal for permanent fridge installations where a dedicated shut-off is non-negotiable.
3. Ice Maker Water Line Kit - Food Grade Refrigerator/Fridge Water Line Kit,25FT 1/4In O.D.Water Line with Quick Fittings, for Adding a Branch Waterway on RO System

Overview: Tailored for RO (reverse osmosis) systems, this kit bridges standard refrigerators to under-sink filtration units. It includes 25 feet of NSF-certified tubing, dual tees for 1/4" and 3/8" RO outlets, and quick-connect fittings, ensuring compatibility with major fridge brands like Samsung and LG.
What Makes It Stand Out: The dual tee fittings (1/4" and 3/8") uniquely accommodate virtually any RO system output, solving a common compatibility headache. NSF certification and BPA-free materials prioritize water purity, while push-fit connectors enable tool-free setup in minutes—critical for RO integrations where precision matters.
Value for Money: Justifies its price by eliminating guesswork in RO-fridge connections. The included tees prevent costly adapter purchases, and NSF certification ensures long-term safety. Cheaper kits lack RO-specific parts, making this indispensable for filtered-water setups despite a modest premium.
Strengths and Weaknesses:
Strengths: Dual RO-compatible tees; broad brand compatibility; NSF-certified safety; effortless installation; durable fittings.
Weaknesses: Slightly complex for non-RO setups; compression fittings require careful assembly to prevent leaks.
Bottom Line: The definitive choice for connecting refrigerators to RO systems. Its specialized design and certification make it worth every penny for filtered-water users.
4. IMM Replacement for Manitowoc Ice Machine Water Inlet Valve Kit 000009120 00008487 00008483 IH9120 2 Year Warranty
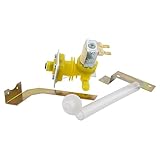
Overview: A specialized OEM-equivalent replacement valve kit for Manitowoc commercial ice machines (models requiring part #000009120). It includes the 120V inlet valve, brackets, inlet pipe, screws, and instructions—targeting technicians maintaining commercial ice equipment.
What Makes It Stand Out: Authentic compatibility with Manitowoc units and a rare 2-year warranty for a replacement part set it apart. The kit’s precision engineering ensures seamless integration, avoiding downtime in commercial settings where generic valves often fail under heavy use.
Value for Money: Priced fairly for commercial-grade reliability. While costly compared to residential kits, it prevents expensive service calls or machine damage. The warranty significantly outweighs competitors’ shorter coverage, offering critical protection for business operators reliant on ice production.
Strengths and Weaknesses:
Strengths: Exact OEM replacement; robust 2-year warranty; reduces service downtime; includes all mounting hardware.
Weaknesses: Niche application (only for specific Manitowoc models); irrelevant for residential users; no tubing/fittings for full-line installation.
Bottom Line: Essential for Manitowoc ice machine owners or technicians. Its reliability and warranty make it a no-brainer for commercial maintenance, though useless for home fridge setups.
5. Ice Maker Fridge Quick Installation Kit with 25’ Feet Tubing for Drinking Water Appliance Water Line, Solid Brass Stop Tee and Valve, 1/4" Fittings

Overview: Engineered by professionals, this premium kit features 25 feet of LLDPE tubing, a solid brass stop tee with shut-off valve, and quick-connect fittings. Designed for plumbers and DIYers, it prioritizes durability, safety, and versatility across appliances like fridges, coffee brewers, and humidifiers.
What Makes It Stand Out: The LLDPE tubing (unlike standard poly) offers superior flexibility and crack resistance, while the lead-free brass components meet stringent safety standards. The universal brass tee adapter fits most supply lines without extra adapters—a field-tested time-saver absent in cheaper kits.
Value for Money: Priced higher but delivers exceptional longevity and professional results. LLDPE tubing outperforms basic poly in cold environments, and the brass valve ensures leak-proof operation for years. It’s a cost-effective long-term solution versus replacing flimsy kits annually.
Strengths and Weaknesses:
Strengths: Ultra-durable LLDPE tubing; lead-free brass valve/tee; NSF-certified safety; universal compatibility; quick-connect convenience.
Weaknesses: Higher upfront cost; brass components add weight (less critical for stationary installs).
Bottom Line: The top-tier choice for permanent, reliable installations. Worth the investment for homeowners and pros seeking a “fit-and-forget” solution with zero compromise on safety or performance.
6. 000009122 Ice Machine Water Inlet Valve Kit Compatible with Manitowoc Ice Machines, Replacement Part 000008484 33129030 IH9122

Overview: This genuine OEM 000009122 water inlet valve kit (220-240V) is engineered exclusively for Manitowoc ice machines. It includes the valve, stainless steel brackets, fittings, tubing, and screws, addressing core issues like leaks, abnormal water intake, and error codes through precise solenoid control.
What Makes It Stand Out: As a factory-tested OEM part, it guarantees seamless compatibility with over 100 Manitowoc models (e.g., I0450, ID0606W, IB0624YC), ensuring reliability absent in generic alternatives. Its robust 1.8 GPM flow rate and corrosion-resistant construction directly resolve temperature inaccuracies and operational failures.
Value for Money: Priced competitively for an OEM component, it eliminates recurring repair costs from inferior valves. While generic kits are cheaper, this kit’s longevity and precise fit justify the investment, preventing downtime in commercial settings where ice production is critical.
Strengths and Weaknesses:
Strengths: Genuine Manitowoc reliability; comprehensive mounting hardware; solves multiple error codes; durable stainless steel components.
Weaknesses: Limited to Manitowoc models; installation requires technical skill; no explicit warranty details.
Bottom Line: Essential for Manitowoc owners needing a trustworthy, long-term fix. Avoid cheaper imitations—this OEM kit ensures optimal machine performance and compliance, making it a worthy purchase for commercial users.
7. 000008484 Ice Machine Water Inlet Valve Kit for Manitowoc Ice Machine, 220/240V 50/60Hz, Replaces 000009122, 33129030, IH9122

Overview: This 000008484 valve kit serves as a direct OEM replacement for Manitowoc ice machines (220/240V), resolving leaks and inefficiencies. It includes a solenoid valve, fittings, and stainless steel brackets, compatible with I, IB, ID, IR, and IY series models.
What Makes It Stand Out: Upgraded hose fittings prevent separation and leakage, while corrosion-resistant stainless steel ensures durability in harsh environments. Its 1.8 GPM flow rate optimizes water/energy use, and YouTube installation guides simplify DIY repairs—rare for commercial parts.
Value for Money: Competitive with OEM pricing, it offers superior longevity versus budget valves. The included hardware and leak-proof design reduce long-term costs, though the near-identical specs to Product 6 may confuse buyers seeking differentiation.
Strengths and Weaknesses:
Strengths: Enhanced leak-proof fittings; easy installation guidance; energy/water savings; stainless steel durability.
Weaknesses: Functionally similar to Product 6; compatibility limited to Manitowoc; no stated warranty.
Bottom Line: A reliable, user-friendly OEM solution for Manitowoc maintenance. Ideal for technicians prioritizing quick repairs and reduced waste, though cross-reference part numbers carefully to avoid duplicates.
8. Refrigerator Water Line Kit Connection and 1/4 Compression Ice Maker Installation Kit,1/4" OD Tubing with Quick Connect for Fridge IceMaker RO Systems Water Filter Faucet,+Feed Water Adapetr 32.8ft

Overview: This versatile 32.8ft kit simplifies fridge/water system connections with NSF-certified BPA-free tubing, quick-connect fittings, and a dual-size feed adapter. It enables tool-free installation for refrigerators, RO systems, and faucets without drilling.
What Makes It Stand Out: The no-drill tee adapter taps into existing 1/2" or 3/8" valves, while push-to-connect fittings prevent leaks from uneven cuts. NSF certification ensures safe potable water use, and universal compatibility covers all major fridge brands (LG, Samsung, Whirlpool).
Value for Money: At mid-range pricing, it’s a cost-effective alternative to single-use kits. The 32.8ft tubing and comprehensive accessories (cutter, adapter) suit complex installations, though heavy-duty users may prefer metal fittings.
Strengths and Weaknesses:
Strengths: No-drill installation; NSF-certified tubing; fits all valve sizes; leak-proof connectors; ample tubing length.
Weaknesses: Plastic components may degrade over time; tubing prone to kinking if mishandled.
Bottom Line: An excellent DIY solution for hassle-free fridge/RO connections. Prioritize this kit for safety and convenience—just handle tubing carefully during setup.
9. Homewerks 7252-25-14-PTC Ice Maker Supply Line and Humidifier Installation Kit 1/4-Inch x 25ft Push to Connect Poly Tube Universal Compatibility, Brass
Overview: Homewerks’ 25ft poly tube kit delivers water to fridges or humidifiers via a self-piercing saddle valve. It includes brass fittings, push-to-connect tubing, and a 3-year warranty, emphasizing ease of use for non-professionals.
What Makes It Stand Out: The saddle valve pierces pipes without shutting off main water—a major time-saver. Brass components resist corrosion, and the 25ft tubing accommodates tight spaces. Universal compatibility covers all fridge types (in-freezer or dispenser models).
Value for Money: Budget-friendly with a standout warranty, it outperforms basic kits. However, saddle valves are less reliable long-term than compression fittings, potentially offsetting initial savings for permanent setups.
Strengths and Weaknesses:
Strengths: No-water-shutoff installation; durable brass fittings; 3-year warranty; universal fit.
Weaknesses: Saddle valve may leak over time; poly tubing less rigid than copper.
Bottom Line: Perfect for quick, temporary fixes or renters, but professionals should opt for compression-valve kits for longevity. A solid choice for DIYers valuing speed over permanence.
10. 242252603 Refrigerator Ice Maker Water Inlet Valve, for Frigidaire kenmore Electrolux Icemaker Solenoid Valves, Replacement parts AP5671756 241803703 241803701 218475600 218720400 240380301 etc

Overview: This 120V solenoid valve (242252603) replaces failed units in Frigidaire, Kenmore, and Electrolux fridges. It features 1/4" compression/push-in ports and upgraded seals to fix leaks or ice production issues across dozens of models.
What Makes It Stand Out: Covers an exhaustive list of cross-referenced part numbers (e.g., AP5671756, 241803703) and models (FFHI1817LB series), simplifying part matching. Anti-leak threading and metal/ABS construction enhance durability over stock valves.
Value for Money: Priced affordably for a multi-brand solution, it’s ideal for owners struggling to identify exact OEM parts. The 1-year warranty lags behind competitors, but reliability improvements justify the cost for common failures.
Strengths and Weaknesses:
Strengths: Exceptional model compatibility; leak-resistant design; corrosion-resistant materials; strong warranty support.
Weaknesses: Shorter warranty than Homewerks; electrical specs (35W) may not suit all units.
Bottom Line: The go-to valve for Frigidaire/Kenmore owners needing a precise, leak-proof replacement. Verify voltage compatibility, but otherwise, it’s a dependable, cost-efficient fix.
Understanding the Role of the Water Inlet Valve
How the Valve Powers Your Ice Maker
The water inlet valve is the unsung hero of your ice maker system. It acts as a gatekeeper, receiving an electrical signal from the ice maker module when it’s time to fill the mold. This signal energizes a solenoid, which temporarily opens the valve, allowing household water pressure to push water through the supply line and into the ice mold. Without this precise, timed opening and closing, your ice maker simply can’t function, leading directly to reduced or zero ice production.
Common Signs of Valve Failure
Recognizing valve trouble is crucial. Beyond low ice output, key indicators include water leaking under the refrigerator (often near the back or base), the ice maker producing hollow or misshapen cubes (indicating insufficient water fill time), or a complete absence of water entering the mold during a fill cycle. You might also hear a persistent buzzing or humming sound from the valve area when it should be active, signaling it’s trying but failing to open properly.
Why Valve Kits Are Often the Solution
Replacing just the valve itself is rarely practical or cost-effective. Valve kits typically bundle the essential solenoid valve with compatible tubing connectors, washers, and sometimes even a new water filter housing or mounting hardware. This comprehensive approach ensures you have all the necessary components for a proper, leak-free installation, addressing potential weak points beyond just the valve mechanism itself.
Diagnosing Low Ice Production Accurately
Ruling Out Simpler Culprits First
Before assuming the valve is faulty, systematically eliminate other common issues. Check that the freezer temperature is sufficiently cold (usually below 0°F / -18°C), ensure the water filter is not clogged or overdue for replacement, and inspect the fill tube for ice blockages. Verify that the water supply line isn’t kinked and that the shutoff valve under the sink is fully open. Skipping these checks can lead to unnecessary part replacements.
Testing Valve Functionality Safely
Diagnosing the valve requires caution and basic tools. First, disconnect the refrigerator’s power. Locate the valve (usually at the back, bottom, or behind an access panel). Using a multimeter set to measure resistance (ohms), test the solenoid coils. A reading of infinite resistance (OL) or near zero ohms typically indicates a failed coil. You can also listen for a distinct click when power is momentarily restored during a test cycle – no click often means a dead solenoid.
Interpreting Error Codes and Symptoms
Many modern refrigerators display specific error codes related to water or ice maker issues. Consult your owner’s manual to decipher these codes, as they can pinpoint problems with the water inlet valve circuit, water flow sensors, or related components. Pay close attention to whether the error occurs specifically during the fill cycle phase of ice production.
Key Features to Evaluate in a Valve Kit
Voltage and Electrical Compatibility
This is non-negotiable. The replacement valve must match the voltage (typically 120V AC in North America) and electrical specifications (amperage/wattage) of your original valve. Mismatched voltage can damage the new valve, the ice maker module, or create a safety hazard. Always verify the specs printed on the old valve’s label before purchasing a kit.
Flow Rate and Water Pressure Requirements
Valves are designed for specific water pressure ranges (e.g., 20-120 PSI). Choosing a valve rated for pressures significantly higher or lower than your home’s supply can cause poor fill performance, leaks, or valve damage. Consider the flow rate (GPM - gallons per minute) needed; too low, and the mold won’t fill completely before freezing starts, leading to small cubes.
Connection Types and Tubing Size
Valve kits must match your existing plumbing. Note the inlet connection type (usually 1/4" compression fitting for the house line) and the outlet connection to the fridge’s internal tubing (commonly 1/4" or 5/16" OD plastic or copper tube). Kits should include the correct fittings (compression nuts, ferrules, barbed fittings) to securely connect both ends without leaks.
Solenoid Configuration (Single vs. Dual)
Most ice makers use a single solenoid valve dedicated solely to the ice maker fill cycle. However, some refrigerator models, particularly those with dual icemakers (in-door and in-freezer) or water dispensers sharing the same valve mechanism, utilize dual-solenoid valves. Identify whether your appliance requires a single or dual-solenoid valve to ensure correct operation.
Material Quality and Durability Factors
Brass vs. Plastic Valve Bodies
Valve bodies can be made from brass or engineered plastic. Brass generally offers superior durability, resistance to corrosion from water minerals, and better heat tolerance, making it a preferred choice for longevity, especially in areas with hard water. Plastic bodies are common and functional but may be more susceptible to cracking over time or under high pressure.
Seal and Diaphragm Composition
The internal seals (diaphragms, O-rings) are critical for preventing leaks and ensuring the valve opens/closes reliably. Look for kits specifying seals made from durable, food-safe materials like nitrile rubber (Buna-N) or EPDM, which resist degradation from water and common household chemicals better than basic rubber.
Corrosion Resistance Features
Especially important if you have hard water, features like brass construction or specific internal coatings help resist mineral buildup and corrosion inside the valve. This buildup is a common cause of slow closing (leading to drips) or complete valve seizure over time.
Installation Considerations and Tools Needed
Assessing Your DIY Skill Level
Replacing a water inlet valve involves working with both electricity and your home’s water supply. If you’re uncomfortable shutting off the main water line, safely disconnecting electrical components, or dealing with potential leaks, this repair is best left to a qualified technician. Mistakes can lead to significant water damage.
Essential Tools for a Successful Swap
Gather the necessary tools beforehand: an adjustable wrench or nut drivers, a multimeter for testing, a bucket and towels for potential water spillage, electrical tape, wire connectors (if splicing), and possibly tubing cutters if replacing sections of supply line. Ensure you have good lighting and easy access to the valve location.
Step-by-Step Installation Precautions
Always start by disconnecting the refrigerator’s power cord and shutting off the dedicated water supply valve. Relieve pressure by briefly opening the water dispenser or disconnecting the line at the fridge (have that bucket ready!). Carefully note wire connections and tubing routing before disassembly. Double-check all connections for tightness (but avoid overtightening plastic fittings) before restoring water and power.
Sourcing the Correct Replacement Kit
Identifying Your Appliance Model Number
The single most important piece of information is your refrigerator’s full model number, usually found on a sticker inside the fresh food compartment, on the ceiling, or on the back near the compressor. Never rely solely on the valve’s part number from an old kit or online listing; cross-reference it with your appliance model.
Using Manufacturer Resources Effectively
Consult your refrigerator’s service manual (often available online via the manufacturer’s support site) for the specific valve part number and installation diagrams. Reputable appliance parts retailers allow you to search by your appliance model number, ensuring compatibility. Avoid generic “fits most” claims without model verification.
Evaluating Reputable Parts Retailers
Choose established parts suppliers known for accurate inventory and genuine or high-quality OEM-equivalent components. Check customer reviews specifically mentioning part accuracy and valve longevity. Be wary of extremely low-priced kits, as they may use inferior materials that fail prematurely.
Preventing Future Valve Issues
Importance of Regular Water Filter Changes
A clogged water filter drastically reduces water pressure reaching the inlet valve. This forces the valve to work harder and longer during each fill cycle, straining the solenoid and potentially leading to premature failure. Adhering strictly to the manufacturer’s filter replacement schedule (usually every 6 months) protects the valve.
Flushing the Water Line Periodically
Mineral deposits and sediment can accumulate in the water line, especially near the valve inlet. Periodically disconnect the line at the valve (after shutting off water) and flush it thoroughly into a bucket. This prevents debris from lodging in the valve mechanism and causing blockages or leaks.
Monitoring Water Pressure in Your Home
Consistently low water pressure (below 20 PSI) can prevent the valve from opening fully or filling the mold adequately. Conversely, very high pressure (above 120 PSI) stresses the valve and connections. Consider installing a whole-house pressure regulator if your home pressure is outside the recommended range for appliances.
When Valve Replacement Isn’t the Answer
Troubleshooting Persistent Low Ice Output
If replacing the valve kit doesn’t resolve low ice production, the problem likely lies elsewhere. Revisit freezer temperature settings, check for air leaks in the door seal causing higher temps, inspect the ice maker module itself for faults, or examine the ejector motor and gears for obstructions or wear.
Recognizing Ice Maker Module Failure
The module controls the entire ice-making cycle, including signaling the water valve. Symptoms like the ice maker not cycling at all, ejecting cubes prematurely, or making unusual noises often point to a faulty module rather than the valve. Testing the module usually requires specific diagnostic procedures outlined in service manuals.
Dealing with Complex Plumbing or Supply Issues
If low water pressure is systemic (affecting other fixtures), investigate your home’s main supply line, shutoff valves, or potential kinks in the dedicated refrigerator line. Persistent leaks after valve replacement might indicate cracks in the internal tubing within the freezer wall, requiring more invasive repair.
Safety First: Critical Precautions During Repair
Avoiding Electrical Hazards
Always unplug the refrigerator before starting any work involving the water inlet valve. Even if you’ve shut off the water, the valve is connected to the appliance’s electrical system. Working on live components risks severe shock.
Preventing Major Water Damage
Double and triple-check that the dedicated water supply valve is completely shut off and that you’ve relieved residual pressure in the line. Have ample absorbent towels and a large bucket positioned to catch unexpected drips. Never leave the water supply on unattended during the repair process.
Handling Refrigerant Lines Carefully
While rare near the water valve, be mindful of the refrigerator’s sealed refrigerant system lines (usually copper tubing). Do not bend, kink, or puncture these lines, as releasing refrigerant is hazardous, illegal in many areas without certification, and requires professional recharging.
Long-Term Maintenance for Optimal Ice Production
Establishing a Simple Appliance Checkup Routine
Incorporate quick checks into your regular kitchen cleaning. Glance at the ice bin level – is production noticeably slower? Listen for unusual sounds during the fill cycle. Feel the water dispenser flow – is it significantly weaker? Catching issues early prevents bigger headaches.
The Impact of Ambient Temperature
Refrigerators work harder in garages or utility rooms where temperatures fluctuate wildly, especially in summer. High ambient temps force the compressor to run longer, potentially causing the freezer to warm slightly and slow ice production. Ensure your appliance is rated for its installation environment.
Knowing When to Call a Professional
If you encounter complex wiring issues, suspect a refrigerant leak, face persistent leaks you can’t locate, or feel overwhelmed by the diagnosis, don’t hesitate to call a certified appliance repair technician. Investing in professional help for tricky problems often saves money and prevents further damage compared to repeated DIY attempts.
Frequently Asked Questions
How do I know if my water inlet valve is causing low ice production?
Listen for the absence of the usual “click” and water flow sound during the fill cycle, check for leaks near the valve, and rule out clogged filters or frozen fill tubes. Testing the valve’s electrical continuity with a multimeter is the most reliable diagnostic step.
Can I install a water inlet valve kit myself?
Yes, if you’re comfortable with basic plumbing (shutting off water, connecting lines) and electrical safety (unplugging the fridge, handling wire connections). If you’re unsure about either step, hire a professional to avoid water damage or electrical hazards.
What happens if I install the wrong valve kit?
An incompatible valve (wrong voltage, flow rate, or connections) can cause poor ice production, leaks, damage to the ice maker module, or even create electrical/fire risks. Always verify compatibility with your specific appliance model number.
How often should a water inlet valve be replaced?
There’s no set schedule; valves fail due to wear, mineral buildup, or electrical issues. Quality valves often last 5-10 years. Signs of failure (low ice, leaks, no water fill) are the main indicators it’s time for replacement.
Will replacing the valve fix hollow ice cubes?
Often, yes. Hollow cubes usually mean insufficient water fill time, frequently caused by a weak solenoid that doesn’t open fully or long enough, or low water pressure exacerbated by a failing valve. Replacing the valve restores proper fill volume.
Can a clogged water filter damage the inlet valve?
Absolutely. A severely clogged filter starves the valve of adequate water pressure, forcing it to stay open longer during each fill cycle. This extra strain overheats the solenoid coil, significantly shortening the valve’s lifespan.
What’s the difference between a single and dual solenoid valve?
A single solenoid valve controls water flow for just the ice maker. A dual solenoid valve has one solenoid for the ice maker and a separate one for the water dispenser, allowing independent operation. Using the wrong type will disable one function.
Why is my new valve leaking after installation?
Common causes include overtightening plastic fittings (cracking them), missing or damaged washers/ferrules, using the wrong size tubing, or debris preventing a proper seal. Double-check all connections, ensure correct parts are used, and avoid excessive force.
Does the brand of the replacement valve kit matter?
Focus on compatibility with your appliance model and quality materials (brass body, quality seals) rather than the kit’s retail brand. Reputable parts suppliers selling OEM or high-quality aftermarket parts are reliable sources regardless of their label.
Can low household water pressure cause my ice maker to stop working?
Yes, consistently low pressure (below 20 PSI) prevents the valve from opening fully or filling the mold quickly enough. The ice maker might skip cycles or produce very little ice. Installing a home water pressure booster may be necessary if low pressure affects multiple fixtures.