Is your trusty old ice maker starting to sound like a miniature construction site every time it kicks on? Maybe it’s producing cubes that look more like cloudy pebbles than the pristine, crystal-clear ice you remember from its glory days. You’re not alone—many homeowners face the dilemma of a aging unit that still functions but lacks modern efficiency, reliability, or features. Replacing the entire appliance seems like overkill, especially if the rest of your refrigerator is holding strong. The good news? There’s a smarter, more economical path forward that breathes new life into your existing setup without the hassle of a full system overhaul.
Enter ice maker conversion kits—a game-changer for extending the lifespan of your current unit while upgrading its performance. These kits transform outdated components into modern, efficient systems with minimal disruption to your kitchen routine. Forget the stress of measuring new appliances or navigating complex installations; conversion kits are designed for precision compatibility and DIY-friendly setups. In this guide, we’ll unpack everything you need to know to choose the right kit for your situation, from decoding technical specs to avoiding common pitfalls. Whether you’re battling slow production, excessive noise, or inconsistent ice quality, you’re about to discover how a strategic upgrade can save you money, reduce waste, and keep your beverages perfectly chilled for years to come.
Top 10 Ice Maker Conversion Kits
Detailed Product Reviews
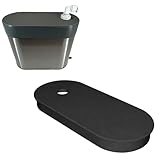
1. GE Opal Nugget Ice Maker Conversion Kit for Opal 2.0 - Permanent Water Line, Measure Tank Size First, Size Chart in Images

Overview: This conversion kit enables permanent plumbing for the GE Opal 2.0 nugget ice maker, eliminating the need for manual water tank refills. It’s a fully assembled solution designed specifically for Opal 2.0 units, though the water tank itself is not included.
What Makes It Stand Out: Its precise compatibility with Opal 2.0 models and inclusion of a sizing chart (with images) are critical differentiators. The pre-assembled design ensures quick installation, while the included Velcro strap secures the lid during operation, enhancing safety and convenience.
Value for Money: Priced competitively against DIY alternatives, it justifies cost through reliability and model-specific engineering. However, the necessity to purchase a separate tank adds to the overall expense, making it slightly less economical than all-in-one bundles.
Strengths and Weaknesses:
Strengths: Hassle-free setup, model-specific fit, Velcro strap included, clear sizing guidance.
Weaknesses: Water tank sold separately, requires precise tank measurement (risk of incorrect purchase), no universal compatibility.
Bottom Line: Ideal for Opal 2.0 owners seeking a permanent fix, but confirm tank dimensions first to avoid returns. A solid investment if sized correctly.
2. Generic Permanent Water Line Conversion Kit Fully Assembled for GE Opal 2.0 XL 1 Gallon Side Water Tank

Overview: A third-party solution for permanently connecting GE Opal 2.0 XL models with 1-gallon side water tanks. Like OEM kits, it’s fully assembled but excludes the water tank, requiring careful sizing verification.
What Makes It Stand Out: Targets the less common Opal 2.0 XL variant with side-mounted tanks, offering a niche alternative to pricier branded kits. The inclusion of measurement photos and a Velcro strap mirrors OEM functionality at a lower cost.
Value for Money: Typically more affordable than GE’s official kit while delivering identical core functionality. Savings are meaningful, but the generic nature risks subtle fitment issues compared to manufacturer-certified parts.
Strengths and Weaknesses:
Strengths: Cost-effective, pre-assembled convenience, Velcro strap included, XL-specific support.
Weaknesses: Potential compatibility inconsistencies, no brand assurance, tank not included, measurement errors could void value.
Bottom Line: A budget-friendly option for Opal 2.0 XL users, but prioritize verifying tank dimensions against provided images to ensure seamless integration.
3. Generic Permanent Water Line Conversion Kit Fully Assembled for GE Opal 1.0 XL 1 Gallon Side Water Tank

Overview: This generic kit converts GE Opal 1.0 XL models (with 1-gallon side tanks) to permanent plumbing. It’s fully assembled but requires a separate water tank purchase and meticulous size checks using the seller’s reference photos.
What Makes It Stand Out: Addresses the Opal 1.0 XL’s unique side-tank configuration, which differs from standard 1.0 models. The pre-assembled tubing and included Velcro strap simplify installation, appealing to users avoiding complex DIY setups.
Value for Money: Offers significant savings over GE’s official 1.0 XL parts. However, generic build quality may lack OEM durability, making it a moderate value—ideal for cost-conscious buyers prioritizing function over longevity.
Strengths and Weaknesses:
Strengths: Low-cost entry, easy installation, Velcro strap included, XL-specific design.
Weaknesses: Uncertified materials, tank sold separately, no guarantee of long-term seal integrity, sizing errors common.
Bottom Line: Suitable for budget-focused Opal 1.0 XL owners, but expect potential trade-offs in reliability; measure twice before buying.
4. GE Opal Nugget Ice Maker Conversion Kit for Opal 2.0 - Permanent Water Line, Measure Tank Size First, Size Chart in Images, it is 3" Wide with Round Ends, White Color

Overview: A refined GE-branded kit for Opal 2.0 units, featuring a 3-inch-wide tube with rounded ends and white coloring for seamless aesthetics. It requires permanent plumbing setup and excludes the water tank.
What Makes It Stand Out: The exact tubing specifications (3" width, round ends) ensure perfect fitment for newer Opal 2.0 tanks, while the white color blends with the appliance. GE’s sizing chart and assembly quality provide confidence absent in generic alternatives.
Value for Money: Priced higher than generic kits, but justified by guaranteed compatibility and premium materials. Avoids the headache of returns, making it worthwhile for those prioritizing reliability over minimal cost savings.
Strengths and Weaknesses:
Strengths: OEM precision, color-matched design, robust construction, included sizing guide, Velcro strap.
Weaknesses: Premium price, tank not included, measurement dependency remains.
Bottom Line: The top choice for Opal 2.0 owners seeking foolproof performance and aesthetics; pay extra for peace of mind.
5. GE Opal 1.0 Nugget Ice Maker Permanent Water Line Conversion Kit for (only Opal 1.0) Water Tank NOT Included. Only fits 1.0 Angled Water Tank. See Second Photo for Compatible Tank.

Overview: This kit exclusively converts standard GE Opal 1.0 models (with the distinctive angled 3/4-gallon tank) to permanent plumbing. It’s fully assembled but requires separate tank purchase and strict adherence to compatibility photos.
What Makes It Stand Out: Its singular focus on the angled Opal 1.0 tank—a design incompatible with 2.0 or XL kits—prevents costly mismatches. The included photos clearly identify compatible tanks, reducing user error.
Value for Money: Fairly priced for a specialized part, though the tank exclusion inflates total cost. Superior value over generic kits due to guaranteed fitment, avoiding wasted money on incorrect parts.
Strengths and Weaknesses:
Strengths: Model-specific accuracy, prevents compatibility errors, Velcro strap included, clear visual guides.
Weaknesses: Extremely narrow use case (angled 1.0 only), tank sold separately, no flexibility for future upgrades.
Bottom Line: Essential for Opal 1.0 owners with angled tanks—ignore if you have any other model. Verify your tank shape against photos before purchasing.
6. Permanent Water Line Conversion Kit for Nugget Ice Maker | Compatible with GE Opal 2.0 Model
Overview: This kit eliminates manual refilling for GE Opal 2.0 nugget ice makers by enabling a direct, permanent water line connection. Designed for continuous ice production, it targets users frustrated by the Opal’s small reservoir. Installation requires measuring the unit’s water tank against the provided size chart to confirm fitment before purchase.
What Makes It Stand Out: The fully assembled design skips complex setup, while dedicated mounting hardware ensures leak-proof stability. Its precise compatibility preserves the Opal 2.0’s aesthetics and performance without third-party modifications. The focus on seamless integration—unlike generic kits—minimizes installation errors.
Value for Money: Priced moderately, it justifies cost by saving time and effort versus daily refills. While cheaper universal kits exist, they risk leaks or voiding warranties; this tailored solution offers long-term reliability worth the premium for Opal 2.0 owners prioritizing convenience.
Strengths and Weaknesses: Strengths: Hassle-free installation, robust mounting, model-specific reliability. Weaknesses: Strict size compatibility demands pre-purchase measurement; only suits Opal 2.0 (not older models); no filter included for water quality.
Bottom Line: Essential for Opal 2.0 users seeking uninterrupted ice production. Verify tank dimensions first, but if compatible, it’s a reliable, money-saving upgrade over manual refilling.
7. The Pod Company Conversion Kit for the Standard Ice Pod – Enables Compatibility with Standard & Pro Water Chillers – Complete Hose & Valve Adapter System for 41°F or 39°F Cooling
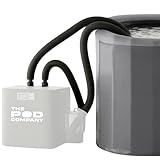
Overview: This kit transforms The Ice Pod therapy tubs into self-chilling systems by connecting to Standard or Pro water chillers. It replaces daily ice refills with consistent 39°F–41°F cooling, featuring filtration and energy-efficient operation. Ideal for cold therapy enthusiasts seeking convenience and water clarity.
What Makes It Stand Out: The integrated 20-micron filter maintains clean water between sessions, while the 280-watt chiller operates quietly—comparable to a freezer. Plug-and-play hoses enable tool-free setup, and precise temperature control (39°F/41°F) ensures therapeutic consistency without ice management.
Value for Money: Though premium-priced, it eliminates recurring ice costs and labor. Competing chillers often lack Pod-specific engineering or filtration; this kit’s seamless compatibility and 24/7 circulation justify investment for frequent users prioritizing hygiene and ease.
Strengths and Weaknesses: Strengths: Effortless installation, crystal-clear water via filtration, whisper-quiet operation, energy-efficient. Weaknesses: Limited to Pod models (not universal); chiller sold separately; cooling time varies with ambient conditions.
Bottom Line: A game-changer for Ice Pod owners. If you use cold therapy regularly, the time saved and water quality benefits make this kit indispensable despite the initial cost.
8. GE Profile Opal Ice Despenser Permanent Water Line Conversion kit. Doesn’t fit ice Makers with ice Bins. This is for The Opal ICE DESPENSER ONLY. See Photos

Overview: Exclusively for GE Profile Opal Ice Dispensers (not bin-style makers), this black kit enables permanent water line connectivity. It stresses critical compatibility: it only fits dispenser models, with photos essential for verification. The Velcro strap secures the lid, and the tank/dispenser isn’t included.
What Makes It Stand Out: Its dispenser-specific design addresses a niche gap ignored by generic kits. The included Velcro strap prevents lid displacement during operation—a subtle but practical touch. Matching black color maintains aesthetic cohesion with the dispenser unit.
Value for Money: Affordable for its specificity, but only valuable if you own a compatible dispenser. Generic kits risk leaks or damage; this avoids voiding warranties. However, limited applicability means poor value if your model isn’t a match (per provided photos).
Strengths and Weaknesses: Strengths: Dispenser-exclusive fit, Velcro strap for safety, color-matched components. Weaknesses: Severe compatibility restrictions (bins incompatible); no tank included; misleading titles may cause returns if users skip photo verification.
Bottom Line: A must-buy only for verified Opal Ice Dispenser owners. Triple-check photos against your unit—otherwise, avoid to prevent frustration.
9. Ice Maker Fridge Quick Installation Kit with 25’ Feet Tubing for Drinking Water Appliance Water Line, Solid Brass Stop Tee and Valve, 1/4" Fittings

Overview: A plumber-curated kit for connecting refrigerators, ice makers, or appliances to water lines. Includes 25’ NSF-certified LLDPE tubing, lead-free brass tee valve, and quick-connect fittings. Targets DIYers needing a durable, tool-free solution for potable water lines.
What Makes It Stand Out: The LLDPE tubing outperforms rigid PEX with superior flexibility and crack resistance, ideal for tight spaces. NSF certification guarantees no odor/taste, while the universal brass valve fits most supply lines—eliminating adapter hassles. The shut-off valve simplifies future maintenance.
Value for Money: Excellent for the price. Professional-grade materials (brass, NSF tubing) typically cost more separately. Competing kits often use lower-grade plastic; this offers years of leak-free service, making it a cost-effective long-term investment.
Strengths and Weaknesses: Strengths: Unbeatable flexibility/durability, NSF safety, universal valve compatibility, easy shut-off for repairs. Weaknesses: Tubing color (white) may show wear; no saddle valve for direct pipe piercing.
Bottom Line: The top choice for reliable, safe fridge/water line installations. Plumbers swear by LLDPE—and for good reason. Skip cheap imitations; this kit pays for itself in longevity.
10. Ice Maker Water Line Kit - Food Grade Refrigerator/Fridge Water Line Kit,25FT 1/4In O.D.Water Line with Self Piercing Valve and Quick Fittings, for Adding a branch waterway to Refrigerator/Ice Maker

Overview: A budget-friendly kit adding a branch line to existing plumbing for fridges, ice makers, or dispensers. Features 25’ food-grade tubing, a self-piercing saddle valve, and NSF-certified quick fittings—all lead-free and BPA-free for safe drinking water.
What Makes It Stand Out: The self-piercing valve requires no pipe cutting or soldering, enabling installation in minutes. All components meet NSF/ANSI standards, and the push-to-connect fittings ensure tool-free assembly. The comprehensive package includes every adapter needed for common setups.
Value for Money: Exceptional for basic needs. While less durable than Product 9’s LLDPE, it’s ideal for renters or temporary setups. The saddle valve’s convenience justifies the lower cost versus kits needing professional valves—though long-term users may prefer brass alternatives.
Strengths and Weaknesses: Strengths: Zero-tool installation, complete component set, strict food safety compliance, affordable. Weaknesses: Saddle valves can leak over time; tubing less robust than LLDPE; not ideal for permanent/hard-water installations.
Bottom Line: Perfect for quick, safe fridge hookups on a budget. DIYers will love the simplicity, but for permanent installations, consider upgrading to a solid-valve kit like Product 9.
Understanding Ice Maker Conversion Kits
What Exactly is a Conversion Kit?
A conversion kit is a curated set of components designed to retrofit your existing ice maker with modern technology. Unlike full replacements, these kits target specific outdated parts—such as motors, sensors, or molds—while leveraging your appliance’s foundational structure. They’re engineered to integrate seamlessly, turning a struggling unit into a reliable ice producer without altering your refrigerator’s footprint or electrical setup.
Why Upgrade Instead of Replace?
Swapping out an entire refrigerator just for the ice maker is often unnecessary and costly. Conversion kits preserve your appliance’s core investment while addressing wear-and-tear issues. They’re ideal for models where the main cooling system remains sound, offering up to 50% savings compared to new unit costs. Plus, you avoid the environmental impact of discarding a functional fridge.
Key Compatibility Factors
Matching Your Appliance Model
Not all kits work universally. You’ll need your refrigerator’s specific make, model, and manufacturing year to ensure parts align physically and electronically. Kits often include adapters for mounting brackets or wiring harnesses, but cross-referencing compatibility charts with your unit’s service manual is non-negotiable.
Electrical and Plumbing Requirements
Older units may operate on legacy voltages or use non-standard water line connectors. Modern kits typically support 110–120V systems and standard ¼-inch tubing, but verify if your home’s plumbing meets updated safety codes. Some kits include pressure regulators to prevent leaks in aging supply lines.
Ice Type and Size Specifications
If your current maker produces crescent-shaped cubes but you prefer nugget or bullet styles, confirm the kit delivers your desired output. Size consistency matters too—kits with precision-engineered molds reduce misshapen ice caused by uneven freezing in worn-out components.
Performance Enhancements to Prioritize
Energy Efficiency Gains
Newer kits often incorporate brushless motors and insulated molds that cut energy use by 15–25%. Look for ENERGY STAR®-aligned features like adaptive defrost cycles that activate only when needed, reducing compressor strain and lowering utility bills over time.
Noise Reduction Technology
That familiar “grinding” sound from aging gears? Modern kits use vibration-dampening materials and silent-cycle motors to operate at under 45 decibels—quieter than a library whisper. This is especially valuable for open-concept kitchens or units near living spaces.
Production Speed and Capacity
If weekend entertaining leaves you ice-cellar empty, prioritize kits advertising “rapid-freeze” capabilities. Enhanced thermal conductivity in new molds can boost output by 20%, with some systems producing a full bin in under 90 minutes versus older units taking 2+ hours.
Installation Practicalities
DIY Feasibility Assessment
Most kits target intermediate DIYers with basic tools (screwdrivers, pliers, multimeter). If you’ve replaced a faucet or mounted a TV, you can likely handle this. Critical red flags for professional help include integrated water filters or complex wiring behind control panels.
Time Investment vs. Complexity
Simple swaps take 1–2 hours; complex retrofits (like adding smart sensors) may require 4+ hours. Kits with color-coded wiring diagrams and modular snap-in parts reduce errors. Always factor in time for water line purging to avoid cloudy initial batches.
Essential Tools Checklist
Beyond basics, you’ll need a towel (for condensation), food-grade silicone grease (for seals), and a bucket (to catch residual water). Skipping these can lead to leaks or premature wear—don’t improvis with household oils near ice molds!
Long-Term Reliability Considerations
Material Durability Standards
Opt for kits using FDA-approved, BPA-free plastics and stainless steel gears. Cheap alternatives may warp at freezer temps, causing jams. High-end kits specify “marine-grade” corrosion resistance for internal springs and brackets exposed to moisture.
Warranty Coverage Depth
Reputable kits offer 1–3 year warranties covering both parts and labor for defects. Avoid vague “limited” terms—look for explicit coverage of mold cracks or motor failures. Some include free tech support for installation hiccups.
Post-Upgrade Maintenance Shifts
Newer kits often simplify upkeep: self-cleaning cycles replace manual scrubbing, and accessible filters snap out in seconds. However, they may require quarterly lubrication of moving parts with included food-safe grease—a minor trade-off for extended longevity.
Cost-Benefit Analysis
Hidden Savings Beyond the Price Tag
While kits range from $80–$250, consider avoided costs: no service call fees ($100–$150), preserved appliance value, and reduced food spoilage during “ice droughts.” Units with consistent output also minimize door-open time, easing strain on your fridge’s main compressor.
When Upgrading Isn’t Economical
If your unit is over 10 years old with multiple failing components (e.g., thermostat issues), a kit might not justify costs. Warning signs include frost buildup in non-ice areas or excessive condensation—symptoms of broader system decay.
Environmental Impact
Reducing E-Waste Footprint
Every kit installed keeps an appliance out of landfills. Refrigerators contain hazardous coolants; conversion avoids their release during disposal. Some manufacturers even take back old kit components for recycling.
Sustainable Material Sourcing
Leading brands now use recycled ocean plastics for non-critical parts and offer carbon-neutral shipping. Check for certifications like UL ECOLOGO® that verify reduced manufacturing emissions.
Frequently Asked Questions
What’s the average lifespan of a converted ice maker?
Most upgraded units run reliably for 5–7 years post-conversion, assuming proper maintenance. This matches the typical lifespan of new standalone makers but extends your original appliance’s total service life significantly.
Can I install a conversion kit on a unit without a water line?
Yes, but you’ll need a separate adapter kit for manual-fill operation. These include insulated reservoirs that hold 24+ hours of water, though output volume will be lower than plumbed systems.
Will my ice taste different after conversion?
Modern kits with activated carbon filters in the water path often improve taste by removing residual odors from old tubing. Initial batches might have a slight plastic note—run 3–4 cycles to flush the system.
Are conversion kits safe for older refrigerators?
Absolutely, if matched correctly. Kits undergo rigorous voltage testing to prevent electrical overload. However, units with frayed internal wiring should be inspected by a pro before installation.
How do I troubleshoot error codes post-upgrade?
Most kits include QR codes linking to model-specific video guides. Common fixes involve resetting the control board (unplug for 30 seconds) or checking water inlet valve alignment—issues rarely stem from the kit itself.
Can I upgrade to smart features like app control?
Some premium kits add Wi-Fi modules for remote monitoring, but this requires your fridge’s control board to support firmware updates. Verify compatibility carefully—retrofitting “smart” capabilities isn’t universal.
What causes ice clumping after conversion?
Clumping usually indicates improper bin placement or insufficient anti-clump coating on new molds. Ensure the bin sits ¼-inch below the ejector arm, and apply the included food-grade mold release spray during the first two cycles.
Do kits work with under-counter ice makers?
Yes, but measure your unit’s internal cavity first. Compact models may need slim-profile kits without external reservoirs. Focus on “direct-scoop” designs that minimize moving parts in tight spaces.
How often should I clean the new system?
Follow the kit’s manual, but generally: clean the mold and bin monthly with vinegar solution, and replace water filters every 6 months. Modern kits with smooth surfaces resist mold better than older textured molds.
What if the kit doesn’t fit my model despite “compatibility”?
Reputable sellers provide hassle-free returns. Take clear photos of mismatches (e.g., bolt holes misaligned)—most will issue a replacement kit within 48 hours if it’s their error. Always double-check model numbers against the kit’s spec sheet pre-purchase.